Download the PHP package redsquirrelstudio/laravel-backpack-import-operation without Composer
On this page you can find all versions of the php package redsquirrelstudio/laravel-backpack-import-operation. It is possible to download/install these versions without Composer. Possible dependencies are resolved automatically.
Download redsquirrelstudio/laravel-backpack-import-operation
More information about redsquirrelstudio/laravel-backpack-import-operation
Files in redsquirrelstudio/laravel-backpack-import-operation
Package laravel-backpack-import-operation
Short Description An operation to make configurable imports for your CRUDs using the Backpack api you know and love
License MIT
FAQ
Example:

In general, it is recommended to use always a project to download your libraries. In an application normally there is more than one library needed.

- Some hosting areas are not accessible by a terminal or SSH. Then it is not possible to use Composer.
- To use Composer is sometimes complicated. Especially for beginners.
- Composer needs much resources. Sometimes they are not available on a simple webspace.
- If you are using private repositories you don't need to share your credentials. You can set up everything on our site and then you provide a simple download link to your team member.
- Simplify your Composer build process. Use our own command line tool to download the vendor folder as binary. This makes your build process faster and you don't need to expose your credentials for private repositories.
Informations about the package laravel-backpack-import-operation
Import Operation for Backpack for Laravel


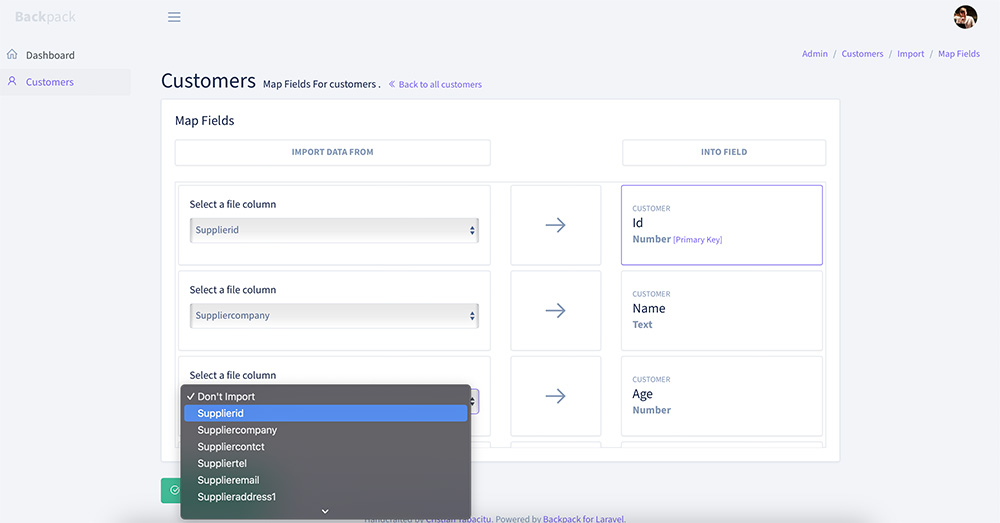
Adds a configurable interface that allows your admin users to:
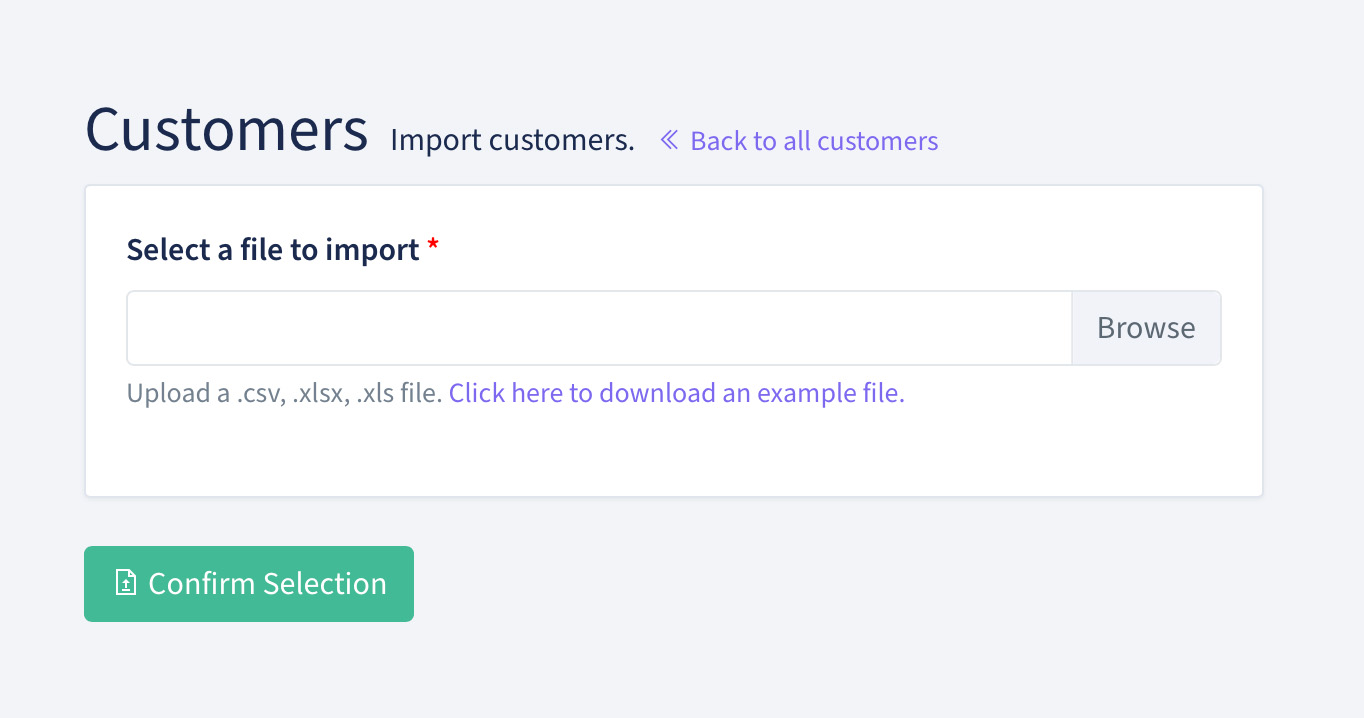
- Upload a spreadsheet file.
- Map the file's columns to your CRUD model's fields.
- Import their data.
and allows you as the developer to:
- Customise each CRUD's import behaviour using the Backpack API you know and love.
- Choose between queued or instant imports.
- Completely customise the operation's behaviour.

If you're looking for a great team of developers to handle some Backpack/Laravel development for you, drop us a line at Sprechen
Also need full exports for your CRUD? Check out redsquirrelstudio/laravel-backpack-export-operation
Powering the imports in the background is and if you wish, you can define your own import class for the operation to use.
However, The real power lies in being able to configure an import lightning fast using the same syntax as you would to define your list views.
Table of Contents
- Installation
- Usage
- Column Types
- Text
- Number
- Boolean
- Date
- Array
- Primary Keys
- Imports Without Primary Keys
- Validation
- Adding an Example File
- Adding Your Own Columns
- Custom Import Classes
- Disabling User Mapping
- Delete Spreadsheet on Completion
- Queued Imports
- Configuration
- File Uploads
- Queues
- Changing the Import log Model
- Customising Translations
- Customising Views
- Events
- Restricting Access
- Credits
- License
Installation
Environment Requirements
- PHP extension php_zip
- PHP extension php_xml
- PHP extension php_gd2
- PHP extension php_iconv
- PHP extension php_simplexml
- PHP extension php_xmlreader
- PHP extension php_zlib
Step 1.
Require the package with composer:
This will also install if it's not already in your project.
Step 2. (Optional)
The service provider at: will be auto-discovered and registered by default. Although, if you're like me, you can add it to your .
Step 3.
Publish the config file:
This will create a new file at allowing you to customise things such as the disk and path uploaded files should be stored at.
Step 4.
Publish and run the migration:
Then
Usage
In your CRUD Controller where you need the import operation.
Wait for it...
Add the import operation:
But wait! There's more!
Configuring the Import
Configuring a CRUD import is very similar to configuring the list or show view, here's an example:
Within the function you can add CRUD columns with, in most cases, a name, label, and type. Each column corresponds to a model field.
The type of column is important as it specifies how the data from the spreadsheet will be processed before it is saved against the model.
=========IMPORTANT==========
The columns you specify here correspond to the model fields NOT the spreadsheet columns. The user has the option to assign any spreadsheet column to any import column within the interface.
=============================
Column Types
Text
The simplest type of column, just takes the text from the spreadsheet and saves it to the model field.
Example
Number
This column will check whether the number is numeric, if it is, it will be saved against the model otherwise will be used. (This field also supports decimal values).
Example
Boolean
By default, this column will evaluate whether the column contains: 'true', '1', or 'y' (case-insensitive). But you can specify what should be counted as true or false using the key.
Example
Date
This column will take the input and try to convert it to a datetime, if successful, the datetime will be return as a instance, otherwise it will return null.
Example
Array
This column is ideal for only importing one or more of a number of options. Example
In this example, the import will only save data from the column if it is 'Retail', 'Trade', or 'Other'. In these instances, values 'retail', 'trade', and 'other' will be saved respectively.
Multiple Values
The array column also supports multiple values.
Example
In this example, the user could import the following data:
and the column would save the following array against the model's type field:
For this to work, make sure to cast the model's field as an array within the array, as shown below:
In the case where you would like the user to be able to specify a comma seperated list of any values. You can add the following to the CRUD column config.
With this configuration, the user could put whatever they like. For example, if they imported dog,cat,rat - It would be saved to the model as:
cannot be used without
as it does not make sense for this column type. In this case, just use a text column.
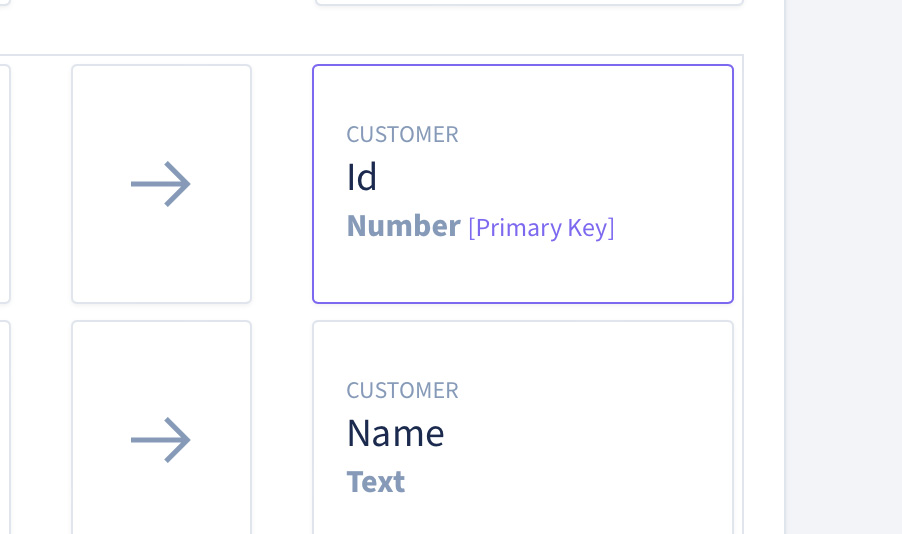
Primary Keys
The import operation needs to know your model's primary key so that it knows whether to create or update with the row's data. By default, the operation will try to find a column you have added that has the model's primary key as the name.
For example, if your model's primary key is id, the operation would use this column as the primary key:
You'll be able to see on the mapping screen which column has been identified as the primary key.
If your primary key cannot be found, the operation instead will look for the first text or number column you have added.
You can also set a column as the primary key by adding the following config to the column:
Imports Without Primary Keys
You can disable the requirement for a primary key, however, it will mean that your import can only create new models and won't be able to update existing data. This can be useful in cases where you don't have a defined primary key and are relying on the model's auto-incrementing ID. This setting can also help where you want to be able to specify a unique column that the user shouldn't be able to create multiples of or change existing data for.
TLDR: Imports with this setting enabled cannot update existing data, only import new data.
Add the following line to your function:
Validation
Validating your imports works similarly to how you would validate a create or update method, call the following function within the function:
The form request should validate what is required for your model, Not the spreadsheet columns, again because the column headers shouldn't matter as the user can map them.
Adding an Example File
You can also add a link for your user to download an example spreadsheet with data that you would expect them to upload. To set this use the following function within the function:
Doing this will provide them with a link like this when uploading their file:
Adding Your Own Columns
The import operation offers the option to create your own handlers. This only takes two steps.
Step 1.
I've included an artisan command to generate a custom column skeleton:
This will generate a blank import column for you at .
When building your custom column you have access to which is the input from the spreadsheet column. You can also access the configuration for the import column using and the model that you are importing using .
Process the data how you need to and return it from the function.
Voila!
By default, the column type name will take the first part of the class name for example, if you had ExampleColumn, the label would be 'Example'. You can customise this by returning a string from the function in your column.
Step 2.
Add your new class to the file at under the array. The key should be what you specify as the column type in
Boom
Your column is ready for action.
Note: you can skip adding a column aliases and specify the column class directly against the type key:
Custom Import Classes
If you don't want to use the column mapping interface, you also have the option to specify your own import class. To do this, create your import class using:
You can then follow the documentation to build an import with finer control if required.
This package provides an interface for your custom import classes that allows your IDE to grab the method stubs providing you with the import log ID and validation class.
This may make life easier, add it or don't, I'm not your boss!
Once you've created your beautiful import class, set it using this function within the function:
Disabling User Mapping
Sometimes, you may not want the user to map their columns, or just need a fast import. In these cases, you can disable the user mapping step.
When user mapping is disabled, the import handler will match the spreadsheet headings to your CRUD column config.
For example: A spreadsheet column called "name" or "Name" would be matched with this config:
To enable this behaviour, add this one line of code to the function:
Delete Spreadsheet on Completion
By default, the uploaded spreadsheet will remain in storage after an import is completed. This is useful for debugging/logging purposes but may not suit your requirements. If you would like your file to be deleted after an import is complete, add this one line of code to the function:
Queued Imports
In most situations, it is going to be better for the user if your imports are processed in the background rather than making them wait for the import to happen on a button press.
Therefore, you have the option to queue your imports by adding this one line of code to the function:
Of course, for this to work, you will need to set up a queue for your application to dispatch jobs to, to do that, follow Laravel's official docs.
Configuration
File Uploads
By default, spreadsheets will be stored in your default disk at the path /imports. but this can be altered either by changing the following env variables:
Or by directly changing the options within .
Queues
You can also change the queue that queued imports are dispatched to and the number of rows processed per chunk by changing the following env variables:
or changing the value directly within .
Import Log
In very rare cases, you may wish to also change the model that is used to log imports, I can't think of a reason why, but I'm sure someone will come up with one.
If you do, make sure to update the migration, and specify your own model at .
Translations
You can update the operation translations if required. To do this run:
this will publish the operation lang files to The files stored in this directory take priority over the package's default lang files.
Views
You can update the operation views if required. To do this run:
this will publish the operation blade files to The files stored in this directory take priority over the package's default views.
Events
This package dispatches events at different points during the import process. This way you can track when import rows fail, succeeds, and when an import starts and ends.
Import Started Event
This event is fired when an import begins processing.
Class:
Payload:
Import Completed Event
This event is fired when an import has been completed.
Event Class:
Payload:
Import Row Processed Event
Each time a row is successfully processed, this event is fired.
Event Class:
Payload:
Import Row Skipped Event
When a row fails validation and is skipped, this event is fired.
Event Class:
Payload:
Restricting Access
Like most operations in Backpack, you can restrict user access using the following line of code in your CRUD Controller's setup function:
Credits
- Lewis Raggett and The Team at Sprechen :: Package Creator
- Cristian Tabacitu :: Backpack for Laravel Creator
- Spartner :: Laravel Excel Creator
License
MIT. Please see the license file for more information.
