Download the PHP package pwpf/demo without Composer
On this page you can find all versions of the php package pwpf/demo. It is possible to download/install these versions without Composer. Possible dependencies are resolved automatically.
FAQ
Example:

In general, it is recommended to use always a project to download your libraries. In an application normally there is more than one library needed.

- Some hosting areas are not accessible by a terminal or SSH. Then it is not possible to use Composer.
- To use Composer is sometimes complicated. Especially for beginners.
- Composer needs much resources. Sometimes they are not available on a simple webspace.
- If you are using private repositories you don't need to share your credentials. You can set up everything on our site and then you provide a simple download link to your team member.
- Simplify your Composer build process. Use our own command line tool to download the vendor folder as binary. This makes your build process faster and you don't need to expose your credentials for private repositories.
Informations about the package demo
Installation
Release
composer create-project pwpf/demo project_name
cd project_name
./pwpf-generator.sh
composer dump-autoload
git config --local core.hooksPath .githooks/
composer update
Or dev
composer create-project pwpf/demo --stability=dev project_name_dev
cd project_name_dev
./pwpf-generator.sh
composer dump-autoload
git config --local core.hooksPath .githooks/
composer update
MVC Plugin Boilerplate for WordPress
WordPress being Event driven system, it is difficult to follow MVC Design Pattern while creating a WordPress Plugin. This project aims to help plugin developers achieve MVC pattern in their coding. If you are new to the term MVC and have never worked with MVC architecture before, I would highly recommend going through this course: https://www.udemy.com/php-mvc-from-scratch/
Why?
The original WordPress Plugin Boilerplate is great starting point for creating small plugins. So if your plugin is small, I definitely recommend using that boilerplate. However, as the plugin starts growing & we add more-n-more features to it, it somewhat becomes challenging to decide where a certain piece of code should go OR how/when to separate different functionalities. When these things are not clear in long term project to the developer, they end up creating GOD classes that try to do everything.
The objective of this boilerplate is to separate concerns. Developer gets a chance to write individual Model, View & Controller. Also, the concern of whether to load a controller/model or not is delegated to Router, so that your controller & model can focus only on what they are supposed to do.
Because this project is meant to be a boilerplate, it has only those features which are required to build plugin in MVC way - No ORM - No Extra Goodies - No Huge Learning Curve.
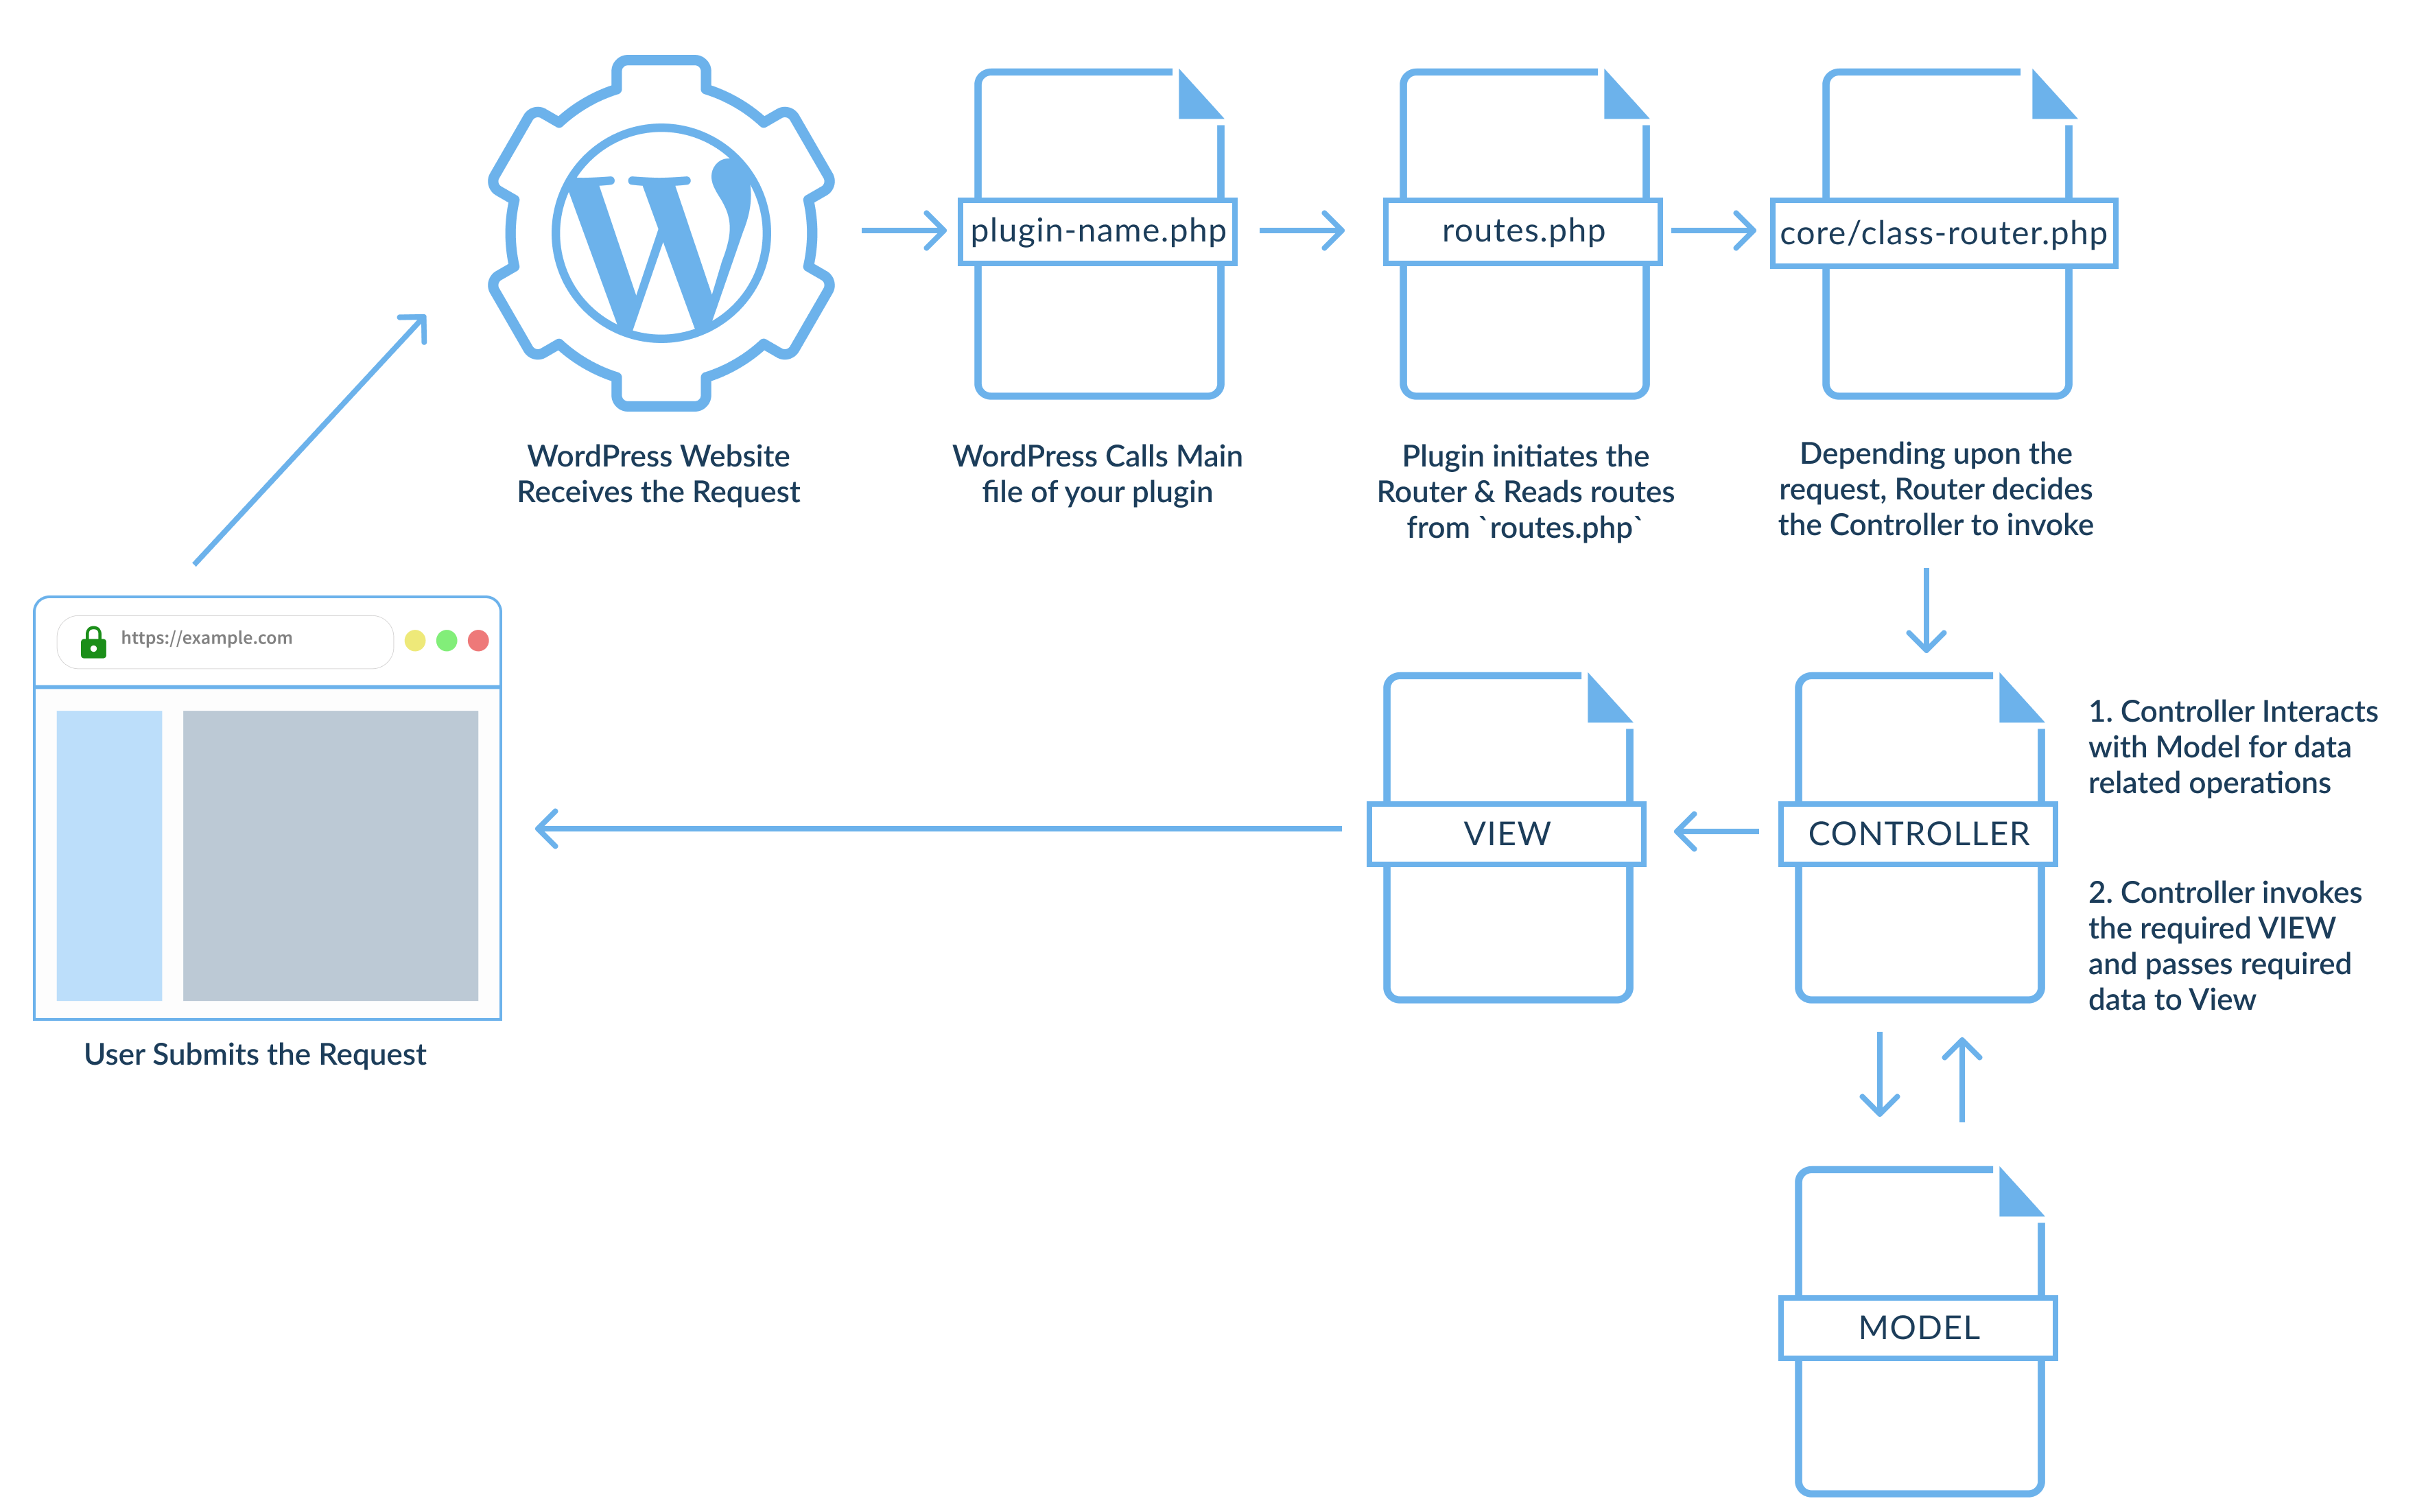
Architecture
Here is a bird eye's view at the architecture
Installation
The Boilerplate can be installed directly into your plugins folder "as-is". You will want to rename it and the classes inside of it to fit your needs. For example, if your plugin is named 'example-me' then:
- rename files from
plugin-nametoexample-me - change
plugin_nametoexample_me - change
plugin-nametoexample-me - change
Plugin_NametoExample_Me - change
PLUGIN_NAME_toEXAMPLE_ME_
It's safe to activate the plugin at this point. Because the Boilerplate has no real functionality there will be no menu items, meta boxes, or custom post types added until you write the code.
Getting Started
We'll try to create a shortcode that prints 10 posts that will help you understand how this boilerplate works. The guide assumes that you have gone through Installation steps and created Example Me Plugin.
1. Writing your first Router 📡
Routes can be defined inside routes.php file. Here is how a route can be defined for our example
It is highly recommended to go through
routes.php. You will get to know list of all available route types & examples in that file.
2. Writing your first Controller 🎮
The boilerplate converts Class Name to a file name & loads that file automatically.
We have passed Example_Me\App\Controllers\Frontend\Print_Posts_Shortcode as a controller in our routes.php. Boilerplate resolves this class name to file example-me/app/controllers/frontend/class-print-posts-shortcode.php
Any controller that is a part of a Routing (Read: added in routes.php) MUST extend Base_Controller class.
- If it is Dashboard (admin) related controller, then it should extend
Plugin_Name\App\Controllers\Admin\Base_Controller. - If it is Frontend related controller, then it should extend
Plugin_Name\App\Controllers\Frontend\Base_Controller.
Every controller that extends Base_Controller MUST have register_hook_callbacks
method. This method is defined as abstract in Base_Controller.
register_hook_callbacks method register callbacks for actions and filters. Most of your add_action/add_filter will go into this method.
register_hook_callbacks method is not called automatically. You
as a developer have to call this method where you see fit. For Example,
You may want to call this method in the route itself with @ , if you feel hooks/filters
callbacks should be registered when the new instance of the class
is created. This way, we don't have to pollute constructor with add_action & add_filter.
The purpose of this method is to set the convention that first place to find add_action/add_filter is register_hook_callbacks method.
NOTE: If you create a constructor inside a controller extending
Base_Controller, then make sure you callinitmethod inside that constructor. That means your custom constructors need to have this line$this->init( $model, $view );to setModel&Viewfor your controller object.
SHOW CONTROLLER EXAMPLE CODE
Here is how this file would look for our example3. Writing your first Model 
All models should extend AbstractModel class.
- If it is Dashboard (admin) related model, then it should extend
Plugin_Name\App\Models\Admin\AbstractAdminModel. - If it is Frontend related model, then it should extend
Plugin_Name\App\Models\Frontend\AbstractFrontendModel.
You may decide whether to create register_hook_callbacks method inside your model or not. It is not an abstract method in Base_Model If you want to write any add_action/add_filter, then that should ideally go inside this method. (I would suggest to place all add_action & add_filter calls inside register_hook_callbacks of the Controller class. It will show you all add_actions & add_filter in one glance but decision is yours! You should do what fits right in your situation.)
Again register_hook_callbacks is not called automatically. If you feel hooks/filters
callbacks should be registered when the new instance of the class
is created, then call this method inside the constructor of your model.
@ is NOT supported in withModel method of Router class, however, @ is supported in with_just_model method of the Router class. If you are confused, what these statements mean? Go through routes.php. It contains variety of examples.
SHOW MODEL EXAMPLE CODE
Create a file `example-me/app/models/frontend/class-print-posts-shortcode.php` because we have to create `Example_Me\App\Models\Frontend\Print_Posts_Shortcode` class. Here is how this file would look for our example4. Writing a View 👸
In app/controllers/AbstractController.php you must defined your View config
5. Writing your first template 👶
Templates are the actual files which generate html for the module you are writing.
A template file can be called by invoking render_template method on any View class's (parent as well as child) object.
Template files are created inside app/templates/ folder.
SHOW TEMPLATE EXAMPLE CODE
So the complete location of template file in our example is `example-me/app/templates/frontend/print-posts-shortcode.php` This is how it would look6. Interacting with Settings ⚙️
While developing the plugin, we sometimes need a way to manually interact with the settings information (Side Note - Settings are saved automatically by WordPress if Settings API is used to create settings page)
Replace Plugin_Name with your plugin's namespace in below methods.
Plugin_Name\App\Models\Settings provide some helper methods to interact with settings data.
| Method | Description |
|---|---|
Plugin_Name\App\Models\Settings::get_plugin_settings_option_key() |
Returns the option key used in wp_options table to save the settings |
Plugin_Name\App\Models\Settings::get_settings() |
Returns all saved settings |
Plugin_Name\App\Models\Settings::get_setting( $setting_name ) |
Returns a value of single setting |
Plugin_Name\App\Models\Settings::delete_settings() |
Deletes All Settings |
Plugin_Name\App\Models\Settings::delete_setting( $setting_name ) |
Deletes a particular setting |
Plugin_Name\App\Models\Settings::update_settings() |
Updates All Settings |
Plugin_Name\App\Models\Settings::update_setting( $setting_name ) |
Updates an individual setting |
7. Activation, Deactivation & Uninstall Procedures? ✨
Activation, Deactivation & Uninstall procedures of your plugin go into Plugin_Name\App\Activator::activate(), Plugin_Name\App\Deactivator::deactivate() & Plugin_Name\App\Uninstaller::uninstall() methods.
8. Folder Structure 📁
| Folder Name | Description |
|---|---|
app |
Functionality shared between the models, controllers and views resides here. Almost everything you write will go into this folder. |
app/models |
The Model component corresponds to all the data-related logic that the user works with. This can represent either the data that is being transferred between the View and Controller components or any other business logic-related data. ( It represents data objects, such as settings, values stored on the database, etc...) |
app/models/admin |
Represents the admin side of the models. |
app/models/frontend |
Represents the frontend side of the models. |
app/contollers |
Acts as an interface between Model and View components to process all the business logic and incoming requests, manipulate data using the Model component and interact with the Views to render the final output |
app/contollers/admin |
Represents the admin side of the controllers. |
app/contollers/frontend |
Represents the frontend side of the controllers. |
app/views |
The View component is used for all the UI logic of. It calls required templates. |
app/views/admin |
Calls admin side templates |
app/views/frontend |
Calls frontend side templates |
app/templates |
Represents html code for the feature |
app/templates/admin |
Represents html code for admin side features |
app/templates/frontend |
Represents html code for frontend side features |
assets |
Stores assets required for plugin |
core |
Main MVC Framework |
docs |
Represents Docs of the plugin |
includes |
Contains main class file of the plugin & i18n class |
languages |
All .po, .pot & .mo goes here |
INSPIRED?

If you like this approach of development, star this repository!
Features
- The Boilerplate is based on the Plugin API, and Documentation Standards.
- All classes, functions, and variables are documented so that you know what you need to be changed.
- The project includes a
.potfile as a starting point for internationalization. - Separation of concern between Model, View & Controller.
- With the appropriate usage of router, plugin's footprint can be kept low.
Recommended Tools
i18n Tools
MVC Plugin Boilerplate for WordPress uses a variable to store the text domain used when internationalizing strings throughout the Boilerplate. To take advantage of this method, there are tools that are recommended for providing correct, translatable files:
Any of the above tools should provide you with the proper tooling to internationalize the plugin.
Credits
The MVC Plugin Boilerplate for WordPress is built upon the WordPress Plugin Boilerplate project forked by Roger Rodrigo. The original WordPress Plugin Boilerplate project was started in 2011 by Tom McFarlin and has since included a number of great contributions. In March of 2015 the project was handed over by Tom to Devin Vinson.
This MVC Plugin Boilerplate for WordPress was developed and is being maintained by Sumit Pore.
