Download the PHP package lmc/steward without Composer
On this page you can find all versions of the php package lmc/steward. It is possible to download/install these versions without Composer. Possible dependencies are resolved automatically.
FAQ
Example:

In general, it is recommended to use always a project to download your libraries. In an application normally there is more than one library needed.

- Some hosting areas are not accessible by a terminal or SSH. Then it is not possible to use Composer.
- To use Composer is sometimes complicated. Especially for beginners.
- Composer needs much resources. Sometimes they are not available on a simple webspace.
- If you are using private repositories you don't need to share your credentials. You can set up everything on our site and then you provide a simple download link to your team member.
- Simplify your Composer build process. Use our own command line tool to download the vendor folder as binary. This makes your build process faster and you don't need to expose your credentials for private repositories.
Informations about the package steward
Steward: easy and robust testing with Selenium WebDriver + PHPUnit


Steward is a set of libraries made to simplify writing and running robust functional system tests in PHPUnit using Selenium WebDriver.
What's great about Steward?
- It allows you to start writing complex test cases in a minute.
- It performs a lot of work for you:
- downloads and installs Selenium server with one command
- sets-up browser of your choice
- automatically takes a screenshot on failed assertions
- produces test results in JUnit format (easily processable, for example, by Jenkins and other tools)
- and more...
- Tests are run in parallel, so the only bottleneck is the number of Selenium nodes you start simultaneously.
- Simple syntax sugar layer on top of default WebDriver commands helps shorten your tests and improve readability.
- If you already use PHP, you don't have to learn a new language to write functional tests. Moreover, if you are familiar with unit tests and PHPUnit, you know it all.
- Allows you to plan test dependencies.
- For example, if you need to wait 2 minutes until some event gets through your message queue before testing the result? No problem! The order of tests is optimized to minimize the total execution time.
- Status of tests can be clearly watched during test execution, so you will easily know how many tests have finished and what their results are.
- You can extend Steward easily by registering custom events to EventDispatcher.
- For example if you can add custom configuration options or change parameters passed to child PHPUnit processes.
- Cloud services like Sauce Labs, BrowserStack or TestingBot are fully integrated giving you a chance to run tests with less setup and without your own infrastructure.
- Steward is field tested - we use it daily in our company to maintain the quality of our products thanks to hundreds of test-cases. The library itself is also extensively covered by unit tests.
- Steward is built on solid foundations: WebDriver is W3C draft standard for browser automation, php-webdriver is the most used and developed Selenium language binding for PHP, PHPUnit is a well known and widely used testing framework, and Symfony Console is industry standard for PHP CLI applications.
Example usage
To see how to use and extend Steward, have a look at our example project.
Changelog
For the latest changes see the Semantic Versioning.
Getting started
1. Install Steward
For most cases we recommend having functional tests in the same repository as your application but in a separate folder.
We suggest putting them in a selenium-tests/ directory.
In this directory, simply install Steward with the following command:
Note: you will need to have Composer installed to do this.
2. Download Selenium Server and browser drivers
The following step only applies if you want to download and run Selenium Standalone Server with the test browser locally right on your computer. Another possibility is to start Selenium Server and test browser inside a Docker container.
Get Selenium Standalone Server
You need to download Selenium server so it can execute commands in the specified browser.
In the root directory of your tests (e.g. selenium-tests/) simply run:
This will check for the latest version of Selenium Standalone Server and download it for you (the jar file will
be placed into the ./vendor/bin directory).
You may want to run this command as part of your CI server build, then simply use the --no-interaction option to
download Selenium without any interaction and print the absolute path to the jar file as the sole output.
Download browser drivers
If it is not already installed on your system, you will need to download Selenium driver for the browser(s) you want to use for the tests. See Selenium server & browser drivers in our wiki for more information.
3. Write the first test
To provide you with Steward functionality, your tests have to extend the Lmc\Steward\Test\AbstractTestCase class.
You must also configure PSR-4 autoloading so that your tests could be found by
Steward. It is as easy as adding the following to your composer.json file:
Don't forget to create the selenium-tests/tests/ directory and to run composer dump-autoload afterward.
For the test itself, place it in the selenium-tests/tests/ directory:
4. Run your tests
Start Selenium server
Now you need to start Selenium server, which will listen for and execute commands sent from your tests.
This will start a single Selenium Server instance (listening on port 4444) in standalone (alias "no-grid") mode (meaning the server will receive and execute the commands itself, without distributing to nodes).
Note: You may want to run Selenium Server in a grid mode. This has the hub receiving commands while multiple nodes execute them. See Selenium Grid documentation.
Run Steward!
Now that Selenium Server is listening, let's launch your test! Use the run command:
In a few moments you should see a Firefox window appear, then the https://www.w3.org/ site (as defined in the example tests) should be loaded before the window instantly closes. See the output of the command to check the test result.
The run command has two required arguments: the name of the environment and the browser:
- The environment argument has no effect by default, but is accessible in your tests making it easy to, for example, change the base URL of your tested site. This would be useful for testing between your local server and staging environments
- The browser name could be any browser name supported by Selenium. Most common are "firefox", "chrome", "phantomjs", "safari" and "internet explorer". See our wiki for more info related to installing browser drivers.
There is also a bunch of useful options for the run command:
--group- only run specific group(s) of tests--exclude-group- exclude some group(s) of tests (can be even combined with--group)--server-url- set different url of selenium server than the default (which ishttp://localhost:4444)--xdebug- start Xdebug debugger on your tests. Allows you to debug tests from your IDE (learn more about tests debugging in our Wiki)--capability- directly pass any extra capability to the Selenium WebDriver server (see wiki for more information and examples)--parallel-limit- limit number of testcases being executed in a parallel (default is 50)--help- see all other options and default values- adjust output levels: by default, only the test results summary is printed to the output; the verbosity could be changed by the following:
-v- to instantly output name of failed test(s)-vv- also print progress information during run (which tests were started/finished etc); if any test fails, its output will by printed to the console-vvv- output everything, including all output from the tests
5. See the results and screenshots
The log is printed to the console where you run the run command. This could be a bit confusing, especially if you run multiple tests in parallel.
As a solution, for each testcase there is a separate file in JUnit XML format, placed in logs/ directory. Screenshots and HTML snapshots are also saved into this directory (they are automatically generated on failed assertion or if a WebDriver command fails).
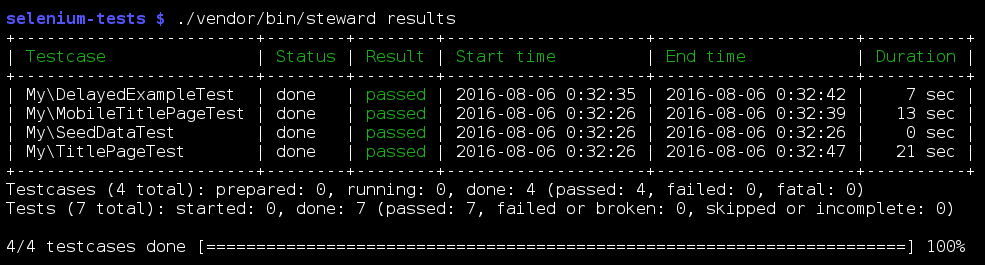
To see the current status of tests during (or after) test execution, open the logs/results.xml file in your browser:
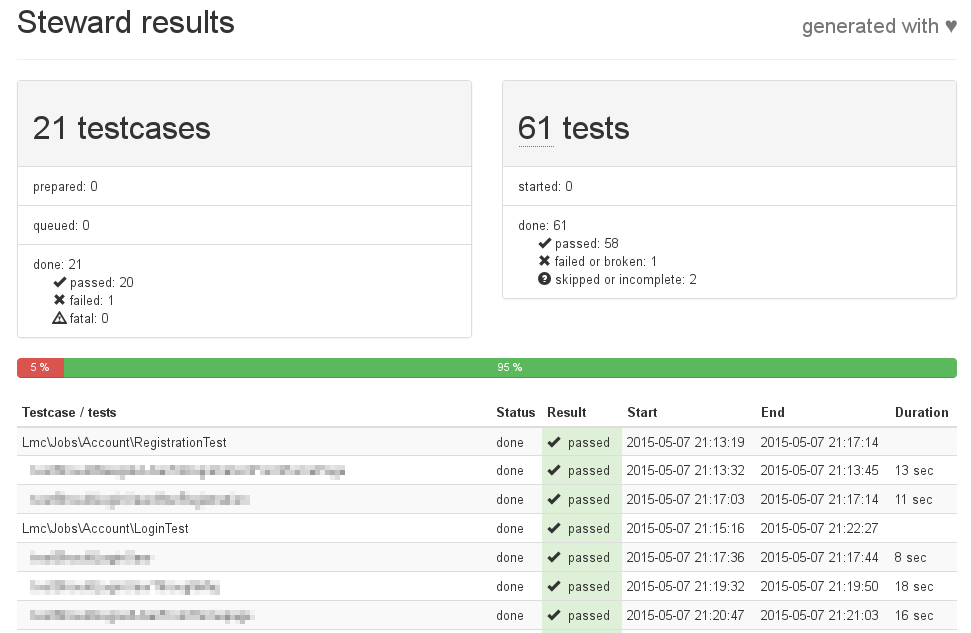
Similar output in the command line interface can be obtained using the ./vendor/bin/steward results command (see below). You can also add -vvv to see results of each individual test.
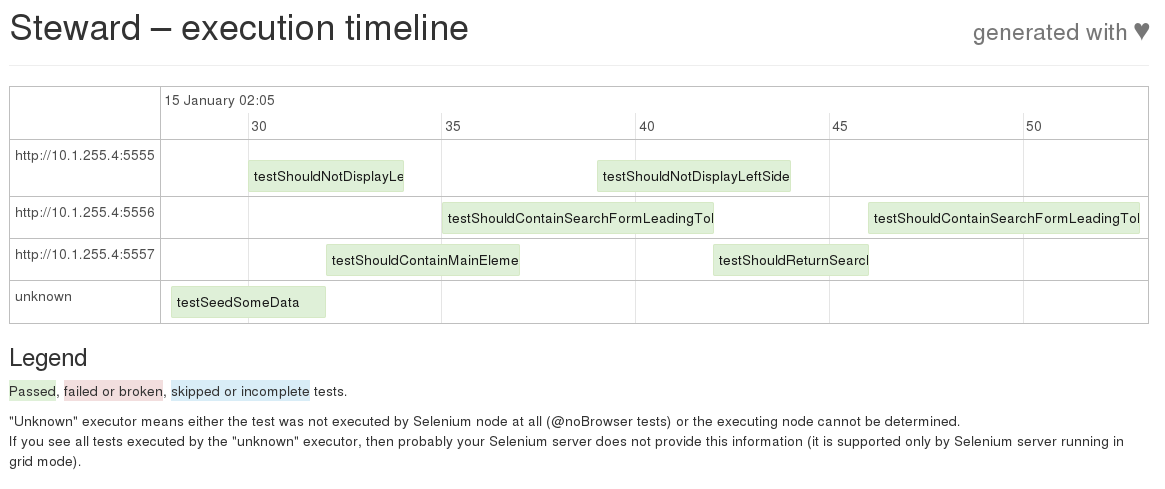
6. See test execution timeline
Steward provides a visual representation of the test execution timeline. When used with Selenium Server in "grid" mode you can see which Selenium node executed which testcase, identify possible bottlenecks and so on.
To generate the timeline, simply run the generate-timeline command after your test build is finished:
File timeline.html will then be generated into the logs/ directory.
License
Steward is open source software licensed under the MIT license.
All versions of steward with dependencies

ext-simplexml Version *
ext-curl Version *
ext-dom Version *
ext-filter Version *
ext-json Version *
ext-libxml Version *
ext-zip Version *
beberlei/assert Version ^3.0
clue/graph Version ^0.9.2
doctrine/inflector Version ^2.0.3
graphp/algorithms Version ^0.8.2
hanneskod/classtools Version ^1.2
ondram/ci-detector Version ^4.0
php-webdriver/webdriver Version ^1.10.0
phpdocumentor/reflection-docblock Version ^5.2
phpunit/phpunit Version ^8.5.15
symfony/console Version ^5.2.6
symfony/event-dispatcher Version ^5.2
symfony/event-dispatcher-contracts Version ^2.2
symfony/filesystem Version ^5.2
symfony/finder Version ^5.2
symfony/options-resolver Version ^5.2
symfony/polyfill-mbstring Version ^1.12
symfony/process Version ^5.2
symfony/stopwatch Version ^5.2
symfony/yaml Version ^5.2