Libraries tagged by User Generator
ohchiko/randomizer
5 Downloads
A laravel helper to generate random text. Initial purpose is for user password.
numeno/api-persona
0 Downloads
### Introduction Use the Numeno Persona API to create and manage **Personas**. Evolving a Persona over time is dead-simple: [create a Persona](create-persona), then send natural-language descriptions of your users’ in-app activities to the Persona API. Under the hood, we create a rich set of models of the system that evolve over time. Then, ask Numeno to personalize some part of your experience using the Persona. Numeno will use our models to tailor your software to each user’s unique preferences and habits, allowing you to dynamically adjust your offerings. For example, connect a Persona to the **[Numeno Article Recommender API](https://numeno.ai/wp-content/uploads/docs/artrec/numeno-article-recommender-api)** to generate **Article Feeds** that evolve over time as your Persona evloves with user interaction. Personas are not limited to modelling users. Posts in a social environment, articles or topics on a content platform, a screen or widget in your UI, a product in your inventory - groups of any of these things – Personas can evolve models of anything in your system! Get creative!
nodeum-io/nodeum-sdk-php
0 Downloads
The Nodeum API makes it easy to tap into the digital data mesh that runs across your organisation. Make requests to our API endpoints and we’ll give you everything you need to interconnect your business workflows with your storage. All production API requests are made to: http://nodeumhostname/api/ The current production version of the API is v1. **REST** The Nodeum API is a RESTful API. This means that the API is designed to allow you to get, create, update, & delete objects with the HTTP verbs GET, POST, PUT, PATCH, & DELETE. **JSON** The Nodeum API speaks exclusively in JSON. This means that you should always set the Content-Type header to application/json to ensure that your requests are properly accepted and processed by the API. **Authentication** All API calls require user-password authentication. **Cross-Origin Resource Sharing** The Nodeum API supports CORS for communicating from Javascript for these endpoints. You will need to specify an Origin URI when creating your application to allow for CORS to be whitelisted for your domain. **Pagination** Some endpoints such as File Listing return a potentially lengthy array of objects. In order to keep the response sizes manageable the API will take advantage of pagination. Pagination is a mechanism for returning a subset of the results for a request and allowing for subsequent requests to “page” through the rest of the results until the end is reached. Paginated endpoints follow a standard interface that accepts two query parameters, limit and offset, and return a payload that follows a standard form. These parameters names and their behavior are borrowed from SQL LIMIT and OFFSET keywords. **Versioning** The Nodeum API is constantly being worked on to add features, make improvements, and fix bugs. This means that you should expect changes to be introduced and documented. However, there are some changes or additions that are considered backwards-compatible and your applications should be flexible enough to handle them. These include: - Adding new endpoints to the API - Adding new attributes to the response of an existing endpoint - Changing the order of attributes of responses (JSON by definition is an object of unordered key/value pairs) **Filter parameters** When browsing a list of items, multiple filter parameters may be applied. Some operators can be added to the value as a prefix: - `=` value is equal. Default operator, may be omitted - `!=` value is different - `>` greater than - `>=` greater than or equal - `=` lower than or equal - `>
macropage/sdk-ebay-rest-catalog
25 Downloads
The Catalog API allows users to search for and locate an eBay catalog product that is a direct match for the product that they wish to sell. Listing against an eBay catalog product helps insure that all listings (based off of that catalog product) have complete and accurate information. In addition to helping to create high-quality listings, another benefit to the seller of using catalog information to create listings is that much of the details of the listing will be prefilled, including the listing title, the listing description, the item specifics, and a stock image for the product (if available). Sellers will not have to enter item specifics themselves, and the overall listing process is a lot faster and easier.
live4tv/stream-network-api-client-php-sdk
3 Downloads
Omnichannel for live streaming on social networks We're glad that you chose to use Live4.tv's API for managing your connection with social networks (currently Instagram). We understand that Instagram currently restricts users from conducting live broadcasts without their official app. However, our innovative API empowers users to go live on Instagram without relying on the app itself. By leveraging our API, users gain access to a stream key, enabling them to seamlessly transmit their live broadcasts using popular software like OBS (Open Broadcaster Software). This breakthrough feature provides users with the freedom to connect with their audience and share captivating live content on Instagram, all without the constraints of the official app. The login flow: 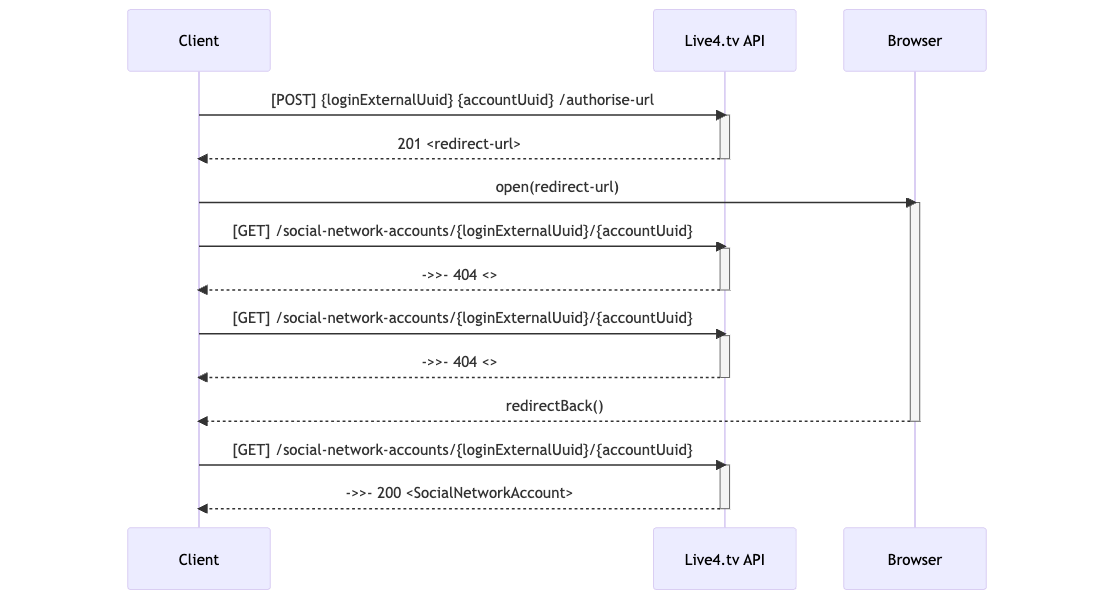
lilt/lilt-connector-sdk-php
9408 Downloads
This document describes the Plugin API for Lilt's Connector platform. The Plugin API is intented to be used by developers who wish to build integrations into their desired systems. The purpose of this API is to enable content transfer and status monitoring for localization projects. - Read more about the concepts and workflows in the [user guide](/docs/api/v1.0). - Test the API interactively via [Swagger UI](/api/v1.0/ui).
kruegge82/jumingo
31 Downloads
## About With the JUMINGO shipping API you can import your shipments into your JUMINGO account from any source. The functionalities of the API include creating and updating shipment drafts, fetching suitable shipment rates for a given shipment and purchasing shipping labels. Furthermore, you can retrieve tracking data and fetch shipping labels and documents for all your purchased shipments. The current main purpose of the API is to connect your account to e-commerce systems and marketplaces. ## General The API is organized around REST. Our API has resource-oriented URLs and uses HTTP response codes to indicate API errors. We use built-in HTTP features, like HTTP authentication and HTTP verbs. All API requests must be made over HTTPS. Calls made over plain HTTP will return errors. Request data is passed to the API as JSON objects and JSON is also returned by all API responses, including errors, although our API SDKs convert requests and responses to appropriate language-specific objects. Best practice usage of the API and business logic is described in the supplementary [integration guide](https://www.jumingo.com/cms/JUMiNGO_API-integration-guide.pdf "JUMiNGO API Integration Guide"). ## Base URL The base URL for all calls is: `https://api.jumingo.com/v1` ## HTTP status codes HTTP response codes in the `2xx` range indicate success. Codes in the `4xx` range indicate an error on the client side (e.g. a required parameter is missing). Codes in the `5xx` range indicate an error with our servers. Each error should provide an error code and an error message with further information. HTTP status code | Description ---------------- | ----------- 200, 201, 204 - OK | Everything worked. 400 - Bad Request | The request was unacceptable, often due to missing a required parameter or a validation error. 401 - Unauthorized | No valid API key has been provided or your account is disabled. 403 - Forbidden | You are not allowed to talk to this endpoint. This can either be due to a wrong authentication or when you’re trying to reach an endpoint that your account isn’t allowed to access. 404 - Not Found | The requested resource doesn’t exist. 500, 502, 503, 504 - Server Errors | Something went wrong on our side. Please contact our support if you receive this error. ## Authentication All API requests requires authentication. Unauthorized calls will return errors. Authenticate by including your API key in the `X-AUTH-TOKEN` HTTP header of each API call, e.g.: `X-AUTH-TOKEN: INSERT_YOUR_API_KEY` You can find your API key in your JUMINGO user account. You can get access to the JUMiNGO customer API by enabling it in your [user account](https://www.jumingo.com/de-de/users/connections/create/8). After activation, you will get your personal API key. ## Date/Time Format All values of type `string ` are defined in a specific [RFC 3339](https://tools.ietf.org/html/rfc3339#section-5.6) format and must also be formatted accordingly for requests. The format is: YYYY-MM-DD hh:mm:ss Example: 2018-07-26 15:54:13 All dates and times are specified in UTC (Coordinated Universal Time).
kruegge82/jtlffn
7 Downloads
# Introduction JTL-FFN is a standardized interface for fulfillment service providers and their customers. Fulfiller can offer their services to merchants and merchants can respectively choose from a wide range of service providers according to their needs. ## The ecosystem The FFN network consists of this REST API, an online portal and third party integrations (JTL-Wawi being one of them). The REST API orchestrates the interactions between the participants and the portal website provides services by JTL (such as managing and certifying warehouses of a fulfiller and merchants searching for their service providers). ## About this API The base url of this api is [https://ffn2.api.jtl-software.com/api](https://ffn2.api.jtl-software.com/api). This API (and this documentation) consists of three parts: * Fulfiller API - operations used when acting as a fulfiller in the network. Only users with the role `Fulfiller` can access these endpoints. * Merchant API - operations used when acting as a merchant in the network. Only users with the role `Merchant` can access these endpoints. * Shared API - operations available to all users. Please use the navigation menu at the top to switch between the documentation for the different APIs. # OAuth The FFN-API uses [OAuth2](https://tools.ietf.org/html/rfc6749) with the [Authorization Code Grant](https://tools.ietf.org/html/rfc6749#section-4.1) for its endpoints. Users must have an active [JTL customer center](https://kundencenter.jtl-software.de) account to authorize against the OAuth2 server. Applications and services using the API must acquire client credentials from JTL. ## Application credentials When making calls against the API, you need to do it in the context of an application. You will get the credentials for your application from JTL. Application credentials consist of the following: * `client_id` - uniquely identifies your application * `client_secret` - secret used to authenticate your application * `callback_uri` - the uri the OAuth2 server redirect to on authorization requests ## Requesting authorization When you want to authorize a user you redirect him to `https://oauth2.api.jtl-software.com/authorize` with the following query string parameters: * `response_type` - Must be set to "code" for the [Authorization Code Grant](https://tools.ietf.org/html/rfc6749#section-4.1). * `redirect_uri` - After the user accepts your authorization request this is the url that will be redirected to. It must match the `callback_uri` in your client credentials. * `client_id` - Your applications identifier from your application credentials. * `scope` - The scopes you wish to authorize (space delimited). * `state` - An opaque value that will be included when redirecting back after the user accepts the authorisation. This is not required, but is important for [security considerations](http://www.thread-safe.com/2014/05/the-correct-use-of-state-parameter-in.html). After successful authorization by the user, the OAuth2 server will redirect back to your applications callback with the following query string parameters: * `code` - The authorization code. * `state` - The state parameter that was sent in the request. ## Verifying authorization The authorization code you acquired in the last step will now be exchanged for an access token. In order to do this you need to POST a request to `https://oauth2.api.jtl-software.com/token`. >POST > >Authorization: Basic `application_basic_auth`\ >Content-Type: application/x-www-form-urlencoded > >grant_type=authorization_code&code=`code`&redirect_uri=`redirect_uri` In the Authorization header [Basic HTTP authentication](https://tools.ietf.org/html/rfc7617) is used. Your application credentials `client_id` will be used as the username and your `client_secret` as the password. The header should have the value "Basic" plus the Base64 encoded string comprising of `client_id:client_secret`. The body of the request consist of the form encoded parameters: * `grant_type` - Must be set to "authorization_code". * `code` - The authorization code received from the previous step. * `redirect_uri` - Must match the `callback_uri` in your client credentials. A successful verification request will return a JSON response with the properties: * `token_type` - is always "Bearer" * `expires_in` - the time in seconds until the access token will expire * `access_token` - the access token used for API requests * `refresh_token` - token used to get a new access_token without needing to ask the user again Now the APIs endpoints that need authorization can be called by setting the header >Authorization: Bearer `access_token` ## Refreshing authorization To get a new `access_token` (for example when the old one expired) one can POST a request to `https://oauth2.api.jtl-software.com/token`. >POST > >Authorization: Basic `application_basic_auth`\ >Content-Type: application/x-www-form-urlencoded > >grant_type=refresh_token&refresh_token=`refresh_token` The Basic HTTP Authorization works exactly as in the verification step. The body of the request consist of the form encoded parameters: * `grant_type` - Must be set to "refresh_token". * `refresh_token` - The `refresh_token` you acquired during verification. The response will be the same as in the verification step. ## Scopes Scopes allow fine grained control over what actions are allowed for a given application. During login users must approve the requested scopes, so it is often feasible to limit asking for permissions your application really needs. Global scopes for common permission scenarios are the following: * `ffn.fulfiller.read` - full read access for the fulfiller API * `ffn.fulfiller.write` - full write access for the fulfiller API * `ffn.merchant.read` - full read access for the merchant API * `ffn.merchant.write` - full write access for the merchant API More fine grained scopes can be acquired from each respective endpoints documentation. ## Example ### Prerequsites * JTL Customer center account (https://kundencenter.jtl-software.de/) * cUrl (https://curl.se/) * FFN portal account (just login here: https://fulfillment.jtl-software.com) * FFN portal sandbox account (if you want to test on sandbox: https://fulfillment-sandbox.jtl-software.com) * Oauth Client for authorization and define scopes Values in this example (access_token, refresh_token, code...) are expired and cannot be used verbatim. ### Step 1 - Create an OAuth client Navigate to https://kundencenter.jtl-software.de/oauth and create a new OAuth client. (You can´t navigate to Oauth in customer account, you should use this link, or you can change logged in index to oauth) !Templates define what scopes are possible for this client. scopes with access rights: * ffn.merchant.read - full read access for the fulfiller API * ffn.merchant.write - full write access for the fulfiller API * ffn.fulfiller.read - full read access for the merchant API * ffn.fulfiller.write - full write access for the merchant API More fine grained scopes can be acquired from each respective endpoints documentation.  Overview: clients, scopes, client-secret and client-id  In our example: * client_id: 97170e65-d390-4633-ba46-d6ghef8222de * client_secret: f364ldUw3wGJFGn3JXE2NpGdCvUSMlmK72gsYg1z * redirect_uri: http://localhost:53972/ffn/sso The values for this client should not be used in production and are for testing only. ### Step 2 - User login In this step you will redirect the user to the JTL OAuth website using his default browser. Here the user will provide his username/password and accept the requested scopes. Finally the JTL Oauth website will redirect to the provided redirect_uri and provide the code. Template: authorize specified scopes and get code answer to request the access token ``` https://oauth2.api.jtl-software.com/authorize?response_type=code&redirect_uri=[redirect_uri]&client_id=[client_id]&scope=[scopes] ``` Note: the scopes should be seperated by spaces or %20 Filled with our example values: ``` https://oauth2.api.jtl-software.com/authorize?response_type=code&redirect_uri=http://localhost:53972/ffn/sso/oauth&client_id=97170e65-d390-4633-ba46-d6ghef8222de&scope=ffn.merchant.read%20ffn.merchant.write ``` * enter password  * authorize scopes  * code answer from server  Example of the answer from the OAuth server to our redirect_uri: ``` http://localhost:53972/ffn/sso?code=def50200f3ac7aabbb6e82a6b131874115b858549dab62e73c68ea21a03de59b5744dc0f0ee321d7607062cf9bfa57471cd0ee7572db1d7b0a15779b0dda7d0ed8f8bfdb0f69939a34678d67aee41e4849d355d8aa223733ab1f397280b205fa739c6252d77d9ff600136e1b744352115fd62ba1035d8da4cbc1b6791c61d0bb621952b0a14625dd75807113ea0746e35528c304a8ce3c06724c1e1d9e1cb3709e9f52778bc8ca5b2d8f7c055f14244b1f8fcb61554c5bf48e02b882b87b9a76a43579eecd578cec97c6f603907e282e45cfec43837c063dc36b556d4974776a942f47cee19023e130ae852bfca6d3ca9c7cb3283d2bc4971f80651b626f8e7ba0ec2d13dddc4c528e1f3e470de907af7eb304d781534dd9b071d9760c9890e5756893c7800589c407bd2da3a2ff56c3fb15a410e24aa2df7ac54e8d0f7445e38e390171b58a0b66b337057d59acd29ed5bbc4df6bee921b244f030c86f49bcae21c9ca77c05eea0094414803f30089c39d585bf83604a2d9bbcc6442fbfdcff6cca946eb84d1eac2e4f98dff31a93460c951c853f9ef7140f572be963e82a3baf72afba34572af63ee7da ``` Extract the code and note it for next steps. ### Step 3 - Get an access_token from the code Template: get access token + refresh token ``` curl --location --request POST "https://oauth2.api.jtl-software.com/token" --header "Content-Type: application/x-www-form-urlencoded" -u "[client_id]:[client_secret]" --data-urlencode "grant_type=authorization_code" --data-urlencode "redirect_uri=[redirect_uri]" --data-urlencode "code=[code]" ``` Filled with our example values: ``` curl --location --request POST "https://oauth2.api.jtl-software.com/token" --header "Content-Type: application/x-www-form-urlencoded" -u "97170e64-d390-4696-ba46-d6fcef8207de:f364ldUw3wIJFGn3JXE2NpGdAvUSMlmK72gsYg1z" --data-urlencode "grant_type=authorization_code" --data-urlencode "redirect_uri=http://localhost:49420/oauth" --data-urlencode "code=def50200e6f3c65cfaba9419cbf6e48a7ed4324ef851b0ace493213884496b851fd825b90b4f994ee265a62f2358bbcbb0f990af5dbfd93dc63e51a7a6fa3bcfc7f722f56366b0a726fd1ed5df1cb926b16610fc7beb0f236e8858e86397422e3caa75d8094af8ba8ad6a93b938bd341bec1e4df671ad71ad1d5fa41166f5d4b2a3ac7d9172c35a8501f10ad722ec2aea88439c21b148ec2ba85e93c17acebe7d7f3d0118a50941cab145ed5ce92946426e5d388584556c0b010c567b433c577a1c4f7b1dfb2c99c25a0efadece4f64f19e54305bfc591e2b30b1a7ba1a33af3e039bcfa80b21ca365dc003f07989fca92472c2c8e2daab51151624a6a10bc511f2ed586f06544f7b98566df4667f5bbd6ba7c6707cb673c767c9eab5a74e63a8269688941c3158e8cc1cb5ebe9a8aa468faf415171a481ee1489b58bedb5fc329b23e0e34e76a4a500270fbebe4e1d20a0f17cebc96cd8ab3db383af746ca0699da34b4665afad30e9dde4f5f507a1dd14c73a692f06de8bafe3be81d7744dbcd8c5f7d3c767101ff5ce0556c244130c1c3fc3f53975a841c0cacebb70118f7552f50c2d2b1c421b8a21e" ``` The result will be a JSON answer with the users access_token and refresh_token as well as the expiry in seconds. ``` { "token_type":"Bearer", "expires_in":1800, "access_token":"eyJ0eXAiOiJKV1QiLCJhbGciOiJSUzI1NiJ9. eyJhdWQiOiI5NzE3MGU2NC1kMzkwLTQ2OTYtYmE0Ni1kNmZjZWY4MjA3ZGUiLCJqdGkiOiJlOWVhN2Q0MWI1NDIzNTcyYWU0MDEzYjEzMDZiMGRkNWM3YmQ2ZTNjMDNhYTZmNjQ2M2NlMjUzNTc0ZmUyMWE3NGQyNTIyMTJhODQwMmI1ZCIsImlhdCI6MTY2MTI1MzE0OCwibmJmIjoxNjYxMjUzMTQ4LCJleHAiOjE2NjEyNTQ5NDgsInN1YiI6IjQ2MjA5Iiwic2NvcGVzIjpbImZmbi5tZXJjaGFudC5yZWFkIiwiZmZuLm1lcmNoYW50LndyaXRlIl19.eEwY021wR3BWVp-wbAVQrjfqwFbYqLlOV_ca-cb7-O3Kdpi8mkFQBxfI8rzSiV_1WpAINf4ydV9FR9Ty992SMiAqGJ3T9zDHd68oUDePeq7Xfafp-87UboI2mCfGd7518CoKVLqg5ohb4YCqgC7Dz588FofggCQyDZQSM-8raOgcM-pJ1TT7oRuYuDHsOzCOTPcX2YiGYKCc3M6kxlBy_NjrJoLa4qysLRmPkznWwj0caC7a0VJO5KubvECcMb9D7Byr3UNjI7GiGMAufa770V5qCjrWs4gOsRV-Bn7oQydvsL21qqjBKHcssQrlLZWmrcfKqgBKwfRXIx3Mu5HBCmtHjHMnuvPVEZAj6fEfIwjYSeTAHTHApEwbE7J1MPd8MU0K6X2YEUF315fXN5F3rO3ZL5FdTwcM1E-1-PKubLuMAaE6Lw-QsDtBoI4ESylomCmCCfgLV4Vj-in_oCJUmKXAX0tDSa9y9vb6oAExung_BTJCBemffCtkJ55Px7bvi9JXmwvI0pIFo3QzTUtRbFDizCMrPZvsatFx64mXX3IDoVqXr3uzvdetBIJEj2ngVdGRrKGt4Yboae5oFV2d5jdSZBL28pwGjey__ZB4zLR1DodQ0sOqDWJ3WsEjMYXU8_-IGrS8Kkw8Q0R0UqqyVLfcLr-cfH5tYqf2QLqAScY","refresh_token":"def50200e636703f8d6372401e7b5e1163e0f46e5d593f6f8a1e9b1b2777d64684b87b7c552db62f9670bc482a3958d8aafb78083c7166c13f2f233fe4623d22873c819a560dc3213a51448a1e0763c2a0f7fb7230ceeae22a7fa84717458886584ab5a0ed1a500be5f9d3ed36b1d063d39b56c8431f3fe623055626c1f99f8c5b684853965645fe5c5bee941857aef79ae4f9b994316bec9d365119fe0fe8d035218c44d00a47c0e92b4613c1f388b9c171f3d79e45a6d2a52dfbd8d25608d6b0350420155e48cc179764a2432220cc0d1e9bfa7798050d0b36fe658e967186ea75cc1d1277cad973d43a0839c50b6885a87b5b446452855a00ac75c5f6d7f62b914496e30ab89a16b335977e4363b94dda7364bb052832a5d122696b6476fb0e1631030ea3c42d9659ca839cc44919efc9532c84f7170e634d3e189eb181d0c114ed9d8150c619f7567587e0311d89d51d1325646d2c014757ba7f2d7b02f7b56a52e093ed2ea95a8abe4a0289b24a5636dce8ad01c20e8cce8c4c51263e7f1731bb6335b0e31342e2439c77ab7cce7a147e24c9be9d61d8eba216fbfd4d5be2fba3502e69000ad6e67b7230a7f924" } ``` ### Step 4 - Test the access_token Using your newly aquired access_token you can test if its working (reminder: the access_token has a limited lifetime and might be expired, in which case we would need to refresh it (see Step 5)). Template: Test communication with access token on sandbox or production (our client is for both systems) ``` curl --location --request GET "https://ffn-sbx.api.jtl-software.com/api/v1/users/current" --header "Authorization: Bearer [access_token]" ``` If you cannot retrieve the user data using this endpoint make sure you have logged into our respective portal website (sandbox, production) at least once as this triggers user creation in the system. ### Step 5 - Refresh access_token when it expires Template: Get a new access token + refresh token with the refresh token ``` curl --location --request POST "https://oauth2.api.jtl-software.com/token" --header "Content-Type: application/x-www-form-urlencoded" -u "[client_id]:[client_secret]" --data-urlencode "grant_type=refresh_token" --data-urlencode "refresh_token=[refresh_token]" ``` Filled with our example values: ``` curl --location --request POST "https://oauth2.api.jtl-software.com/token" --header "Content-Type: application/x-www-form-urlencoded" -u "97170e64-d390-4696-ba46-d6fcef8207de:f364ldUw3wIJFGn3JXE2NpGdAvUSMlmK72gsYg1z" --data-urlencode "grant_type=refresh_token" --data-urlencode "refresh_token=def50200a01c0caff50b7db271f8268e3806ab2cce8e28e25f41e5fe9167a6521b47f6ed0dd3dd2d7856e1983ae645b032cf9285e91c1ee535decb0e0ca3e52670773f2737114955267d83db0204f80233214a623fcc36de04127e1cdcda006eaf60cacfb30c80081a8c9314e20117f64639ab5e333301a10173385c1bfc660709fde0b1a3517f8030dfdba8187e53c23c9d5fe9f33c48e11a4aa41bfd9ea1291507ea1bc8c64df32bdc91c61af907c41cf0bb305cae76e68448a85ad65b0a03a23ec35a7e9cc42aadd0792b9d7d187ae028e2759a7f4a0164f94d9baca29779a702f023216631e1e777069cc2bc65fd404f4fcc5818219063beb1717afe159b8110394af9a0d245de960c227b1183d6a745819ac08d92238938da798f702f83a3faf648f07a8a6d1e694c008517fd8be2fa154aab88a3eaacb3cbb1830c4bdee018e06c7f81e68c5844213f1d02372b23a22d99ac06a860748a3db891fd71768d74470c9a5a8571058dd901c888d13cd4481d63a800322614e63d3d8e6fb109ee7e1b1e046cd086ecbc2d4d362ca662e3ac867f21168833abd7a8247b06602197b7da555361efbf07b0afed69f7a558" ``` The result will be the same format as in step 3. Refresh_tokens are only valid for a single refresh and you will get a new refresh_token every single time that you must persist. ### My token is not working! #### 404 NotFound You need to log into the respective portal website (sandbox-https://fulfillment-sandbox.jtl-software.com, production-https://fulfillment.jtl-software.com) at least once to trigger user creation. #### 403 Forbidden You might be missing scopes in your token and don't have sufficient rights. #### 401 Forbidden Incorrect Oauth method. For example, we do not support the Oauth method authorisation "client_credentials grant". The authorisation method "code grant" with user must be used.
kruegge82/dhl-authentication-oauth-api
29 Downloads
This API describes how API client can obtain a token which is used to access various Parcel Germany APIs. Using this API is often the first step in making your API call. Preconditions You will need: * client ID (aka "API Key", obtained when you create an app in developer.dhl.com) * client secret (obtained when you create an app in developer.dhl.com) * GKP user name (obtained when setting up your business account with Parcel Germany) * GKP password (obtained when setting up your business account with Parcel Germany) Technical Information This uses an implementation of OAuth2 Password Grant (RFC 6749). After successfull usage you will: * have an opaque access token to be used for API calls afterwards * this token will have an expiration time
kruegge82/billbee-php-sdk-api
26 Downloads
Documentation of the Billbee REST API to connect a Billbee account to external aplications. ## Endpoint The Billbee API endpoint base url is https://api.billbee.io/api/v1 ## Activation You have to enable the API in the settings of your Billbee account. In addition you need a Billbee API Key identifying the application you develop. To get an API key, send a mail to [email protected] and send us a short note about what you are building. ## Authorization & security Because you can access private data with the Billbee API, every request has to be sent over https and must * Contain a valid API Key identifying the application/developer. It has to be sent as the HTTP header X-Billbee-Api-Key * Contain a valid user login with billbee username and api password in form of a basic auth HTTP header ## Throttling 50 calls per second for each API Key. 10 calls per second for each API Key in combination with Billbee user. Besides that each endpoint has a throttle of max 2 requests per second per combination of API Key and Billbee user. When you exceed the throttle threshold, the API will return a HTTP 429 status code and a Retry-After-Header indicating how many seconds you will have to wait before you can call the API again.
handsondigital/lib.php.admin.idplugger
2 Downloads
# Introdução Bem-vindo à documentação oficial da API da Plataforma de Promoção IdPlugger exclusiva para administradores da API! Se você está procurando a documentação destinada ao cliente da Plataforma de Promoção IdPlugger [acesse clicando aqui!](/docs/v3/promotion) # Sobre a API Esta API é baseada em REST, proporcionando uma arquitetura flexível e de fácil integração. # Começando Para começar a explorar e utilizar a API da Plataforma de Promoção IdPlugger, recomendamos que você siga os seguintes passos: 0. **Postman**: [Baixe a collection do postman](https://god.gw.postman.com/run-collection/13619232-20687020-3c58-488d-bd15-9f9d1a8164b1?action=collection%2Ffork&source=rip_markdown&collection-url=entityId%3D13619232-20687020-3c58-488d-bd15-9f9d1a8164b1%26entityType%3Dcollection%26workspaceId%3Df86d7ea0-5224-4351-bf69-54ada2ca328d), instale o postman na sua máquina e importe a collection. 1. **Autenticação**: Obtenha suas credenciais de autenticação ('username' e 'password') de administrador, para acessar a API. 2. **Explorar Endpoints**: Navegue pela lista de endpoints disponíveis e suas respectivas funcionalidades. 3. **Experimentar**: Utilize os exemplos de solicitação fornecidos para testar os endpoints e compreender melhor seu funcionamento. 4. **Integrar**: Integre a API da Plataforma de Promoção IdPlugger em seus próprios projetos e sistemas para aproveitar ao máximo suas capacidades. # Autenticação Todos os endpoints requerem token de autenticação válido, que pode ser obtido através de requisição à API enviando as credenciais obtidas. Este token é do tipo bearer e deve ser enviado no header da requisição no seguinte formato: | Header | Valor | | - | - | | Authorization | bearer `{token}` | Substitua `{token}` pelo token obtido na autenticação. IMPORTANTE: O bearer token tem um tempo de validade, o ideal é armazenar o bearer token e solicitar um novo token apenas quando o seu token expirar. A validade do token é enviada junto com o token na resposta do endpoint de autenticação. # Configurações de Promoção ## Pull Configurations O primeiro passo para configurar uma promoção na API é puxar a parametrização da promoção criada. Para isto, libere o servidor da API para acesso ao banco de dados da promoção e informe os dados de conexão através da rota [Pull Configuration](#/Promotion/App%5CHttp%5CControllers%5CAdmin%5CAdminController%3A%3ApullConfiguration) ## Steps Após puxar as configurações na etapa anterior, configure as steps da promoção. Steps são as partes de código que serão executadas para cada promoção. Cada promoção pode ter uma configuração diferente de steps. - Para consultar quais steps estão disponíveis, utilize [este endpoint](/docs/v3/setup/index.php#/Steps/App%5CHttp%5CControllers%5CStepsController%3A%3Aindex) - Para ativar steps em uma promoção, utilize [este endpoint](https://api.idplugger.com/docs/v3/setup/index.php#/Steps/App%5CHttp%5CControllers%5CStepsController%3A%3Aallow) - Para desativar steps em uma promoção, utilize [este endpoint](https://api.idplugger.com/docs/v3/setup/index.php#/Steps/App%5CHttp%5CControllers%5CStepsController%3A%3Aunallow) - Para consultar quais steps estão ativas, utilize o endpoint de ativação sem passar nenhuma step Algumas steps são configuradas por padrão ao fazer o pull configuration, para saber quais confira o parâmetro default na resposta do endpoint de consulta de steps. Este endpoint também retorna a descrição do que a step faz e se ela depende que outra esteja ativada ou desativada. ## Criar Usuário da API Para que um cliente possa utilizar a API, é necessário criar um usuário para ele. Para isto, após fazer o pull configuration e a parametrização de steps, utilize [este endpoint](#/User/App%5CHttp%5CControllers%5CAdmin%5CAdminController%3A%3Aregister) para criar um usuário da API. Este endpoint cria o usuário e retorna uma senha para este usuário. ## Permissões do usuário da API Após criar o usuário, é necessário dar as permissões para que ele possa atuar na promoção. Para isso, utilize [este endpoint](#/User/App%5CHttp%5CControllers%5CAdmin%5CAdminController%3A%3AgrantPermissions). Atenção: Selecione bem as permissões, deixando apenas as necessárias. ## Teste Utilize as credenciais do usuário criado para testar se a API está respondendo para a promoção configurada. # Postman Collection [](https://god.gw.postman.com/run-collection/13619232-20687020-3c58-488d-bd15-9f9d1a8164b1?action=collection%2Ffork&source=rip_markdown&collection-url=entityId%3D13619232-20687020-3c58-488d-bd15-9f9d1a8164b1%26entityType%3Dcollection%26workspaceId%3Df86d7ea0-5224-4351-bf69-54ada2ca328d)\n\n# Limite de Frequência (Rate Limit)\n\nA resposta da **API Idplugger** quando o limite de frequência (rate limit) é atingido é um código de status HTTP **429 (Too Many Requests)**.\n\nDetalhes do retorno:\n\n1. **Código de Status HTTP**: 429 Too Many Requests.\n2. **Corpo da Resposta (Body)**: Um JSON contendo a mensagem de erro: `{"message": "Too Many Requests"}`.\n3. **Cabeçalhos HTTP (Headers)**:\n - `X-RateLimit-Limit`: O limite total permitido.\n - `X-RateLimit-Remaining`: Quantidade de requisições restantes.\n - `Retry-After`: Segundos a esperar antes da próxima tentativa.\n - `X-RateLimit-Reset`: Timestamp de quando o limite será zerado.
fwrepae/fwrepae
0 Downloads
The Inter TT REST API is described using OpenAPI 3.0. The descriptor for the api can be downloaded in both [YAML](http://localhost:8080/cyclos/api/openapi.yaml) or [JSON](http://localhost:8080/cyclos/api/openapi.json) formats. These files can be used in tools that support the OpenAPI specification, such as the [OpenAPI Generator](https://openapi-generator.tech). In the API, whenever some data is referenced, for example, a group, or payment type, either id or internal name can be used. When an user is to be referenced, the special word 'self' (sans quotes) always refers to the currently authenticated user, and any identification method (login name, e-mail, mobile phone, account number or custom field) that can be used on keywords search (as configured in the products) can also be used to identify users. Some specific data types have other identification fields, like accounts can have a number and payments can have a transaction number. This all depends on the current configuration. ----------- Most of the operations that return data allow selecting which fields to include in the response. This is useful to avoid calculating data that finally won't be needed and also for reducing the transfer over the network. If nothing is set, all object fields are returned. Fields are handled in 3 modes. Given an example object `{"a": {"x": 1, "y": 2, "z": 3}, "b": 0}`, the modes are: - **Include**: the field is unprefixed or prefixed with `+`. All fields which are not explicitly included are excluded from the result. Examples: - `["a"]` results in `{"a": {"x": 1, "y": 2, "z": 3}}` - `["+b"]` results in `{"b": 0}` - `["a.x"]` results in `{"a": {"x": 1}}`. This is a nested include. At root level, includes only `a` then, on `a`'s level, includes only `x`. - **Exclude**: the field is prefixed by `-` (or, for compatibility purposes, `!`). Only explicitly excluded fields are excluded from the result. Examples: - `["-a"]` results in `{"b": 0}` - `["-b"]` results in `{"a": {"x": 1, "y": 2, "z": 3}}` - `["a.-x"]` results in `{"a": {"y": 2, "z": 3}}`. In this example, `a` is actually an include at the root level, hence, excludes `b`. - **Nested only**: when a field is prefixed by `*` and has a nested path, it only affects includes / excludes for the nested fields, without affecting the current level. Only nested fields are configured. Examples: - `["*a.x"]` results in `{"a": {"x": 1}, "b": 0}`. In this example, `a` is configured to include only `x`. `b` is also included because, there is no explicit includes at root level. - `["*a.-x"]` results in `{"a": {"y": 2, "z": 3}, "b": 0}`. In this example, `a` is configured to exclude only `x`. `b` is also included because there is no explicit includes at the root level. For backwards compatibility, this can also be expressed in a special syntax `-a.x`. Also, keep in mind that `-x.y.z` is equivalent to `*x.*y.-z`. You cannot have the same field included and excluded at the same time - a HTTP `422` status will be returned. Also, when mixing nested excludes with explicit includes or excludes, the nested exclude will be ignored. For example, using `["*a.x", "a.y"]` will ignore the `*a.x` definition, resulting in `{"a": {"y": 2}}`. ----------- For details of the deprecated elements (operations and model) please visit the [deprecation notes page](https://documentation.cyclos.org/4.16.3/api-deprecation.html) for this version.
eciboadaptech/finapi-webform
363 Downloads
The following pages give you some general information on how to use our APIs.The actual API services documentation then follows further below. You can use the menu to jump between API sections.This page has a built-in HTTP(S) client, so you can test the services directly from within this page, by filling in the request parameters and/or body in the respective services, and then hitting the TRY button. Note that you need to be authorized to make a successful API call. To authorize, refer to the 'Authorization' section of Access, or in case you already have a valid user token, just use the QUICK AUTH on the left.Please also remember that all user management functions should be looked up in Access.You should also check out the Web Form 2.0 Public Documentation as well as Access Public Documentation for more information. If you need any help with the API, contact [email protected] informationRequest IDsWith any API call, you can pass a request ID via a header with name "X-Request-Id". The request ID can be an arbitrary string with up to 255 characters. Passing a longer string will result in an error.If you don't pass a request ID for a call, finAPI will generate a random ID internally.The request ID is always returned back in the response of a service, as a header with name "X-Request-Id".We highly recommend to always pass a (preferably unique) request ID, and include it into your client application logs whenever you make a request or receive a response(especially in the case of an error response). finAPI is also logging request IDs on its end. Having a request ID can help the finAPI support team to work more efficiently and solve tickets faster.Type CoercionIn order to ease the integration for some languages, which do not natively support high precision number representations, Web Form 2.0 API supports relax type binding for the openAPI type number, which is used for money amount fields. If you use one of those languages, to avoid precision errors that can appear from float values, you can pass the amount as a string.FAQIs there a finAPI SDK?Currently we do not offer a native SDK, but there is the option to generate an SDKfor almost any target language via OpenAPI. Use the 'Download SDK' button on this page for SDK generation.Why do I need to keep authorizing when calling services on this page?This page is a "one-page-app". Reloading the page resets the OAuth authorization context. There is generally no need to reload the page, so just don't do it and your authorization will persist.
eciboadaptech/finapi-access
368 Downloads
RESTful API for Account Information Services (AIS) and Payment Initiation Services (PIS) Application Version: 2.29.4 The following pages give you some general information on how to use our APIs. The actual API services documentation then follows further below. You can use the menu to jump between API sections. This page has a built-in HTTP(S) client, so you can test the services directly from within this page, by filling in the request parameters and/or body in the respective services, and then hitting the TRY button. Note that you need to be authorized to make a successful API call. To authorize, refer to the 'Authorization' section of the API, or just use the OAUTH button that can be found near the TRY button. General information Error Responses When an API call returns with an error, then in general it has the structure shown in the following example: { "errors": [ { "message": "Interface 'FINTS_SERVER' is not supported for this operation.", "code": "BAD_REQUEST", "type": "TECHNICAL" } ], "date": "2020-11-19T16:54:06.854+01:00", "requestId": "selfgen-312042e7-df55-47e4-bffd-956a68ef37b5", "endpoint": "POST /api/v2/bankConnections/import", "authContext": "1/21", "bank": "DEMO0002 - finAPI Test Redirect Bank (id: 280002, location: none)" } If an API call requires an additional authentication by the user, HTTP code 510 is returned and the error response contains the additional "multiStepAuthentication" object, see the following example: { "errors": [ { "message": "Es ist eine zusätzliche Authentifizierung erforderlich. Bitte geben Sie folgenden Code an: 123456", "code": "ADDITIONAL_AUTHENTICATION_REQUIRED", "type": "BUSINESS", "multiStepAuthentication": { "hash": "678b13f4be9ed7d981a840af8131223a", "status": "CHALLENGE_RESPONSE_REQUIRED", "challengeMessage": "Es ist eine zusätzliche Authentifizierung erforderlich. Bitte geben Sie folgenden Code an: 123456", "answerFieldLabel": "TAN", "redirectUrl": null, "redirectContext": null, "redirectContextField": null, "twoStepProcedures": null, "photoTanMimeType": null, "photoTanData": null, "opticalData": null, "opticalDataAsReinerSct": false } } ], "date": "2019-11-29T09:51:55.931+01:00", "requestId": "selfgen-45059c99-1b14-4df7-9bd3-9d5f126df294", "endpoint": "POST /api/v2/bankConnections/import", "authContext": "1/18", "bank": "DEMO0001 - finAPI Test Bank" } An exception to this error format are API authentication errors, where the following structure is returned: { "error": "invalid_token", "error_description": "Invalid access token: cccbce46-xxxx-xxxx-xxxx-xxxxxxxxxx" } Paging API services that may potentially return a lot of data implement paging. They return a limited number of entries within a "page". Further entries must be fetched with subsequent calls. Any API service that implements paging provides the following input parameters: • "page": the number of the page to be retrieved (starting with 1). • "perPage": the number of entries within a page. The default and maximum value is stated in the documentation of the respective services. A paged response contains an additional "paging" object with the following structure: { ... , "paging": { "page": 1, "perPage": 20, "pageCount": 234, "totalCount": 4662 } } Internationalization The finAPI services support internationalization which means you can define the language you prefer for API service responses. The following languages are available: German, English, Czech, Slovak. The preferred language can be defined by providing the official HTTP Accept-Language header. finAPI reacts on the official iso language codes "de", "en", "cs" and "sk" for the named languages. Additional subtags supported by the Accept-Language header may be provided, e.g. "en-US", but are ignored. If no Accept-Language header is given, German is used as the default language. Exceptions: • Bank login hints and login fields are only available in the language of the bank and not being translated. • Direct messages from the bank systems typically returned as BUSINESS errors will not be translated. • BUSINESS errors created by finAPI directly are available in German and English. • TECHNICAL errors messages meant for developers are mostly in English, but also may be translated. Request IDs With any API call, you can pass a request ID via a header with name "X-Request-Id". The request ID can be an arbitrary string with up to 255 characters. Passing a longer string will result in an error. If you don't pass a request ID for a call, finAPI will generate a random ID internally. The request ID is always returned back in the response of a service, as a header with name "X-Request-Id". We highly recommend to always pass a (preferably unique) request ID, and include it into your client application logs whenever you make a request or receive a response (especially in the case of an error response). finAPI is also logging request IDs on its end. Having a request ID can help the finAPI support team to work more efficiently and solve tickets faster. Overriding HTTP methods Some HTTP clients do not support the HTTP methods PATCH or DELETE. If you are using such a client in your application, you can use a POST request instead with a special HTTP header indicating the originally intended HTTP method. The header's name is X-HTTP-Method-Override. Set its value to either PATCH or DELETE. POST Requests having this header set will be treated either as PATCH or DELETE by the finAPI servers. Example: X-HTTP-Method-Override: PATCH POST /api/v2/label/51 {"name": "changed label"} will be interpreted by finAPI as: PATCH /api/v2/label/51 {"name": "changed label"} User metadata With the migration to PSD2 APIs, a new term called "User metadata" (also known as "PSU metadata") has been introduced to the API. This user metadata aims to inform the banking API if there was a real end-user behind an HTTP request or if the request was triggered by a system (e.g. by an automatic batch update). In the latter case, the bank may apply some restrictions such as limiting the number of HTTP requests for a single consent. Also, some operations may be forbidden entirely by the banking API. For example, some banks do not allow issuing a new consent without the end-user being involved. Therefore, it is certainly necessary and obligatory for the customer to provide the PSU metadata for such operations. As finAPI does not have direct interaction with the end-user, it is the client application's responsibility to provide all the necessary information about the end-user. This must be done by sending additional headers with every request triggered on behalf of the end-user. At the moment, the following headers are supported by the API: • "PSU-IP-Address" - the IP address of the user's device. It has to be an IPv4 address, as some banks cannot work with IPv6 addresses. If a non-IPv4 address is passed, we will replace the value with our own IPv4 address as a fallback. • "PSU-Device-OS" - the user's device and/or operating system identification. • "PSU-User-Agent" - the user's web browser or other client device identification. FAQ Is there a finAPI SDK? Currently we do not offer a native SDK, but there is the option to generate an SDK for almost any target language via OpenAPI. Use the 'Download SDK' button on this page for SDK generation. How can I enable finAPI's automatic batch update? Currently there is no way to set up the batch update via the API. Please contact [email protected] for this. Why do I need to keep authorizing when calling services on this page? This page is a "one-page-app". Reloading the page resets the OAuth authorization context. There is generally no need to reload the page, so just don't do it and your authorization will persist.
echron/packagist-uac
57 Downloads
Set up a private packagist with user access control