Libraries tagged by us states
sendpost/sendpost-php-sdk
1044 Downloads
# Introduction SendPost provides email API and SMTP relay which can be used not just to send & measure but also alert & optimised email sending. You can use SendPost to: * Send personalised emails to multiple recipients using email API * Track opens and clicks * Analyse statistics around open, clicks, bounce, unsubscribe and spam At and advanced level you can use it to: * Manage multiple sub-accounts which may map to your promotional or transactional sending, multiple product lines or multiple customers * Classify your emails using groups for better analysis * Analyse and fix email sending at sub-account level, IP Pool level or group level * Have automated alerts to notify disruptions regarding email sending * Manage different dedicated IP Pools so to better control your email sending * Automatically know when IP or domain is blacklisted or sender score is down * Leverage pro deliverability tools to get significantly better email deliverability & inboxing [](https://god.gw.postman.com/run-collection/33476323-e6dbd27f-c4a7-4d49-bcac-94b0611b938b?action=collection%2Ffork&source=rip_markdown&collection-url=entityId%3D33476323-e6dbd27f-c4a7-4d49-bcac-94b0611b938b%26entityType%3Dcollection%26workspaceId%3D6b1e4f65-96a9-4136-9512-6266c852517e) # Overview ## REST API SendPost API is built on REST API principles. Authenticated users can interact with any of the API endpoints to perform: * **GET**- to get a resource * **POST** - to create a resource * **PUT** - to update an existing resource * **DELETE** - to delete a resource The API endpoint for all API calls is: https://api.sendpost.io/api/v1 Some conventions that have been followed in the API design overall are following: * All resources have either /api/v1/subaccount or /api/v1/account in their API call resource path based on who is authorised for the resource. All API calls with path /api/v1/subaccount use X-SubAccount-ApiKey in their request header. Likewise all API calls with path /api/v1/account use X-Account-ApiKey in their request header. * All resource endpoints end with singular name and not plural. So we have domain instead of domains for domain resource endpoint. Likewise we have sender instead of senders for sender resource endpoint. * Body submitted for POST / PUT API calls as well as JSON response from SendPost API follow camelcase convention * All timestamps returned in response (created or submittedAt response fields) are UNIX nano epoch timestamp. All resources have either /api/v1/subaccount or /api/v1/account in their API call resource path based on who is authorised for the resource. All API calls with path /api/v1/subaccount use X-SubAccount-ApiKey in their request header. Likewise all API calls with path /api/v1/account use X-Account-ApiKey in their request header. SendPost uses conventional HTTP response codes to indicate the success or failure of an API request. * Codes in the 2xx range indicate success. * Codes in the 4xx range indicate an error owing due to unauthorize access, incorrect request parameters or body etc. * Code in the 5xx range indicate an eror with SendPost's servers ( internal service issue or maintenance ) SendPost all responses return created in UNIX nano epoch timestamp. ## Authentication SendPost uses API keys for authentication. You can register a new SendPost API key at our [developer portal](https://app.sendpost.io/register). SendPost expects the API key to be included in all API requests to the server in a header that looks like the following: `X-SubAccount-ApiKey: AHEZEP8192SEGH` This API key is used for all Sub-Account level operations such as: * Sending emails * Retrieving stats regarding open, click, bounce, unsubscribe and spam * Uploading suppressions list * Verifying sending domains and more In addition to X-SubAccount-ApiKey you also have another API Key X-Account-APIKey which is used for Account level operations such as : * Creating and managing sub-accounts * Allocating IPs for your account * Getting overall billing and usage information * Email List validation * Creating and managing alerts and more You must look at individual API reference page to look at whether X-SubAccount-ApiKey is required or X-Account-ApiKey In case an incorrect API Key header is specified or if it is missed you will get HTTP Response 401 ( Unauthorized ) response from SendPost. ## HTTP Response Headers Code | Reason | Details ---------------| -----------------------| ----------- 200 | Success | Everything went well 401 | Unauthorized | Incorrect or missing API header either X-SubAccount-ApiKey or X-Account-ApiKey 403 | Forbidden | Typically sent when resource with same name or details already exist 406 | Missing resource id | Resource id specified is either missing or doesn't exist 422 | Unprocessable entity | Request body is not in proper format 500 | Internal server error | Some error happened at SendPost while processing API request 503 | Service Unavailable | SendPost is offline for maintenance. Please try again later # API SDKs We have native SendPost SDKs in the following programming languages. You can integrate with them or create your own SDK with our API specification. In case you need any assistance with respect to API then do reachout to our team from website chat or email us at **[email protected]** * [PHP](https://github.com/sendpost/sendpost_php_sdk) * [Javascript](https://github.com/sendpost/sendpost_javascript_sdk) * [Ruby](https://github.com/sendpost/sendpost_ruby_sdk) * [Python](https://github.com/sendpost/sendpost_python_sdk) * [Golang](https://github.com/sendpost/sendpost_go_sdk) # API Reference SendX REST API can be broken down into two major sub-sections: * Sub-Account * Account Sub-Account API operations enable common email sending API use-cases like sending bulk email, adding new domains or senders for email sending programmatically, retrieving stats, adding suppressions etc. All Sub-Account API operations need to pass X-SubAccount-ApiKey header with every API call. The Account API operations allow users to manage multiple sub-accounts and manage IPs. A single parent SendPost account can have 100's of sub-accounts. You may want to create sub-accounts for different products your company is running or to segregate types of emails or for managing email sending across multiple customers of yours. # SMTP Reference Simple Mail Transfer Protocol (SMTP) is a quick and easy way to send email from one server to another. SendPost provides an SMTP service that allows you to deliver your email via our servers instead of your own client or server. This means you can count on SendPost's delivery at scale for your SMTP needs. ## Integrating SMTP 1. Get the SMTP `username` and `password` from your SendPost account. 2. Set the server host in your email client or application to `smtp.sendpost.io`. This setting is sometimes referred to as the external SMTP server or the SMTP relay. 3. Set the `username` and `password`. 4. Set the port to `587` (or as specified below). ## SMTP Ports - For an unencrypted or a TLS connection, use port `25`, `2525` or `587`. - For a SSL connection, use port `465` - Check your firewall and network to ensure they're not blocking any of our SMTP Endpoints. SendPost supports STARTTLS for establishing a TLS-encrypted connection. STARTTLS is a means of upgrading an unencrypted connection to an encrypted connection. There are versions of STARTTLS for a variety of protocols; the SMTP version is defined in [RFC 3207](https://www.ietf.org/rfc/rfc3207.txt). To set up a STARTTLS connection, the SMTP client connects to the SendPost SMTP endpoint `smtp.sendpost.io` on port 25, 587, or 2525, issues an EHLO command, and waits for the server to announce that it supports the STARTTLS SMTP extension. The client then issues the STARTTLS command, initiating TLS negotiation. When negotiation is complete, the client issues an EHLO command over the new encrypted connection, and the SMTP session proceeds normally. If you are unsure which port to use, a TLS connection on port 587 is typically recommended. ## Sending email from your application ```javascript "use strict"; const nodemailer = require("nodemailer"); async function main() { // create reusable transporter object using the default SMTP transport let transporter = nodemailer.createTransport({ host: "smtp.sendpost.io", port: 587, secure: false, // true for 465, false for other ports auth: { user: "" , // generated ethereal user pass: "", // generated ethereal password }, requireTLS: true, debug: true, logger: true, }); // send mail with defined transport object try { let info = await transporter.sendMail({ from: '[email protected]', to: '[email protected]', subject: 'Test Email Subject', html: 'Hello Geeks!!!', }); console.log("Message sent: %s", info.messageId); } catch (e) { console.log(e) } } main().catch(console.error); ``` For PHP ```php
inda-hr/php_sdk
1358 Downloads
# Introduction **INDA (INtelligent Data Analysis)** is an [Intervieweb](https://www.intervieweb.it/hrm/) AI solution provided as a RESTful API. The INDA pricing model is *credits-based*, which means that a certain number of credits is associated to each API request. Hence, users have to purchase a certain amount of credits (established according to their needs) which will be reduced at each API call. INDA accepts and processes a user's request only if their credits quota is grater than - or, at least, equal to - the number of credits required by that request. To obtain further details on the pricing, please visit our [site](https://inda.ai) or contact us. INDA HR embraces a wide range of functionalities to manage the main elements of a recruitment process: + [**candidate**](https://api.inda.ai/hr/docs/v2/#tag/Resume-Management) (hereafter also referred to as **resume** or **applicant**), or rather a person looking for a job; + [**job advertisement**](https://api.inda.ai/hr/docs/v2/#tag/JobAd-Management) (hereafter also referred to as **job ad**), which is a document that collects all the main information and details about a job vacancy; + [**application**](https://api.inda.ai/hr/docs/v2/#tag/Application-Management), that binds candidates to job ads; it is generated whenever a candidate applies for a job. Each of them has a specific set of methods that grants users the ability to create, read, update and delete the relative documents, plus some special features based on AI approaches (such as *document parsing* or *semantic search*). They can be explored in their respective sections. Data about the listed document types can be enriched by connecting them to other INDA supported entities, such as [**companies**](https://api.inda.ai/hr/docs/v2/#tag/Company-Management) and [**universities**](https://api.inda.ai/hr/docs/v2/#tag/Universities), so that recruiters may get a better and more detailed idea on the candidates' experiences and acquired skills. All the functionalities mentioned above are meant to help recruiters during the talent acquisition process, by exploiting the power of AI systems. Among the advantages a recruiter has by using this kind of systems, tackling the bias problem is surely one of the most relevant. Bias in recruitment is a serious issue that affect both recruiters and candidates, since it may cause wrong hiring decisions. As we care a lot about this problem, we are constantly working on reduce the bias in original data so that INDA results may be as fair as possible. As of now, in order to tackle the bias issue, INDA automatically ignores specific fields (such as name, gender, age and nationality) during the initial processing of each candidate data. Furthermore, we decided to let users collect data of various types, including personal or sensitive details, but we do not allow their usage if it is different from statistical purposes; our aim is to discourage recruiters from focusing on candidates' personal information, and to put their attention on the candidate's skills and abilities. We want to help recruiters to prevent any kind of bias while searching for the most valuable candidates they really need. The following documentation is addressed both to developers, in order to provide all technical details for INDA integration, and to managers, to guide them in the exploration of the implementation possibilities. The host of the API is [https://api.inda.ai/hr/v2/](https://api.inda.ai/hr/v2/). We recommend to check the API version and build (displayed near the documentation title). You can contact us at [email protected] in case of problems, suggestions, or particular needs. The search panel on the left can be used to navigate through the documentation and provides an overview of the API structure. On the right, you can find (*i*) the url of the method, (*ii*) an example of request body (if present), and (*iii*) an example of response for each response code. Finally, in the central section of each API method, you can find (*i*) a general description of the purpose of the method, (*ii*) details on parameters and request body schema (if present), and (*iii*) details on response schema, error models, and error codes.
briqpay/php-sdk
12072 Downloads
This is the API documentation for Briqpay. You can find out more about us and our offering at our website [https://briqpay.com](https://briqpay.com) In order to get credentials to the playgrund API Please register at [https://app.briqpay.com](https://app.briqpay.com) # Introduction Briqpay Checkout is an inline checkout solution for your b2b ecommerce. Briqpay Checkout gives you the flexibility of controlling your payment methods and credit rules while optimizing the UX for your customers # SDKs Briqpay offers standard SDKs to PHP and .NET based on these swagger definitions. You can download them respively or use our swagger defintitions to codegen your own versions. #### For .NET `` Install-Package Briqpay `` #### For PHP `` composer require briqpay/php-sdk `` # Standard use-case As a first step of integration you will need to create a checkout session. \n\nIn this session you provide Briqpay with the basic information necessary. In the response from briqpay you will recieve a htmlsnippet that is to be inserted into your frontend. The snippet provided by briqpay will render an iframe where the user will complete the purchase. Once completed, briqpay will redirect the customer to a confirmation page that you have defined. 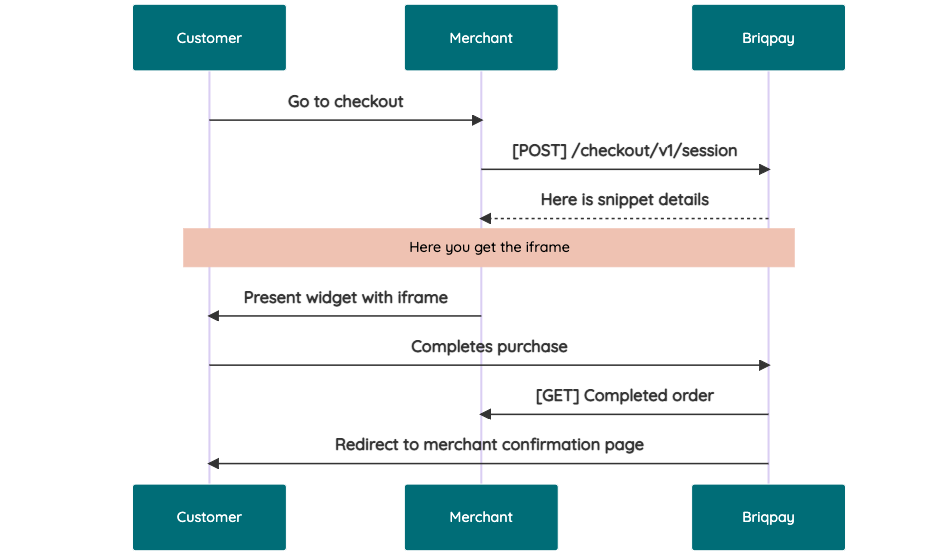 # JavaScript SDK The first step of integration is to add our JS to your site just before closing the ```` tag. This ensures that our JS library is avaliable to load the checkout. ```` Briqpay offers a few methods avaliable through our Javascript SDK. The library is added by our iframe and is avalable on ``window._briqpay`` If you offer the posibility to update the cart or order amonts on the checkout page, the JS library will help you. If your store charges the customer different costs and fees depening on their shipping location, you can listen to the ``addressupdate``event in order to re-calculate the total cost. ```javascript window._briqpay.subscribe('addressupdate', function (data) { console.log(data) }) ``` If your frontend needs to perform an action whe the signup has completed, listen to the ``signup_finalized`` event. ```javascript window._briqpay.subscribe('signup_finalized', function (status) { // redirect or handle status 'success' / 'failure' }) ``` If you allow customers to change the total cart value, you can utilise the JS library to suspend the iframe while you perform a backen update call towards our services. As described below: 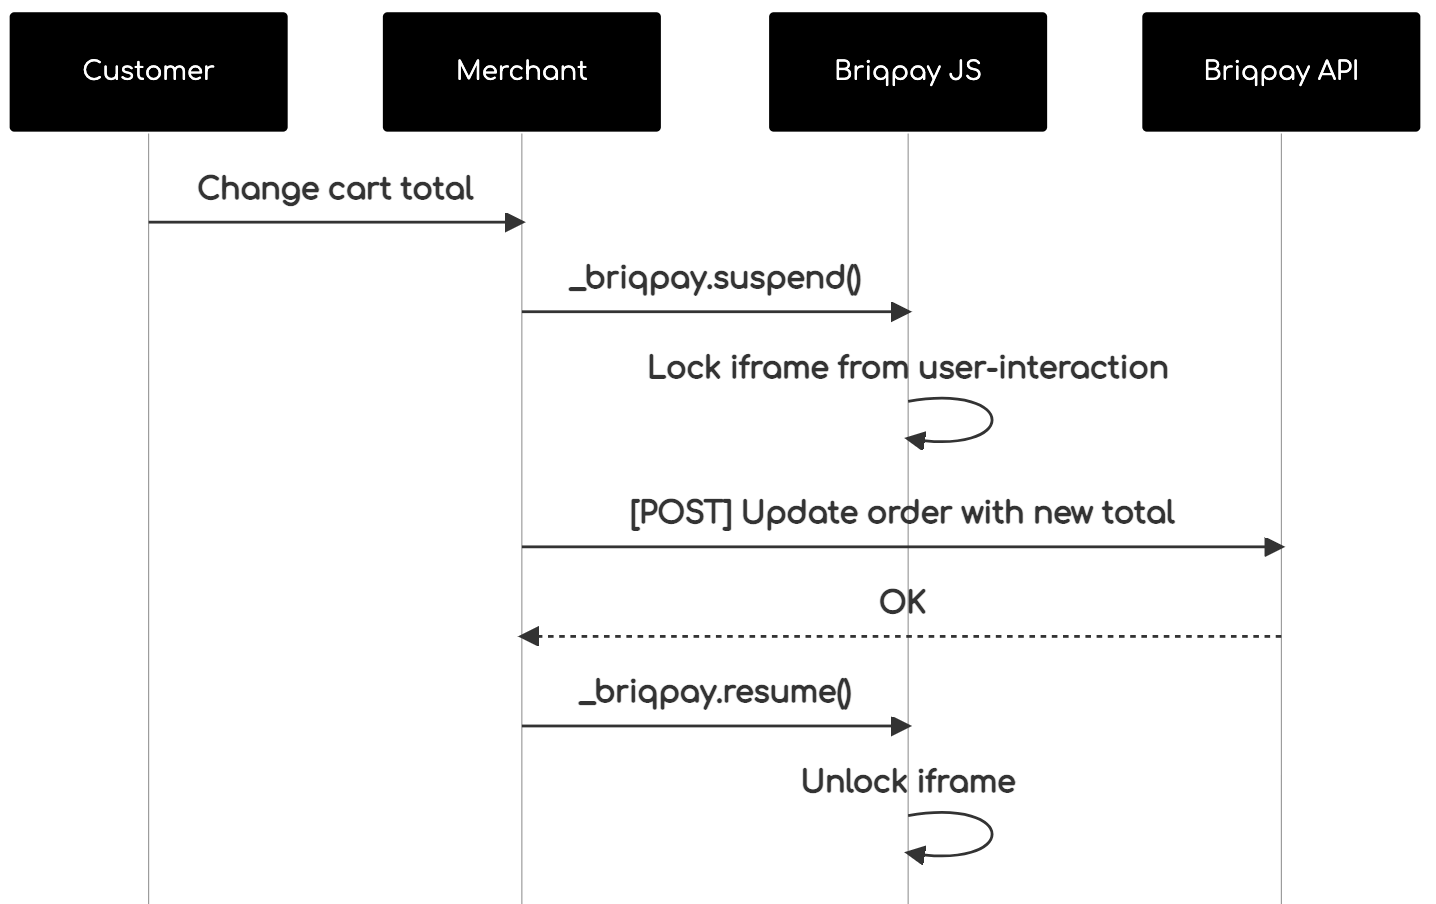 The iframe will auto-resume after 7 seconds if you dont call ``_briqpay.resume()`` before # Test Data In order to verify your integration you will neeed to use test data towards our credit engine. ## Company identication numbers * 1111111111 - To recieve a high credit scoring company ( 100 in rating) * 2222222222 - To test the enviournment with a bad credit scoring company (10 in rating) ## Card details In our playground setup your account is by default setup with a Stripe integration. In order to test out the card form you can use the below card numbers: * 4000002500003155 - To mock 3ds authentication window * 4000000000000069 Charge is declined with an expired_card code. You can use any valid expiry and CVC code # Authentication Briqpay utilizes JWT in order to authenticate calls to our platform. Authentication tokens expire after 48 hours, and at that point you can generate a new token for the given resource using the ``/auth`` endpoint. - Basic Auth - only used on the auth endpoint in order to get the Bearer Token - JWT Bearer Token - All calls towards the API utlizes this method"
payherokenya/payhero-php
136 Downloads
This PHP client library enables easy interaction with the PayHero API, allowing developers to integrate PayHero's payment processing capabilities into their PHP applications. With this client, you can perform operations like checking wallet balances, topping up service wallets, initiating payments, and querying transaction statuses.To be able to generate API keys with Pay Hero to use our API services you need to create an account with us. Create an account using below link and verify your account to be able to proceed. Go To: https://app.payhero.co.ke
alissonlinneker/statuspage-php-sdk
4 Downloads
# Code of Conduct Please don't abuse the API, and please report all feature requests and issues to https://support.atlassian.com/contact # Rate Limiting Each API token is limited to 1 request / second as measured on a 60 second rolling window. To get this limit increased, please contact us at https://support.atlassian.com/contact Error codes 420 or 429 indicate that you have exceeded the rate limit and the request has been rejected. # Basics ## HTTPS It's required ## URL Prefix In order to maintain version integrity into the future, the API is versioned. All calls currently begin with the following prefix: https://api.statuspage.io/v1/ ## RESTful Interface Wherever possible, the API seeks to implement repeatable patterns with logical, representative URLs and descriptive HTTP verbs. Below are some examples and conventions you will see throughout the documentation. * Collections are buckets: https://api.statuspage.io/v1/pages/asdf123/incidents.json * Elements have unique IDs: https://api.statuspage.io/v1/pages/asdf123/incidents/jklm456.json * GET will retrieve information about a collection/element * POST will create an element in a collection * PATCH will update a single element * PUT will replace a single element in a collection (rarely used) * DELETE will destroy a single element ## Sending Data Information can be sent in the body as form urlencoded or JSON, but make sure the Content-Type header matches the body structure or the server gremlins will be angry. All examples are provided in JSON format, however they can easily be converted to form encoding if required. Some examples of how to convert things are below: // JSON { "incident": { "name": "test incident", "components": ["8kbf7d35c070", "vtnh60py4yd7"] } } // Form Encoded (using curl as an example): curl -X POST https://api.statuspage.io/v1/example \ -d "incident[name]=test incident" \ -d "incident[components][]=8kbf7d35c070" \ -d "incident[components][]=vtnh60py4yd7" # Authentication
kruegge82/billbee-php-sdk-api
26 Downloads
Documentation of the Billbee REST API to connect a Billbee account to external aplications. ## Endpoint The Billbee API endpoint base url is https://api.billbee.io/api/v1 ## Activation You have to enable the API in the settings of your Billbee account. In addition you need a Billbee API Key identifying the application you develop. To get an API key, send a mail to [email protected] and send us a short note about what you are building. ## Authorization & security Because you can access private data with the Billbee API, every request has to be sent over https and must * Contain a valid API Key identifying the application/developer. It has to be sent as the HTTP header X-Billbee-Api-Key * Contain a valid user login with billbee username and api password in form of a basic auth HTTP header ## Throttling 50 calls per second for each API Key. 10 calls per second for each API Key in combination with Billbee user. Besides that each endpoint has a throttle of max 2 requests per second per combination of API Key and Billbee user. When you exceed the throttle threshold, the API will return a HTTP 429 status code and a Retry-After-Header indicating how many seconds you will have to wait before you can call the API again.
eciboadaptech/finapi-access
368 Downloads
RESTful API for Account Information Services (AIS) and Payment Initiation Services (PIS) Application Version: 2.29.4 The following pages give you some general information on how to use our APIs. The actual API services documentation then follows further below. You can use the menu to jump between API sections. This page has a built-in HTTP(S) client, so you can test the services directly from within this page, by filling in the request parameters and/or body in the respective services, and then hitting the TRY button. Note that you need to be authorized to make a successful API call. To authorize, refer to the 'Authorization' section of the API, or just use the OAUTH button that can be found near the TRY button. General information Error Responses When an API call returns with an error, then in general it has the structure shown in the following example: { "errors": [ { "message": "Interface 'FINTS_SERVER' is not supported for this operation.", "code": "BAD_REQUEST", "type": "TECHNICAL" } ], "date": "2020-11-19T16:54:06.854+01:00", "requestId": "selfgen-312042e7-df55-47e4-bffd-956a68ef37b5", "endpoint": "POST /api/v2/bankConnections/import", "authContext": "1/21", "bank": "DEMO0002 - finAPI Test Redirect Bank (id: 280002, location: none)" } If an API call requires an additional authentication by the user, HTTP code 510 is returned and the error response contains the additional "multiStepAuthentication" object, see the following example: { "errors": [ { "message": "Es ist eine zusätzliche Authentifizierung erforderlich. Bitte geben Sie folgenden Code an: 123456", "code": "ADDITIONAL_AUTHENTICATION_REQUIRED", "type": "BUSINESS", "multiStepAuthentication": { "hash": "678b13f4be9ed7d981a840af8131223a", "status": "CHALLENGE_RESPONSE_REQUIRED", "challengeMessage": "Es ist eine zusätzliche Authentifizierung erforderlich. Bitte geben Sie folgenden Code an: 123456", "answerFieldLabel": "TAN", "redirectUrl": null, "redirectContext": null, "redirectContextField": null, "twoStepProcedures": null, "photoTanMimeType": null, "photoTanData": null, "opticalData": null, "opticalDataAsReinerSct": false } } ], "date": "2019-11-29T09:51:55.931+01:00", "requestId": "selfgen-45059c99-1b14-4df7-9bd3-9d5f126df294", "endpoint": "POST /api/v2/bankConnections/import", "authContext": "1/18", "bank": "DEMO0001 - finAPI Test Bank" } An exception to this error format are API authentication errors, where the following structure is returned: { "error": "invalid_token", "error_description": "Invalid access token: cccbce46-xxxx-xxxx-xxxx-xxxxxxxxxx" } Paging API services that may potentially return a lot of data implement paging. They return a limited number of entries within a "page". Further entries must be fetched with subsequent calls. Any API service that implements paging provides the following input parameters: • "page": the number of the page to be retrieved (starting with 1). • "perPage": the number of entries within a page. The default and maximum value is stated in the documentation of the respective services. A paged response contains an additional "paging" object with the following structure: { ... , "paging": { "page": 1, "perPage": 20, "pageCount": 234, "totalCount": 4662 } } Internationalization The finAPI services support internationalization which means you can define the language you prefer for API service responses. The following languages are available: German, English, Czech, Slovak. The preferred language can be defined by providing the official HTTP Accept-Language header. finAPI reacts on the official iso language codes "de", "en", "cs" and "sk" for the named languages. Additional subtags supported by the Accept-Language header may be provided, e.g. "en-US", but are ignored. If no Accept-Language header is given, German is used as the default language. Exceptions: • Bank login hints and login fields are only available in the language of the bank and not being translated. • Direct messages from the bank systems typically returned as BUSINESS errors will not be translated. • BUSINESS errors created by finAPI directly are available in German and English. • TECHNICAL errors messages meant for developers are mostly in English, but also may be translated. Request IDs With any API call, you can pass a request ID via a header with name "X-Request-Id". The request ID can be an arbitrary string with up to 255 characters. Passing a longer string will result in an error. If you don't pass a request ID for a call, finAPI will generate a random ID internally. The request ID is always returned back in the response of a service, as a header with name "X-Request-Id". We highly recommend to always pass a (preferably unique) request ID, and include it into your client application logs whenever you make a request or receive a response (especially in the case of an error response). finAPI is also logging request IDs on its end. Having a request ID can help the finAPI support team to work more efficiently and solve tickets faster. Overriding HTTP methods Some HTTP clients do not support the HTTP methods PATCH or DELETE. If you are using such a client in your application, you can use a POST request instead with a special HTTP header indicating the originally intended HTTP method. The header's name is X-HTTP-Method-Override. Set its value to either PATCH or DELETE. POST Requests having this header set will be treated either as PATCH or DELETE by the finAPI servers. Example: X-HTTP-Method-Override: PATCH POST /api/v2/label/51 {"name": "changed label"} will be interpreted by finAPI as: PATCH /api/v2/label/51 {"name": "changed label"} User metadata With the migration to PSD2 APIs, a new term called "User metadata" (also known as "PSU metadata") has been introduced to the API. This user metadata aims to inform the banking API if there was a real end-user behind an HTTP request or if the request was triggered by a system (e.g. by an automatic batch update). In the latter case, the bank may apply some restrictions such as limiting the number of HTTP requests for a single consent. Also, some operations may be forbidden entirely by the banking API. For example, some banks do not allow issuing a new consent without the end-user being involved. Therefore, it is certainly necessary and obligatory for the customer to provide the PSU metadata for such operations. As finAPI does not have direct interaction with the end-user, it is the client application's responsibility to provide all the necessary information about the end-user. This must be done by sending additional headers with every request triggered on behalf of the end-user. At the moment, the following headers are supported by the API: • "PSU-IP-Address" - the IP address of the user's device. It has to be an IPv4 address, as some banks cannot work with IPv6 addresses. If a non-IPv4 address is passed, we will replace the value with our own IPv4 address as a fallback. • "PSU-Device-OS" - the user's device and/or operating system identification. • "PSU-User-Agent" - the user's web browser or other client device identification. FAQ Is there a finAPI SDK? Currently we do not offer a native SDK, but there is the option to generate an SDK for almost any target language via OpenAPI. Use the 'Download SDK' button on this page for SDK generation. How can I enable finAPI's automatic batch update? Currently there is no way to set up the batch update via the API. Please contact [email protected] for this. Why do I need to keep authorizing when calling services on this page? This page is a "one-page-app". Reloading the page resets the OAuth authorization context. There is generally no need to reload the page, so just don't do it and your authorization will persist.
apiverve/incometax
0 Downloads
Income Tax Brackets is a tool for retrieving US federal income tax bracket data by year. It returns tax rates, income ranges, and standard deductions for all filing statuses.
adaptech/finapi-access
515 Downloads
RESTful API for Account Information Services (AIS) and Payment Initiation Services (PIS) The following pages give you some general information on how to use our APIs. The actual API services documentation then follows further below. You can use the menu to jump between API sections. This page has a built-in HTTP(S) client, so you can test the services directly from within this page, by filling in the request parameters and/or body in the respective services, and then hitting the TRY button. Note that you need to be authorized to make a successful API call. To authorize, refer to the 'Authorization' section of the API, or just use the OAUTH button that can be found near the TRY button. General information Error Responses When an API call returns with an error, then in general it has the structure shown in the following example: { "errors": [ { "message": "Interface 'FINTS_SERVER' is not supported for this operation.", "code": "BAD_REQUEST", "type": "TECHNICAL" } ], "date": "2020-11-19 16:54:06.854", "requestId": "selfgen-312042e7-df55-47e4-bffd-956a68ef37b5", "endpoint": "POST /api/v1/bankConnections/import", "authContext": "1/21", "bank": "DEMO0002 - finAPI Test Redirect Bank" } If an API call requires an additional authentication by the user, HTTP code 510 is returned and the error response contains the additional "multiStepAuthentication" object, see the following example: { "errors": [ { "message": "Es ist eine zusätzliche Authentifizierung erforderlich. Bitte geben Sie folgenden Code an: 123456", "code": "ADDITIONAL_AUTHENTICATION_REQUIRED", "type": "BUSINESS", "multiStepAuthentication": { "hash": "678b13f4be9ed7d981a840af8131223a", "status": "CHALLENGE_RESPONSE_REQUIRED", "challengeMessage": "Es ist eine zusätzliche Authentifizierung erforderlich. Bitte geben Sie folgenden Code an: 123456", "answerFieldLabel": "TAN", "redirectUrl": null, "redirectContext": null, "redirectContextField": null, "twoStepProcedures": null, "photoTanMimeType": null, "photoTanData": null, "opticalData": null } } ], "date": "2019-11-29 09:51:55.931", "requestId": "selfgen-45059c99-1b14-4df7-9bd3-9d5f126df294", "endpoint": "POST /api/v1/bankConnections/import", "authContext": "1/18", "bank": "DEMO0001 - finAPI Test Bank" } An exception to this error format are API authentication errors, where the following structure is returned: { "error": "invalid_token", "error_description": "Invalid access token: cccbce46-xxxx-xxxx-xxxx-xxxxxxxxxx" } Paging API services that may potentially return a lot of data implement paging. They return a limited number of entries within a "page". Further entries must be fetched with subsequent calls. Any API service that implements paging provides the following input parameters: • "page": the number of the page to be retrieved (starting with 1). • "perPage": the number of entries within a page. The default and maximum value is stated in the documentation of the respective services. A paged response contains an additional "paging" object with the following structure: { ... , "paging": { "page": 1, "perPage": 20, "pageCount": 234, "totalCount": 4662 } } Internationalization The finAPI services support internationalization which means you can define the language you prefer for API service responses. The following languages are available: German, English, Czech, Slovak. The preferred language can be defined by providing the official HTTP Accept-Language header. finAPI reacts on the official iso language codes "de", "en", "cs" and "sk" for the named languages. Additional subtags supported by the Accept-Language header may be provided, e.g. "en-US", but are ignored. If no Accept-Language header is given, German is used as the default language. Exceptions: • Bank login hints and login fields are only available in the language of the bank and not being translated. • Direct messages from the bank systems typically returned as BUSINESS errors will not be translated. • BUSINESS errors created by finAPI directly are available in German and English. • TECHNICAL errors messages meant for developers are mostly in English, but also may be translated. Request IDs With any API call, you can pass a request ID via a header with name "X-Request-Id". The request ID can be an arbitrary string with up to 255 characters. Passing a longer string will result in an error. If you don't pass a request ID for a call, finAPI will generate a random ID internally. The request ID is always returned back in the response of a service, as a header with name "X-Request-Id". We highly recommend to always pass a (preferably unique) request ID, and include it into your client application logs whenever you make a request or receive a response (especially in the case of an error response). finAPI is also logging request IDs on its end. Having a request ID can help the finAPI support team to work more efficiently and solve tickets faster. Overriding HTTP methods Some HTTP clients do not support the HTTP methods PATCH or DELETE. If you are using such a client in your application, you can use a POST request instead with a special HTTP header indicating the originally intended HTTP method. The header's name is X-HTTP-Method-Override. Set its value to either PATCH or DELETE. POST Requests having this header set will be treated either as PATCH or DELETE by the finAPI servers. Example: X-HTTP-Method-Override: PATCH POST /api/v1/label/51 {"name": "changed label"} will be interpreted by finAPI as: PATCH /api/v1/label/51 {"name": "changed label"} User metadata With the migration to PSD2 APIs, a new term called "User metadata" (also known as "PSU metadata") has been introduced to the API. This user metadata aims to inform the banking API if there was a real end-user behind an HTTP request or if the request was triggered by a system (e.g. by an automatic batch update). In the latter case, the bank may apply some restrictions such as limiting the number of HTTP requests for a single consent. Also, some operations may be forbidden entirely by the banking API. For example, some banks do not allow issuing a new consent without the end-user being involved. Therefore, it is certainly necessary and obligatory for the customer to provide the PSU metadata for such operations. As finAPI does not have direct interaction with the end-user, it is the client application's responsibility to provide all the necessary information about the end-user. This must be done by sending additional headers with every request triggered on behalf of the end-user. At the moment, the following headers are supported by the API: • "PSU-IP-Address" - the IP address of the user's device. • "PSU-Device-OS" - the user's device and/or operating system identification. • "PSU-User-Agent" - the user's web browser or other client device identification. FAQ Is there a finAPI SDK? Currently we do not offer a native SDK, but there is the option to generate a SDK for almost any target language via OpenAPI. Use the 'Download SDK' button on this page for SDK generation. How can I enable finAPI's automatic batch update? Currently there is no way to set up the batch update via the API. Please contact [email protected] for this. Why do I need to keep authorizing when calling services on this page? This page is a "one-page-app". Reloading the page resets the OAuth authorization context. There is generally no need to reload the page, so just don't do it and your authorization will persist.