Libraries tagged by php feed reader
benz3d/php-rss-feed
1737 Downloads
The Read/Write Rss Feed in PHP
tentaclefeed/feedreader
42 Downloads
A Simple Feed Reader Laravel Package
onetoweb/google-product-feed
11 Downloads
Google Product Feed Reader
ahoraian/feed
10 Downloads
A simple package based on PHP to read Atom feeds
popphp/pop-feed
864 Downloads
Pop Feed Component for Pop PHP Framework
sbuckpesch/medium-php-reader
53 Downloads
Easy SDK for reading Medium posts of a user by parsing mediums JSON feed.
obydul/easyfeed
432 Downloads
EasyFeed is a simple PHP package to create and read RSS & Atom feed specially for Laravel.
nibblebits/rssfeedreader
17 Downloads
An RSS feed reader library in PHP that also extracts images from URL content
byn9826/fake-ssr
19 Downloads
Feed web crawlers on rendered HTML for JavaScript rendering pages
numeno/api-art-rec
2 Downloads
## Introduction Use the Numeno Article Recommender API to receive a curated selection of articles from across the web. See below for the steps to creating a Feed, as well as an introduction to the top-level concepts making up the Article Recommender API. ## Steps to creating a Feed 1. Create a Feed - [`/feeds`](create-feed) 2. Create a number of Stream queries associated with the Feed - [`/feeds/:feedId/streams`](create-stream) 3. Pull from the Feed as the Feed refreshes - [`/feeds/:feedId/articles`](get-articles-in-feed) 4. Use those Article IDs to look up metadata for the Articles -[`/articles/:id`](get-article-by-id) 5. Visit the Article links and render to your server DB or client app. ## Sources, Articles and Topics A **Source** is a place where Articles come from, typically a website, a blog, or a knowledgebase endpoint. Sources can be queried for activity via the [`/sources`](get-sources) endpoint. Beyond the Sources Numeno regaularly indexes, additional Sources can be associated with Stream queries, and Sources can be `allowlist`/`denylist`'d. **Articles** are the documents produced by Sources, typically pages from a blogpost or website, articles from a news source, or posts from a social platform or company intranet. See the [`/articles`](search-articles) endpoint. **Topics** - Numeno has millions of Topics that it associates with Articles when they are sourced. Topics are used in Stream queries, which themselves are composed to create Feeds. Get topics via the [`/topics`](get-topics) endpoint. ## Feeds **A Feed is a collection of Streams.** Feeds are configured to refresh on a regular schedule. No new Articles are published to a Feed except when it's refreshed. Feeds can be refreshed manually if the API Key Scopes allow. You can ask for Articles chronologically or by decreasing score. You can also limit Articles to a date-range, meaning that you can produce Feeds from historical content. Interact with Feeds via the [`/feeds`](create-feed) endpoint. ## Streams Think of a **Stream** as a search query with a "volume control knob". It's a collection of Topics that you're interested and a collection of Sources you'd explicitly like to include or exclude. Streams are associated with a Feed, and a collection of Streams produce the sequence of Articles that appear when a Feed is refreshed. The "volume control knob" on a Stream is a way to decide how many of the search results from the Stream query are included in the Feed. Our searches are "soft", and with a such a rich `Article x Topic` space to draw on, the "volume control" allows you to put a cuttoff on what you'd like included. Streams are a nested resource of `/feeds` - get started by explorting [`/feeds/:feedId/streams`](create-stream).
briqpay/php-sdk
12007 Downloads
This is the API documentation for Briqpay. You can find out more about us and our offering at our website [https://briqpay.com](https://briqpay.com) In order to get credentials to the playgrund API Please register at [https://app.briqpay.com](https://app.briqpay.com) # Introduction Briqpay Checkout is an inline checkout solution for your b2b ecommerce. Briqpay Checkout gives you the flexibility of controlling your payment methods and credit rules while optimizing the UX for your customers # SDKs Briqpay offers standard SDKs to PHP and .NET based on these swagger definitions. You can download them respively or use our swagger defintitions to codegen your own versions. #### For .NET `` Install-Package Briqpay `` #### For PHP `` composer require briqpay/php-sdk `` # Standard use-case As a first step of integration you will need to create a checkout session. \n\nIn this session you provide Briqpay with the basic information necessary. In the response from briqpay you will recieve a htmlsnippet that is to be inserted into your frontend. The snippet provided by briqpay will render an iframe where the user will complete the purchase. Once completed, briqpay will redirect the customer to a confirmation page that you have defined. 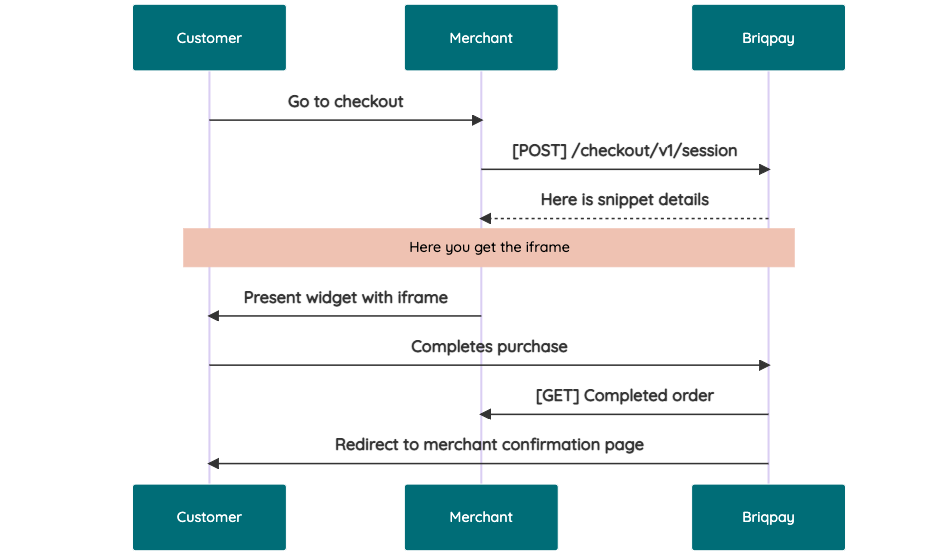 # JavaScript SDK The first step of integration is to add our JS to your site just before closing the ```` tag. This ensures that our JS library is avaliable to load the checkout. ```` Briqpay offers a few methods avaliable through our Javascript SDK. The library is added by our iframe and is avalable on ``window._briqpay`` If you offer the posibility to update the cart or order amonts on the checkout page, the JS library will help you. If your store charges the customer different costs and fees depening on their shipping location, you can listen to the ``addressupdate``event in order to re-calculate the total cost. ```javascript window._briqpay.subscribe('addressupdate', function (data) { console.log(data) }) ``` If your frontend needs to perform an action whe the signup has completed, listen to the ``signup_finalized`` event. ```javascript window._briqpay.subscribe('signup_finalized', function (status) { // redirect or handle status 'success' / 'failure' }) ``` If you allow customers to change the total cart value, you can utilise the JS library to suspend the iframe while you perform a backen update call towards our services. As described below: 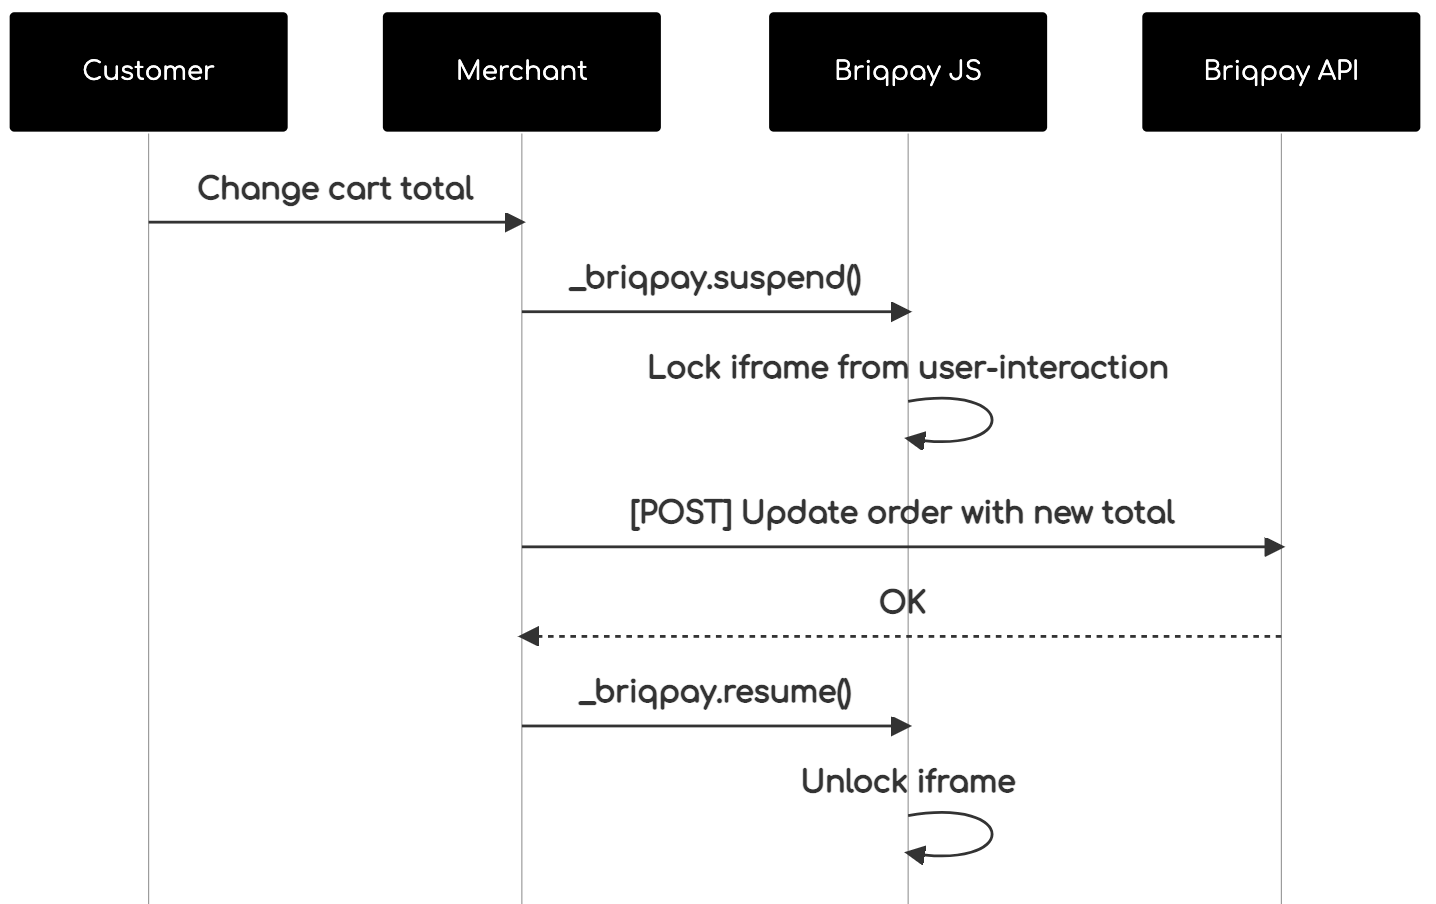 The iframe will auto-resume after 7 seconds if you dont call ``_briqpay.resume()`` before # Test Data In order to verify your integration you will neeed to use test data towards our credit engine. ## Company identication numbers * 1111111111 - To recieve a high credit scoring company ( 100 in rating) * 2222222222 - To test the enviournment with a bad credit scoring company (10 in rating) ## Card details In our playground setup your account is by default setup with a Stripe integration. In order to test out the card form you can use the below card numbers: * 4000002500003155 - To mock 3ds authentication window * 4000000000000069 Charge is declined with an expired_card code. You can use any valid expiry and CVC code # Authentication Briqpay utilizes JWT in order to authenticate calls to our platform. Authentication tokens expire after 48 hours, and at that point you can generate a new token for the given resource using the ``/auth`` endpoint. - Basic Auth - only used on the auth endpoint in order to get the Bearer Token - JWT Bearer Token - All calls towards the API utlizes this method"
dcarbone/paragon-solutions-php-sdk
2 Downloads
Paragon Processing PlatformThis document is to provide a detailed description of how a developer or software solution provider can integrate with the Paragon Processing Platform (Paragon Platform). The Paragon Platform is for developers who wish to use Paragon's processing services within their software applications. The Paragon Platform can stand alone as a web-based storefront with (or without) attached card readers or may be used in combination with point-of-sale (POS) and order entry applications.The Paragon Platform accepts payments in many forms, including check, credit, debit, gift, loyalty and EBT cards. Payments may be taken online, over the telephone, from a mobile phone and at physical store locations. In addition to handling large volumes of payment transactions, the Paragon Platform manages and settles batches, protects sensitive card information, administers billing contracts and produces operational and analytical reports. Application Programming Interfaces (APIs) With our API, software systems and devices communicate with the Paragon Platform by exchanging messages. Client Application formulates a message and transmits the request to the Paragon Platform. The Paragon Platform translates the request and relays it to the Payment Processing Network. The Payment Processing Network processes the request and returns a response to the Paragon Platform. The Paragon Platform translates the response and relays it to the Client Application.The Path to Integration Step 1: Open a Test Account Visit https://developer.paragonsolutions.com/testaccount to register for a free test account. Once registered you have instant access to your test account credentials and all the documentation you need to get started. Head over to the library and make sure to check out all of our API's to learn about the Paragon Processing Platform transaction requests and responses.Step 2: Code & CertifyOnce in the Paragon Development portal, begin your certification or have an experienced Paragon integration specialist guide you through the testing process. Once coding and testing are completed submit your request for certification. Our team will then perform a detailed review of your integration to make sure your integration meets all your business requirements for success. Step 3: Go Live!After final review and testing your software solution is ready to begin taking live payments! We know, an integration that is easy sounds too good to be true. Don't take our word for it, start your integration today! Developer NotesInstall your development platform according to its product documentation.Read through all the steps before you get started. We recommend reviewing the rest of this guide to familiarize yourself with the Paragon Processing Platform's terms, capabilities, web services and operations.
vitexsoftware/rbczpremiumapi
355 Downloads
##### API Overview - Accounts list and balance - Transaction overview (also for saving accounts) - Payments import - Statement list and download - FX rates ##### Authentication Before making a call to Premium API, you need to register your app at our _Developer portal_. This is where you get the **ClientID** that your application must send in the request as `X-IBM-Client-Id`. This is the key that grants your app access to the API. However, this may not be enough. Your application needs to use mTLS to call most operations here. Thus, you not only need _https_ but also a client certificate issued by us. The exception is two operations for FX rates that are accessible also without a client certificate. Each bank client/user can issue several certificates. Each certificate can permit different sets of operations (http methods) on different bank accounts. All this must be configured in Internet Banking first by each bank client/user (bank clients need to look under _Settings_ and do not forget to download the certificate at the last step). The certificate is downloaded in **PKCS#12** format as **\*.p12** file and protected by a password chosen by the bank client/user. Yes, your app needs the password as well to get use of the **\*p12** file for establishing mTLS connection to the bank. Client certificates issued in Internet Banking for bank clients/users have limited validity (e.g. **5 years**). However, **each year** certificates are automatically blocked and bank client/user must unblock them in Internet Banking. It is possible to do it in advance and prolong the time before the certificate is blocked. Your app should be prepared for these scenarios and it should communicate such cases to your user in advance to provide seamless service and high user-experience of your app. ##### Rate Limiting The number of requests in each API operation is limited to 10 per client per sliding second and 5000 per client per sliding day. The exception is the 'Download Statement' operation with the limits lowered to 5 per client per sliding second and 1500 per client per sliding day. This is because it transports potentially sizeable binary files. The consumer must be able to handle HTTP status 429 in case of exceeding these limits. Response headers `X-RateLimit-Limit-Second` and `X-RateLimit-Limit-Day` show the actual limits configured for the specific operation. Response headers `X-RateLimit-Remaining-Second` and `X-RateLimit-Remaining-Day` are returned to help prevent the limits from being exceeded. ##### Notes Be aware, that in certain error situations, API can return specific error structures along with 5xx status code, which is not explicitely defined below. ##### Quick Start Client Feel free to download a simple Java client that gives you quick access to our API.
segnivo/php-sdk
0 Downloads
**API Version**: 1.7 **Date**: 9th July, 2024 ## 📄 Getting Started This API is based on the REST API architecture, allowing the user to easily manage their data with this resource-based approach. Every API call is established on which specific request type (GET, POST, PUT, DELETE) will be used. The API must not be abused and should be used within acceptable limits. To start using this API, you will need not create or access an existing Segnivo account to obtain your API key ([retrievable from your account settings](https://messaging.segnivo.com/account/api)). - You must use a valid API Key to send requests to the API endpoints. - The API only responds to HTTPS-secured communications. Any requests sent via HTTP return an HTTP 301 redirect to the corresponding HTTPS resources. - The API returns request responses in JSON format. When an API request returns an error, it is sent in the JSON response as an error key or with details in the message key. ### 🔖 **Need some help?** In case you have questions or need clarity with interacting with some endpoints feel free to create a support ticket on your account or you can send an email ([[email protected]](https://mailto:[email protected])) directly and we would be happy to help. --- ## Authentication As noted earlier, this API uses API keys for authentication. You can generate a Segnivo API key in the [API](https://messaging.segnivo.com/account/api) section of your account settings. You must include an API key in each request to this API with the `X-API-KEY` request header. ### Authentication error response If an API key is missing, malformed, or invalid, you will receive an HTTP 401 Unauthorized response code. ## Rate and usage limits API access rate limits apply on a per-API endpoint basis in unit time. The limit is 10k requests per hour for most endpoints and 1m requests per hour for transactional/relay email-sending endpoints. Also, depending on your plan, you may have usage limits. If you exceed either limit, your request will return an HTTP 429 Too Many Requests status code or HTTP 403 if sending credits have been exhausted. ### 503 response An HTTP `503` response from our servers may indicate there is an unexpected spike in API access traffic, while this rarely happens, we ensure the server is usually operational within the next two to five minutes. If the outage persists or you receive any other form of an HTTP `5XX` error, contact support ([[email protected]](https://mailto:[email protected])). ### Request headers To make a successful request, some or all of the following headers must be passed with the request. | **Header** | **Description** | | --- | --- | | Content-Type | Required and should be `application/json` in most cases. | | Accept | Required and should be `application/json` in most cases | | Content-Length | Required for `POST`, `PATCH`, and `PUT` requests containing a request body. The value must be the number of bytes rather than the number of characters in the request body. | | X-API-KEY | Required. Specifies the API key used for authorization. | ##### 🔖 Note with example requests and code snippets If/when you use the code snippets used as example requests, remember to calculate and add the `Content-Length` header. Some request libraries, frameworks, and tools automatically add this header for you while a few do not. Kindly check and ensure yours does or add it yourself.
karim-tao/concurrent-console-progress
1 Downloads
Concurrent progress dashboard for PHP console applications that need to render and monitor multiple concurrent tasks in a single live terminal view.