Libraries tagged by openai call function
tuzlu07x/openai
5 Downloads
OpenAI Call Function API PHP
mathsgod/openai-chat
17 Downloads
OpenAI Chat completion wrapper. Support function calls and variable assignment.
sendpost/sendpost-php-sdk
596 Downloads
# Introduction SendPost provides email API and SMTP relay which can be used not just to send & measure but also alert & optimised email sending. You can use SendPost to: * Send personalised emails to multiple recipients using email API * Track opens and clicks * Analyse statistics around open, clicks, bounce, unsubscribe and spam At and advanced level you can use it to: * Manage multiple sub-accounts which may map to your promotional or transactional sending, multiple product lines or multiple customers * Classify your emails using groups for better analysis * Analyse and fix email sending at sub-account level, IP Pool level or group level * Have automated alerts to notify disruptions regarding email sending * Manage different dedicated IP Pools so to better control your email sending * Automatically know when IP or domain is blacklisted or sender score is down * Leverage pro deliverability tools to get significantly better email deliverability & inboxing [](https://god.gw.postman.com/run-collection/33476323-e6dbd27f-c4a7-4d49-bcac-94b0611b938b?action=collection%2Ffork&source=rip_markdown&collection-url=entityId%3D33476323-e6dbd27f-c4a7-4d49-bcac-94b0611b938b%26entityType%3Dcollection%26workspaceId%3D6b1e4f65-96a9-4136-9512-6266c852517e) # Overview ## REST API SendPost API is built on REST API principles. Authenticated users can interact with any of the API endpoints to perform: * **GET**- to get a resource * **POST** - to create a resource * **PUT** - to update an existing resource * **DELETE** - to delete a resource The API endpoint for all API calls is: https://api.sendpost.io/api/v1 Some conventions that have been followed in the API design overall are following: * All resources have either /api/v1/subaccount or /api/v1/account in their API call resource path based on who is authorised for the resource. All API calls with path /api/v1/subaccount use X-SubAccount-ApiKey in their request header. Likewise all API calls with path /api/v1/account use X-Account-ApiKey in their request header. * All resource endpoints end with singular name and not plural. So we have domain instead of domains for domain resource endpoint. Likewise we have sender instead of senders for sender resource endpoint. * Body submitted for POST / PUT API calls as well as JSON response from SendPost API follow camelcase convention * All timestamps returned in response (created or submittedAt response fields) are UNIX nano epoch timestamp. All resources have either /api/v1/subaccount or /api/v1/account in their API call resource path based on who is authorised for the resource. All API calls with path /api/v1/subaccount use X-SubAccount-ApiKey in their request header. Likewise all API calls with path /api/v1/account use X-Account-ApiKey in their request header. SendPost uses conventional HTTP response codes to indicate the success or failure of an API request. * Codes in the 2xx range indicate success. * Codes in the 4xx range indicate an error owing due to unauthorize access, incorrect request parameters or body etc. * Code in the 5xx range indicate an eror with SendPost's servers ( internal service issue or maintenance ) SendPost all responses return created in UNIX nano epoch timestamp. ## Authentication SendPost uses API keys for authentication. You can register a new SendPost API key at our [developer portal](https://app.sendpost.io/register). SendPost expects the API key to be included in all API requests to the server in a header that looks like the following: `X-SubAccount-ApiKey: AHEZEP8192SEGH` This API key is used for all Sub-Account level operations such as: * Sending emails * Retrieving stats regarding open, click, bounce, unsubscribe and spam * Uploading suppressions list * Verifying sending domains and more In addition to X-SubAccount-ApiKey you also have another API Key X-Account-APIKey which is used for Account level operations such as : * Creating and managing sub-accounts * Allocating IPs for your account * Getting overall billing and usage information * Email List validation * Creating and managing alerts and more You must look at individual API reference page to look at whether X-SubAccount-ApiKey is required or X-Account-ApiKey In case an incorrect API Key header is specified or if it is missed you will get HTTP Response 401 ( Unauthorized ) response from SendPost. ## HTTP Response Headers Code | Reason | Details ---------------| -----------------------| ----------- 200 | Success | Everything went well 401 | Unauthorized | Incorrect or missing API header either X-SubAccount-ApiKey or X-Account-ApiKey 403 | Forbidden | Typically sent when resource with same name or details already exist 406 | Missing resource id | Resource id specified is either missing or doesn't exist 422 | Unprocessable entity | Request body is not in proper format 500 | Internal server error | Some error happened at SendPost while processing API request 503 | Service Unavailable | SendPost is offline for maintenance. Please try again later # API SDKs We have native SendPost SDKs in the following programming languages. You can integrate with them or create your own SDK with our API specification. In case you need any assistance with respect to API then do reachout to our team from website chat or email us at **[email protected]** * [PHP](https://github.com/sendpost/sendpost_php_sdk) * [Javascript](https://github.com/sendpost/sendpost_javascript_sdk) * [Ruby](https://github.com/sendpost/sendpost_ruby_sdk) * [Python](https://github.com/sendpost/sendpost_python_sdk) * [Golang](https://github.com/sendpost/sendpost_go_sdk) # API Reference SendX REST API can be broken down into two major sub-sections: * Sub-Account * Account Sub-Account API operations enable common email sending API use-cases like sending bulk email, adding new domains or senders for email sending programmatically, retrieving stats, adding suppressions etc. All Sub-Account API operations need to pass X-SubAccount-ApiKey header with every API call. The Account API operations allow users to manage multiple sub-accounts and manage IPs. A single parent SendPost account can have 100's of sub-accounts. You may want to create sub-accounts for different products your company is running or to segregate types of emails or for managing email sending across multiple customers of yours. # SMTP Reference Simple Mail Transfer Protocol (SMTP) is a quick and easy way to send email from one server to another. SendPost provides an SMTP service that allows you to deliver your email via our servers instead of your own client or server. This means you can count on SendPost's delivery at scale for your SMTP needs. ## Integrating SMTP 1. Get the SMTP `username` and `password` from your SendPost account. 2. Set the server host in your email client or application to `smtp.sendpost.io`. This setting is sometimes referred to as the external SMTP server or the SMTP relay. 3. Set the `username` and `password`. 4. Set the port to `587` (or as specified below). ## SMTP Ports - For an unencrypted or a TLS connection, use port `25`, `2525` or `587`. - For a SSL connection, use port `465` - Check your firewall and network to ensure they're not blocking any of our SMTP Endpoints. SendPost supports STARTTLS for establishing a TLS-encrypted connection. STARTTLS is a means of upgrading an unencrypted connection to an encrypted connection. There are versions of STARTTLS for a variety of protocols; the SMTP version is defined in [RFC 3207](https://www.ietf.org/rfc/rfc3207.txt). To set up a STARTTLS connection, the SMTP client connects to the SendPost SMTP endpoint `smtp.sendpost.io` on port 25, 587, or 2525, issues an EHLO command, and waits for the server to announce that it supports the STARTTLS SMTP extension. The client then issues the STARTTLS command, initiating TLS negotiation. When negotiation is complete, the client issues an EHLO command over the new encrypted connection, and the SMTP session proceeds normally. If you are unsure which port to use, a TLS connection on port 587 is typically recommended. ## Sending email from your application ```javascript "use strict"; const nodemailer = require("nodemailer"); async function main() { // create reusable transporter object using the default SMTP transport let transporter = nodemailer.createTransport({ host: "smtp.sendpost.io", port: 587, secure: false, // true for 465, false for other ports auth: { user: "" , // generated ethereal user pass: "", // generated ethereal password }, requireTLS: true, debug: true, logger: true, }); // send mail with defined transport object try { let info = await transporter.sendMail({ from: '[email protected]', to: '[email protected]', subject: 'Test Email Subject', html: 'Hello Geeks!!!', }); console.log("Message sent: %s", info.messageId); } catch (e) { console.log(e) } } main().catch(console.error); ``` For PHP ```php
briqpay/php-sdk
11923 Downloads
This is the API documentation for Briqpay. You can find out more about us and our offering at our website [https://briqpay.com](https://briqpay.com) In order to get credentials to the playgrund API Please register at [https://app.briqpay.com](https://app.briqpay.com) # Introduction Briqpay Checkout is an inline checkout solution for your b2b ecommerce. Briqpay Checkout gives you the flexibility of controlling your payment methods and credit rules while optimizing the UX for your customers # SDKs Briqpay offers standard SDKs to PHP and .NET based on these swagger definitions. You can download them respively or use our swagger defintitions to codegen your own versions. #### For .NET `` Install-Package Briqpay `` #### For PHP `` composer require briqpay/php-sdk `` # Standard use-case As a first step of integration you will need to create a checkout session. \n\nIn this session you provide Briqpay with the basic information necessary. In the response from briqpay you will recieve a htmlsnippet that is to be inserted into your frontend. The snippet provided by briqpay will render an iframe where the user will complete the purchase. Once completed, briqpay will redirect the customer to a confirmation page that you have defined. 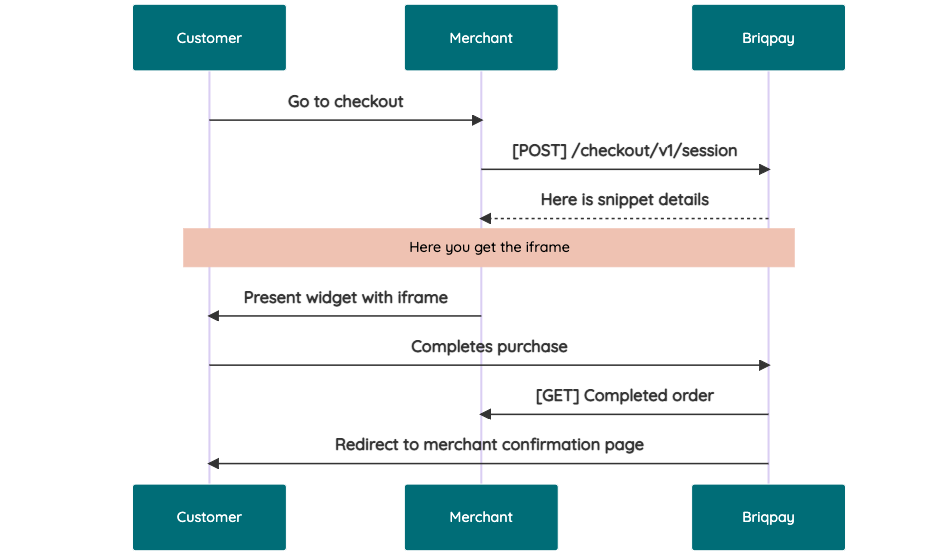 # JavaScript SDK The first step of integration is to add our JS to your site just before closing the ```` tag. This ensures that our JS library is avaliable to load the checkout. ```` Briqpay offers a few methods avaliable through our Javascript SDK. The library is added by our iframe and is avalable on ``window._briqpay`` If you offer the posibility to update the cart or order amonts on the checkout page, the JS library will help you. If your store charges the customer different costs and fees depening on their shipping location, you can listen to the ``addressupdate``event in order to re-calculate the total cost. ```javascript window._briqpay.subscribe('addressupdate', function (data) { console.log(data) }) ``` If your frontend needs to perform an action whe the signup has completed, listen to the ``signup_finalized`` event. ```javascript window._briqpay.subscribe('signup_finalized', function (status) { // redirect or handle status 'success' / 'failure' }) ``` If you allow customers to change the total cart value, you can utilise the JS library to suspend the iframe while you perform a backen update call towards our services. As described below: 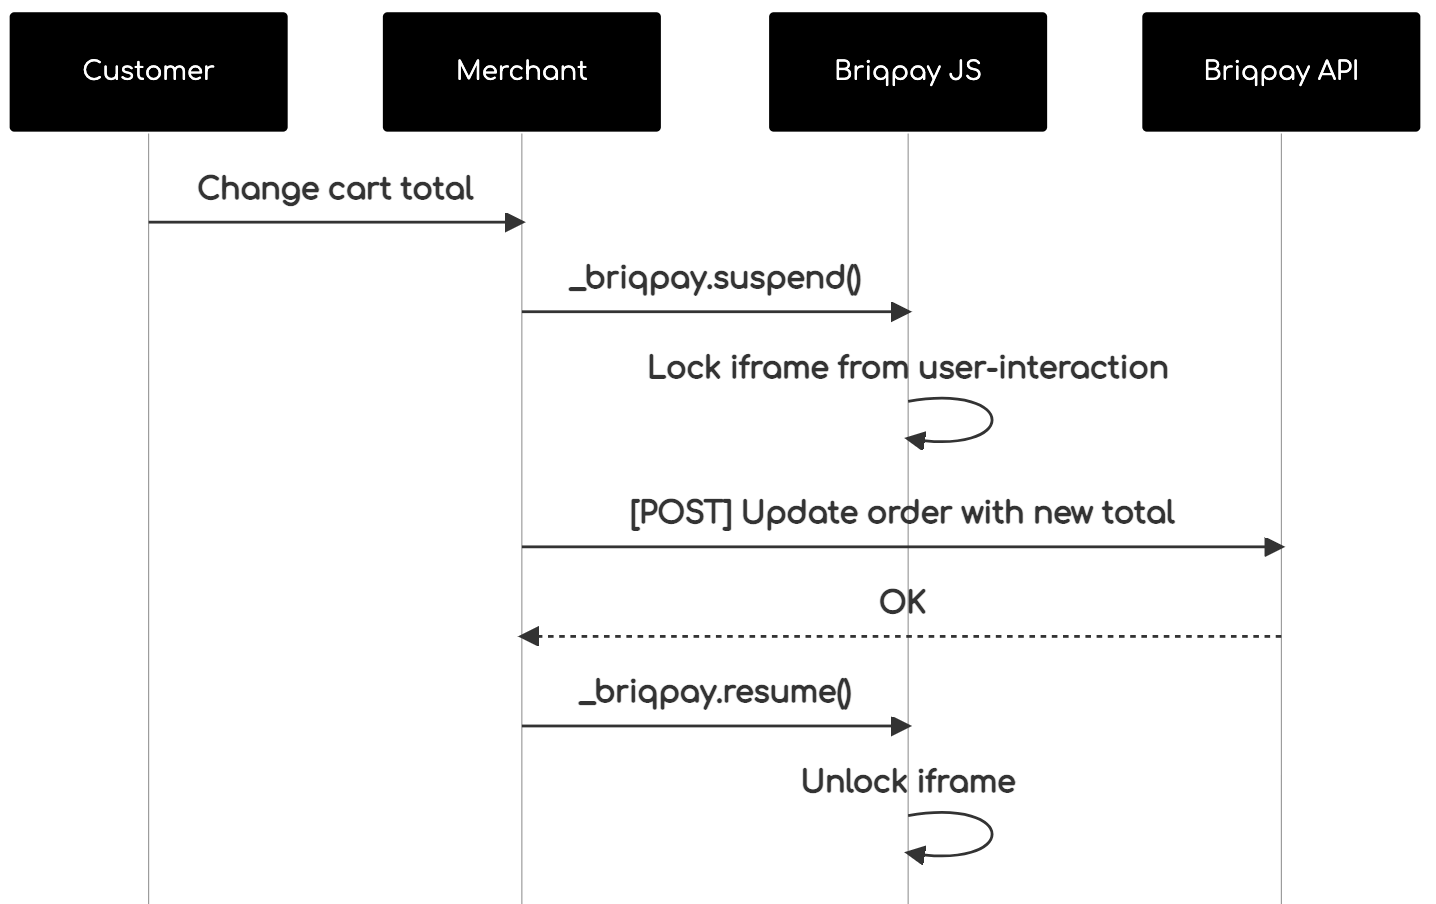 The iframe will auto-resume after 7 seconds if you dont call ``_briqpay.resume()`` before # Test Data In order to verify your integration you will neeed to use test data towards our credit engine. ## Company identication numbers * 1111111111 - To recieve a high credit scoring company ( 100 in rating) * 2222222222 - To test the enviournment with a bad credit scoring company (10 in rating) ## Card details In our playground setup your account is by default setup with a Stripe integration. In order to test out the card form you can use the below card numbers: * 4000002500003155 - To mock 3ds authentication window * 4000000000000069 Charge is declined with an expired_card code. You can use any valid expiry and CVC code # Authentication Briqpay utilizes JWT in order to authenticate calls to our platform. Authentication tokens expire after 48 hours, and at that point you can generate a new token for the given resource using the ``/auth`` endpoint. - Basic Auth - only used on the auth endpoint in order to get the Bearer Token - JWT Bearer Token - All calls towards the API utlizes this method"
m-michalis/boxnow-api
2416 Downloads
Document describes the API description for partners in order to create and track delivery requests. ## Revision history |Date|Author|Description|Version| |-|-|-|-| |2024-09-26|Hoffmann, P.| Add P466 error code |1.65| |2024-09-25|Filatov, R.| Add P465 error for /api/{v1,v2}/delivery-requests:checkAddressDelivery |1.64| |2024-08-13|Hoffmann, P.| Update `shippingRegions` in /api/v1/entrusted-partners response. |1.63| |2024-07-22|Hoffmann, P.| Add `shippingRegions` and `phoneNumber` to /api/v1/entrusted-partners response. |1.62| |2024-07-11|Filatov, R.| Add P461, P462, P464 errors for ArcGIS validations to /api/v2/delivery-requests:checkAddressDelivery |1.61| |2024-07-08|Hoffmann, P.| Add `email` and `phoneNumber` to /api/v1/entrusted-partners response. Add `originContactEmail` and `originContactNumber` to /api/v1/delivery-requests:fromCsv request body |1.60| |2024-05-23|Balagazova, K.| Add lost parcel event |1.59| |2024-04-08|Hoffmann, P.| Add declareDeliveryPartnerReturn |1.58| |2024-03-15|Šmolík, J.| Add generate upload label link |1.57| |2024-02-02|Šmolík, J.| Add location id to /api/v1/parcels events |1.56| |2023-11-15|Filatov, R.| Add P422, P423, P424 error codes |1.55| |2023-11-13|Filatov, R.| Add new `/api/v2/delivery-requests:checkAddressDelivery` endpoint switched to ArcGIS |1.54| |2023-11-08|Filatov, R.| Add `customerReturnsMaxAllowedSize` for /api/v1/entrusted-partners |1.53| |2023-06-10|Filatov, R.| Add `weight` min/max validation (error cde P421) and always round it to 2 decimals on /api/v1/delivery-requests:customerReturns|1.52| |2023-05-10|Balagazova, K.| Forbid usage of `q` parameter of `api/v1/parcels` for partner server accounts |1.51| |2023-04-28|Hoffmann, P.| Remove `X-Overwrite-Date` request header from /api/v1/delivery-requests and /api/v1/entrusted-partners |1.50| |2023-04-28|Azizov, J.| Add P442 error code |1.49| |2023-04-12|Balagazova, K.|Add `limit` field and automatic ordering by distance to /api/v1/destinations |1.48| |2023-04-04|Balagazova K.| Add `showRecipientInformation` field to /api/v1/delivery-requests /api/v1/delivery-requests:fromCsv |1.47| |2023-02-23|Balagazova K.| Add customer information to the webhook message |1.46| |2022-11-29|Azizov J.| Add Webhook schema and an example endpoint |1.45| |2022-11-28|Vala J.| Add partner permission to /entrusted-partners response |1.44| |2022-11-24|Vala J.| Add partner permission `addressAsDestination`, `codAddressAsDestination`. Validate partner permission for delivery to address and cod payment use for delivery to address when creating delivery request |1.43| |2022-11-14|Vala J.| Add `X-Overwrite-Date` request header for delivery request to test Croatian currency conversion, only testeable on dev |1.42| |2022-10-21|Vala J.| Add validation error code to /api/v1/simple-delivery-requests /api/v1/delivery-requests /api/v1/delivery-requests:customerReturns |1.41| |2022-09-22|Šmolík, J.|Add accepted-to-locker parcel event |1.40| |2022-09-08|Šmolík J.| Add support for user to choose partner they want to work with |1.39| |2022-08-10|Šmolík J.| Add /labels:search to download PDF labels for defined criteria |1.38| |2022-08-08|Azizov. J.| Add `region` field to /destinations and /origins endpoints |1.37| |2022-07-27|Vala J.| Add EP for listing shipping label data of parcels order /api/v1/delivery-requests/{orderNumber}/label |1.36| |2022-07-27|Vala J.| Add EP for listing shipping label data of parcel /api/v1/parcels/{id}/label |1.35| |2022-07-22|Vala J.| Add destination_public_id column to csv export of parcels |1.34| |2022-07-08|Vala J.| Add exportCsvUrl to headers ['X-export-url-csv'] to response from /api/v1/parcelsAdd endpoint to export parcels to csv file /ui/v1/parcels.csv |1.33| |2022-06-27|Vala J.| Add width and printerModel query parameters for zpl shipping labels for /api/v1/delivery-requests/{orderNumber}/label.{type} and /api/v1/parcels/{id}/label.{type} |1.32| |2022-06-17|Šmolík, J.| Allow to select return location for delivery request |1.31| |2022-05-25|Vala, J.| Add single labelUrlPdf to headers ['X-labels-url-pdf'] in response from /api/v1/delivery-requests:fromCsv |1.30| |2022-05-25|Vala, J.| Add EP to handle csv import orders printing of shipping label /ui/v1/delivery-requests/{orderImportsNumber}/label.pdf |1.29| |2022-05-20|Vala, J.| Add possibility to overwrite 4 rows in shipping label sender info to /api/v1/delivery-requests endpoint |1.28| |2022-05-04|Azizov, J.| Add state and created filters to to /api/v1/parcels endpoint |1.27| |2022-05-03|Azizov, J.| Add possibility to search parcels to /api/v1/parcels endpoint |1.26| |2022-04-27|Azizov, J.| Add /api/v1/delivery-requests:customerReturns for customer returns delivery requests |1.25| |2022-04-26|Vala, J.| Add createTime, updateTime to parcel list response |1.24| |2022-04-21|Šmolík, J.| Add payment info to parcels |1.23| |2022-02-22|Azizov, J.| Add P408 and P409 error codes |1.22| |2022-02-22|Azizov, J.| Add notifySMSOnAccepted to DeliveryRequest |1.21| |2022-02-01|Šmolík, J.| Add check address delivery endpointAdd /api/v1/simple-delivery-requests for simpler delivery creation |1.20| |2022-01-20|Šmolík, J.| Add P405, P406 and P407 error codes |1.19| |2022-01-10|Šmolík, J.| Add CSV import endpointAdd JWT custom claims descriptionMove 403 error codes to own section |1.18| |2021-12-23|Šmolík, J.| Add new endpoint to confirm AnyAPM delivery of a parcelPartition error codes by HTTP status response |1.17| |2021-12-16|Šmolík, J.| Add new error code P403 |1.16| |2021-12-09|Šmolík, J.| Add new error codes P401, P402 |1.15| |2021-11-30|Šmolík, J.| Add delivery request origin, destination and items fields description |1.14| |2021-11-11|Šmolík, J.| Add endpoint for parcel delivery cancellation |1.13| |2021-11-09|Šmolík, J.| Add X403 error code spec |1.12| |2021-10-14|Šmolík, J.| Add Accepted for return event |1.11| |2021-10-05|Šmolík, J.| Make DeliveryRequest.items required |1.10| |2021-09-22|Šmolík, J.| Add canceled event state and event|1.9| |2021-09-17|Šmolík, J.| Add PDF label URLs to parcels response |1.8 |2021-09-13|Šmolík, J.| Update parcel state enum valuesRemove history event displayName, add type|1.7 |2021-08-25|Azizov, J.| Add possibility to print labels for all parcels in orderMake contact information of origin optional in delivery request|1.6 |2021-08-02|Azizov, J.| Add items metadata to parcel |1.5| |2021-07-15|Šmolík, J.| Add destination expected delivery time |1.4| |2021-06-23|Šmolík, J.| Update money value fields description |1.3| |2021-06-21|Šmolík, J.| Update Requesting a delivery textAdd `name` filter to origins and destinations Rename delivery request code of description to plain descriptionAdd more specific info to value amount fieldsUpdate address country to match ISO CodeUpdate address postal code formattingUpdate origin/destination for delivery requestRemove height, length, width from order itemAdd events to parcel infoUpdate delivery request responseUpdate order number descriptionAdd parcel id filter to /parcelsAdd message to errorMake contact name requiredAdd delivery partner parcel idsRemove order items' code and status |1.2| |2021-06-14|Šmolík, J.| Add a todo to specify client notification type after accepting the order. Let the partner choose to receive an email when successful delivery request is made. Remove `typeOfOrder` from delivery request.Add option to select delivery partner for pickupMake item weight in the order optionalMake origin contact email requiredAdd support to add sender's name when making delivery requestRemove landmark and code from addressAdd new error code or partners not eligible to create COD delivery requestsAdd support to filter destinations/origins by typeAdd support to send compartment size for order item, required for APM originMake `typeOfService` optional |1.1| |2021-06-09|Šmolík, J.|Initial version|1.0| # Setup Register your company through our support. We are going to need - Company name - List of Phone numbers for SMS OTP authentication of people who'll you want to have access to the Partner CMS - List of addresses for pickup points - where do we pickup your order for delivery You will get in return - `OAUTH_CLIENT_ID` - OAuth2 Client ID for authenticating with the Partner API. Keep it safe. Value may vary for each environment. - `OAUTH_CLIENT_SECRET` - OAuth2 Client Secret for authenticating with the Partner API. Keep it safe. Value may vary for each environment. - `API_URL` - Base URL for Partner API ## Environments Product offers multiple environments - Sandbox - For you to test the integration. Limited functionality. - Production - Connected to real end-users. Use with care. Environment setting summary: | Value \ Env | Sandbox | Production | |---|---|---| | `API_URL` | N/A | N/A | | `OAUTH_CLIENT_SECRET` | Contact Support | Contact Support | | `OAUTH_CLIENT_ID` | Contact Support | Contact Support | # API ## Authentication Authentication is based on OAuth2 standard, Client Credentials grant. Token endpoint `/auth-sessions`, see examples below. Client ID and Secret MUST be passed to you from BoxNow support in advance. In order to use the API, you MUST attach the access token to Authorization header as a Bearer token. ### Custom JWT claims You can find additional user information in custom claims under namespace key `https://boxnow.gr`. For example ```json { "iat": 1641980553, "exp": 1641984153, "https://boxnow.gr": { "permission": { "warehouseAsOrigin": true, "anyApmAsOrigin": true, "anyApmToSameApmDelivery": true, "anyApmToSameApmDeliveryWithoutConfirmation": true, "depotAsOrigin": true } } } ``` ## Listing available destinations You can skip this if you don't want to deliver your order to one of our APMs. Use `/destinations` to list available APM locations we can deliver the goods to. You will refer to these records by `id` when requesting delivery later on. ## What can influence `/destinations` endpoint response - Only APMs with `Box Now Ready` state are considered - APMs must be available for your required package size (see: '#/components/parameters/LocationRequiredSize') ## Requesting a delivery Create a delivery request to delivery your order to the client. Use `/delivery-requests` endpoint for this operation. Once a successful request delivery is made - (optional) we send you an email notifying about successful delivery request creation, if you choose to receive this email - you should fetch the PDF label for each of the parcel from `/parcels/{id}/label.pdf`, print it and stick it to the parcel/s - we send a courier to pick up the labeled parcel/s - we notify the client via email that we have accepted the order from you and its being delivered by us ## Modifying a delivery request After a delivery request is successfully made, you can alter some parts of it later on. Use `/delivery-requests/{id}` endpoint for these modifications. ## Checking on the deliveries You can list parcel related to your delivery requests via `/parcels` endpoint. ## Error codes ### Description of codes for `400 Bad Request` responses - `P400` - Invalid request data. Make sure are sending the request according to this documentation. - `P401` - Invalid request origin location reference. Make sure you are referencing a valid location ID from Origins endpoint or valid address. - `P402` - Invalid request destination location reference. Make sure you are referencing a valid location ID from Destinations endpoint or valid address. - `P403` - You are not allowed to use AnyAPM-SameAPM delivery. Contact support if you believe this is a mistake. - `P404` - Invalid import CSV. See error contents for additional info. - `P405` - Invalid phone number. Make sure you are sending the phone number in full international format, e.g. +30 xx x xxx xxxx. - `C404` - Invalid phone number. Make sure you are sending the phone number in full international format, e.g. +30 xx x xxx xxxx. - `P406` - Invalid compartment/parcel size. Make sure you are sending one of required sizes 1, 2 or 3. Size is required when sending from AnyAPM directly. - `P407` - Invalid country code. Make sure you are sending country code in ISO 3166-1 alpha-2 format, e.g. GR. - `P408` - Invalid amountToBeCollected amount. Make sure you are sending amount in the valid range of (0, 5000> - `P409` - Invalid delivery partner reference. Make sure you are referencing a valid delivery partner ID from Delivery partners endpoint. - `P410` - Order number conflict. You are trying to create a delivery request for order ID that has already been created. Choose another order id. - `P411` - You are not eligible to use Cash-on-delivery payment type. Use another payment type or contact our support. - `P412` - You are not allowed to create customer returns deliveries. Contact support if you believe this is a mistake. - `P413` - Invalid return location reference. Make sure you are referencing a valid location warehouse ID from Origins endpoint or valid address. - `P415` - You are not allowed to create delivery to home address. Contact support if you believe this is a mistake. - `P416` - You are not allowed to use COD payment for delivery to home address. Contact support if you believe this is a mistake. - `P417` - You are not allowed to use `q` parameter. It is forbidden for server partner accounts. - `P420` - Parcel not ready for cancel. You can cancel only new, undelivered, or parcels that are not returned or lost. Make sure parcel is in transit and try again. - `P421` - Invalid parcel weight. Make sure you are sending value between 0 and 10^6. - `P422` - Address not found. Try to call just with postal code and country. - `P423` - Nearby locker not found. - `P424` - Invalid region format. Please ensure the format includes a language code followed by a country code in ISO 3166-1 alpha-2 format, separated by a hyphen, e.g. el-GR, or region exists in context. - `P425` - Parcel not ready to declare a delivery partner return. Make sure parcel is not in any of the following states in order to declare a delivery partner return: 'canceled-return', 'lost', 'canceled', 'returned', 'expired-return'. - `P426` - Parcel not eligible to declare a delivery partner return. Parcel needs to use a delivery partner in order to declare a return. - `P430` - Parcel not ready for AnyAPM confirmation. Parcel is probably already confirmed or being delivered. Contact support if you believe this is a mistake. - `P440` - Ambiguous partner. Your account is linked to multiple partners and is unclear on whose behalf you want to perform this action. Send `X-PartnerID` header with ID of the partner you want to manage. You can get list of available Partner IDs from /entrusted-partners endpoint. - `P441` - Invalid X-PartnerID header. Value you provided for X-PartnerID header is either invalid or references partner you don't have access to. Make sure you are sending ID from /entrusted-partners endpoint. - `P442` - Invalid limit query parameter. The query limit for this API has been exceeded. Please reduce the size of your query (max allowed is 100). - `P460` - Parcel not eligible for external destination delivery. Delivery request destination.deliveryPartnerId is not set. - `P461` - Invalid street. Make sure the length is not more than 100 characters. - `P462` - Invalid city. Make sure the length is not more than 50 characters. - `P464` - Invalid postal code. Make sure the length is not more than 20 characters. ### Description of codes for `403 Forbidden` responses - `X403` - Account disabled. Your account had been disabled, contact support. - `P414` - Unauthorized parcel access. You are trying to access information to parcel/s that don't belong to you. Make sure you are requesting information for parcels you have access to. - `P465` - Partner doesn't have access for checking delivery addresses. - `P466` - You are not allowed to create a delivery request because your account has an overdue flag and you are not a vip partner. ### Description of codes for `503 Service Unavailable` responses | Code | Description | |---|---| | `P600` | Locker bridge communication failed. There has been some error when communicating with the locker bridge. Try again later or contact support. | | `P610` | Geolocation API failed. There has been some error when translating address to gps coordinates. Try again later or contact support. |
inda-hr/php_sdk
1253 Downloads
# Introduction **INDA (INtelligent Data Analysis)** is an [Intervieweb](https://www.intervieweb.it/hrm/) AI solution provided as a RESTful API. The INDA pricing model is *credits-based*, which means that a certain number of credits is associated to each API request. Hence, users have to purchase a certain amount of credits (established according to their needs) which will be reduced at each API call. INDA accepts and processes a user's request only if their credits quota is grater than - or, at least, equal to - the number of credits required by that request. To obtain further details on the pricing, please visit our [site](https://inda.ai) or contact us. INDA HR embraces a wide range of functionalities to manage the main elements of a recruitment process: + [**candidate**](https://api.inda.ai/hr/docs/v2/#tag/Resume-Management) (hereafter also referred to as **resume** or **applicant**), or rather a person looking for a job; + [**job advertisement**](https://api.inda.ai/hr/docs/v2/#tag/JobAd-Management) (hereafter also referred to as **job ad**), which is a document that collects all the main information and details about a job vacancy; + [**application**](https://api.inda.ai/hr/docs/v2/#tag/Application-Management), that binds candidates to job ads; it is generated whenever a candidate applies for a job. Each of them has a specific set of methods that grants users the ability to create, read, update and delete the relative documents, plus some special features based on AI approaches (such as *document parsing* or *semantic search*). They can be explored in their respective sections. Data about the listed document types can be enriched by connecting them to other INDA supported entities, such as [**companies**](https://api.inda.ai/hr/docs/v2/#tag/Company-Management) and [**universities**](https://api.inda.ai/hr/docs/v2/#tag/Universities), so that recruiters may get a better and more detailed idea on the candidates' experiences and acquired skills. All the functionalities mentioned above are meant to help recruiters during the talent acquisition process, by exploiting the power of AI systems. Among the advantages a recruiter has by using this kind of systems, tackling the bias problem is surely one of the most relevant. Bias in recruitment is a serious issue that affect both recruiters and candidates, since it may cause wrong hiring decisions. As we care a lot about this problem, we are constantly working on reduce the bias in original data so that INDA results may be as fair as possible. As of now, in order to tackle the bias issue, INDA automatically ignores specific fields (such as name, gender, age and nationality) during the initial processing of each candidate data. Furthermore, we decided to let users collect data of various types, including personal or sensitive details, but we do not allow their usage if it is different from statistical purposes; our aim is to discourage recruiters from focusing on candidates' personal information, and to put their attention on the candidate's skills and abilities. We want to help recruiters to prevent any kind of bias while searching for the most valuable candidates they really need. The following documentation is addressed both to developers, in order to provide all technical details for INDA integration, and to managers, to guide them in the exploration of the implementation possibilities. The host of the API is [https://api.inda.ai/hr/v2/](https://api.inda.ai/hr/v2/). We recommend to check the API version and build (displayed near the documentation title). You can contact us at [email protected] in case of problems, suggestions, or particular needs. The search panel on the left can be used to navigate through the documentation and provides an overview of the API structure. On the right, you can find (*i*) the url of the method, (*ii*) an example of request body (if present), and (*iii*) an example of response for each response code. Finally, in the central section of each API method, you can find (*i*) a general description of the purpose of the method, (*ii*) details on parameters and request body schema (if present), and (*iii*) details on response schema, error models, and error codes.
eciboadaptech/finapi-webform
362 Downloads
The following pages give you some general information on how to use our APIs.The actual API services documentation then follows further below. You can use the menu to jump between API sections.This page has a built-in HTTP(S) client, so you can test the services directly from within this page, by filling in the request parameters and/or body in the respective services, and then hitting the TRY button. Note that you need to be authorized to make a successful API call. To authorize, refer to the 'Authorization' section of Access, or in case you already have a valid user token, just use the QUICK AUTH on the left.Please also remember that all user management functions should be looked up in Access.You should also check out the Web Form 2.0 Public Documentation as well as Access Public Documentation for more information. If you need any help with the API, contact [email protected] informationRequest IDsWith any API call, you can pass a request ID via a header with name "X-Request-Id". The request ID can be an arbitrary string with up to 255 characters. Passing a longer string will result in an error.If you don't pass a request ID for a call, finAPI will generate a random ID internally.The request ID is always returned back in the response of a service, as a header with name "X-Request-Id".We highly recommend to always pass a (preferably unique) request ID, and include it into your client application logs whenever you make a request or receive a response(especially in the case of an error response). finAPI is also logging request IDs on its end. Having a request ID can help the finAPI support team to work more efficiently and solve tickets faster.Type CoercionIn order to ease the integration for some languages, which do not natively support high precision number representations, Web Form 2.0 API supports relax type binding for the openAPI type number, which is used for money amount fields. If you use one of those languages, to avoid precision errors that can appear from float values, you can pass the amount as a string.FAQIs there a finAPI SDK?Currently we do not offer a native SDK, but there is the option to generate an SDKfor almost any target language via OpenAPI. Use the 'Download SDK' button on this page for SDK generation.Why do I need to keep authorizing when calling services on this page?This page is a "one-page-app". Reloading the page resets the OAuth authorization context. There is generally no need to reload the page, so just don't do it and your authorization will persist.
adaptech/finapi-webform
498 Downloads
The following pages give you some general information on how to use our APIs.The actual API services documentation then follows further below. You can use the menu to jump between API sections.This page has a built-in HTTP(S) client, so you can test the services directly from within this page, by filling in the request parameters and/or body in the respective services, and then hitting the TRY button. Note that you need to be authorized to make a successful API call. To authorize, refer to the 'Authorization' section of Access, or in case you already have a valid user token, just use the QUICK AUTH on the left.Please also remember that all user management functions should be looked up in Access.You should also check out the Web Form 2.0 Public Documentation as well as Access Public Documentation for more information. If you need any help with the API, contact [email protected].
nathan-emanuel/congressus
4 Downloads
# Introduction The Congressus API allows you to interact with your Congressus administration. The API is RESTful and uses JSON to transport information. This documentation aims to get you started with your first requests. Make sure to read this introduction completely to know all aspects of our API. ## REST basics A REST API describes the resources you can access in a clearly defined path structure. This documentation contains a reference for each resource in the API. Before you can use these resources, you need to know the basics of accessing the Congressus REST API. **Paths and versioning** The Congressus API resides on the following paths: https://api.congressus.nl/ `version` / `resource_path` ? `query_params` - The `version` part of the path indicates the version of the API you want to use. At this moment version v30 is the current version. By pointing to a specific version, we can make sure you always can expect equal behaviour from our API. - The `resource_path` part indicates the path of the resource you want to access. Specific paths to resources can be found in the API documentation. Examples of resource paths are: /members to retrieve all members or /member/ `obj_id` /statuses to create new member status for a member. - The `query_params` contains all filtering, ordering and pagination information. ## Authentication The current authentication flow present at Congressus API is by the use of the Bearer Token suggested by OAuth 2.0. To interact with the Congressus API, you must authenticate by supplying the header `Authorization` with the value `Bearer {access_token}`. **How do I get an API key?** You can create new apps and API keys in Congressus Manager through [this link](https://manager.congressus.nl/settings/integrations/apps). ## Requests There are different approaches for making requests to our API. The command line tool [curl](https://curl.se/) is easy and fast for testing our API. When you want to integrate the API into your own software, you can choose to use a general purpose REST library or to [create your own API client library](https://github.com/OpenAPITools/openapi-generator) based on our OpenAPI specs. ## Responses Congressus uses conventional HTTP response codes to indicate success or failure of an API request. In general, codes in the 2xx range indicate success, codes in the 4xx range indicate an error that resulted from the provided information (e.g. a required parameter was missing or input data was invalid), and codes in the 5xx range indicate an error with the Congressus API. ## Pagination Endpoints returning a list of entities, are paginated to prevent large responses. To control the pagination, you can use the `page` and `page_size` parameters. page determines which page to return (default: 1), page_size controls the amount of entities to return (default: 25, maximum: 100). Each paginated response contains the following information: - `has_prev` bool - `prev_num` int with previous page number - `has next` bool - `next_num` int with next page number - `data` list with results on current page - `total` int with total number of results ## Filtering Most list endpoints support filtering to get a subset of the available information. Filtering is done using the query. For some filter attributes, filtering for multiple options is supported by adding the `=` multiple times. E.g. `category_id=1&category_id=2`. ### Filtering on period For some resources, a period filter is available. This filter is used to get a subset of the available information within a certain period. The period filter is used by adding the `period_filter` query parameter to the endpoint. **Absolute periods** Absolute periods are defined by exact dates. The format is `YYYY(MM(DD))`. E.g. `2024` or `202402` or `20240227`. A different end date can be given by adding `..` and the end date. E.g. `202402..202403` for the period February 2024 to March 2024. **Relative periods** Relative periods are defined by a period in the past or future. Multiple formats are supported: - `today` - today's date - `yesterday` - yesterday's date - `tomorrow` - tomorrow's date - `(last/this/next)_(day/month/quarter/half_year/year)` - e.g. `last_month` or `next_year` or `this_quarter` - `last_x_days` - e.g. `last_7_days` or `last_14_days` ## Ordering Most list endpoints support ordering on one or more attributes. The order is defined using the `order=` parameter in the query part of the endpoint. Multiple columns can be used for ordering, delimited by a comma. E.g. `order=lastname,initials,first_name`. Each attribute used in the order parameter could be extended with a sort property `:`. E.g. `order=lastname:desc`. The following properties are supported throughout our API: - ```:asc``` ASC NULLS LAST (default) [comment]: (- ```:asc_nulls_last``` ASC NULLS LAST) [comment]: (- ```:asc_nulls_first``` ASC NULLS FIRST) - ```:desc``` DESC NULLS FIRST [comment]: (- ```:desc_nulls_last``` DESC NULLS LAST) [comment]: (- ```:desc_nulls_first``` DESC NULLS FIRST) ## Searching and location filtering For some resources a dedicated /search endpoint is available, which is optimized for searching large datasets. We use an Elasticsearch database to deliver these results. The schema for these resources is often a concise version of the schema used for regular endpoints, but always contains the primary key (obj_id). If you need the full schema for a resource found through /search, you can perform an additional call to the GET / endpoint. In most cases, searching has the following query parameters: - `term` - generic term used for the search - `city` or `zip` - a city name or postal code (only Dutch postal codes allowed) - `distance` - distance from the center of the given city or zip (default *5km*) Results from /search endpoints do not support custom ordering, but are ordered based on relevance (i.e. *score* for term queries and *distance* for all location bound search queries). ## Rate limiting Usage of the Congressus API is unlimited within the plan and permissions of the account you are using. To prevent fraud and abuse, requests to the API are throttled. You can request the API 60 times each minute and 1000 times per hour. The API will respond with a **429 Too many requests** response. This response contains the following fields in the headers: - `X-RateLimit-Limit` The total number of requests allowed for the active window - `X-RateLimit-Remaining` The number of requests remaining in the active window. - `X-RateLimit-Reset` UTC seconds since epoch when the window will be reset. - `Retry-After` Seconds to retry after when the Rate Limit will be reset. ## Cross-Origin Resource Sharing This API features Cross-Origin Resource Sharing (CORS) implemented in compliance with W3C spec. This allows cross-domain communication from the browser. All responses have a wildcard same-origin, which allows to use our API from any domain or server. # Webhooks Information in a Congressus administration is constantly changing. If you want to perform actions based on these changes, webhooks help you to achieve this. Instead of querying the API at a certain interval, Congressus will notify you about changes to information in the administration. ## Usage Webhooks are useful in a broad range of situations. When the state of an resource changes, Congressus will perform a HTTP request to the URL you provide. Based on the payload of the request, you can determine which action you need to perform. How it works: - You need a URL that Congressus can call to deliver the payload. The Congressus servers must be able to access this URL. - You can add HTTP basic authentication or other token authentication in the URL, as long as the URL stays valid. - Your URL always needs to respond with a 200 HTTP status. Upon registration this is checked. - When your URL responds with another HTTP status code, Congressus will retry to deliver the call 10 times. The time interval between retries is gradually extended. - After each call, Congressus will store the last HTTP status code and HTTP body. Using the webhooks API, you can retrieve this information for debugging purposes. - You can register as many webhooks as required in an administration. Registration is done by sending a POST request to the webhooks API. > **We strongly recommend that you use a secure HTTPS endpoint for receiving payload from Congressus. If you use > unencrypted HTTP, anyone on the network may be able to listen in on sensitive information like members and invoices.** ## Webhook events Each webhook subscribes to an event. When an event occurs, Congressus will call the webhook using an HTTP request to the provided URL. The following events are available: **Members** - member - All member related events - member_added - Member added to the administration - member_updated - Existing Member is updated - member_deleted - Member is removed from the administration - member_birthday - Triggered once on the birthday of a member **Events** - event - All event related events - event_added - Event added - event_updated - Event updated - event_deleted - Event deleted from the administration **Event participations** - event_participation - All event participation related events - event_participation_added - Event participation added - event_participation_updated - Event participation updated - event_participation_deleted - Event participation deleted from the administration **Form entries** - form_entry - All form entry related events - form_entry_added - Form entry added - form_entry_updated - Form entry updated - form_entry_deleted - Form entry deleted from the administration **Sale invoices** - sale_invoices - All sale invoice related events - sale_invoices_added - Sale invoice added - sale_invoices_updated - Sale invoice updated - sale_invoices_deleted - Sale invoice deleted from the administration ## Payload Each webhook call has a payload based on the category of the event that triggered the webhook. E.g. events in the category **Members** get a payload based on the schema for Members, filled with the data for the resource that triggered the webhook. Each webhook call contains the following information: - `webhook_id`- The id of the webhook that triggered the call - `webhook_event` - The category of events for the webhook - `webhook_event_trigger` - The trigger that caused the webhook call - `created` - Date and time at which the webhook was triggered - `data` - List which contains the payload(s) in the form of the complete resource that triggered the event # Changelog This is version 3.0 of the Congressus API. In this chapter we describe all changes in v3.0. ## 2025-09-30 Endpoint for Filters added - A new endpoint `/filters` is added to retrieve available filters for Members, Events and Organisations. ## 2025-08-13 Filter on folder_id added to Storage - The `folder_id` parameter is added to the `storage` endpoint. This allows you to filter storage resources by folder. ## 2025-07-11 Website added to Magic link endpoint - The `website_id` parameter is added to the `magic-links` endpoint. This allows you to create magic links for a specific website. ## 2025-05-24 Organisation resource improvements - `Organisation` resources now also have the 'published' attribute. - `Organisation` resources now also include custom field data in the `custom_field_data` attribute. - Custom fields are defined per organisation category, so the custom fields available for an organisation depend on the category of the organisation. - `Organisation category` resources now also include metadata for the custom fields available for that category in the `custom_fields` attribute. ## 2025-05-04 Magic links added - `Magic links` are added to the API. These links can be used to authenticate a website visitor without the need for a password. ## 2024-11-25 Form and Form entry resources added - `Form` and `Form entry` resources are added to the API. - `Form` resources can be created and updated through the API. It is currently not possible to delete a form or manage fields and fieldsets. - `forms//entries` endpoint is available to retrieve form entries. - `forms//fields` endpoint is available to retrieve form fields. ## 2024-04-23 Custom fields for Members available in PUT/POST requests - Custom fields for Members can now be added or updated through the API. The custom fields are available in the `custom_field_data` attribute of the Member resource. - The old `custom_fields` attribute is deprecated and will be removed in a future version. - The `members/custom-fields` resource shows the available custom fields for Members, including meta information. ## 2024-02-27 Action endpoints for EventParticipation added - `EventParticipation` status can now be changed through the API, including fines when unsubscribing or declining a participation. - API upgrade guide from v20 to v30 removed from docs, as it is no longer relevant. The v20 API is unavailable since mid 2023. ## 2022-12-09 Event ticket types endpoints - `EventTicketType` resources can now be created, updated and deleted through the API - The context is now applied at row level according to the status of the Member for the `v30/members` endpoint ## 2022-06-28 Events updated, MembershipStatus resources added - `Event` resources are now fully operational, including the possibility to add participants / sell tickets through the API. - `MembershipStatus` is now available for Member resources. ## 2022-06-22 Minor updates and fixes - Feat: /members can be filtered against multiples statuses with the status_id query parameter (i.e: /members?status_id=2&status_id=3). - Feat: the News model now contains a list of websites where the news item is published on - Fix: add the default website to POST /news on create - Fix: sale_invoice_id is now honored when given by the creation of a sale invoice /sale-invoices//send ## 2022-06-03 Minor updates and fixes - Feat: Additional filtering for /sale-invoices endpoint added (invoice_type 'debit', 'is_credited' and 'is_not_credited'). - Feat: Renamed /groups/folders endpoints to /group-folders for more consistency. Deprecated old endpoints. - Feat: Added member status resources through /member-statuses. - Feat: Added profile_picture and formal_picture to Member resources. - Fix: we incorrectly used 'per_page' as parameter in the Pagination-section of these docs. The correct parameter is **'page_size'**. - Fix: all non-recursive endpoints for Group folders and Product folders returned children, this is resolved. ## 2022-05-03 Member validation through context added - Added extended validation options for Member-resources by setting a `context` parameter. This context ensures validation according to the field settings as set in Congressus Manager for the member status. - Description for Context validation added to the Member-resources. - Introduction on Context validation added to the [upgrade guide](#section/Upgrading-from-v20-to-v30) ## 2022-04-22 Upgrade guide from v20 to v30 added - First version for the [upgrade guide](#section/Upgrading-from-v20-to-v30) added ## 2022-03-23 Additional filtering for Group and Organisation resources - `Group` and `Group membership` resources can use a filter on member_id - `Organisation` and `Organisation membership` resources can use a filter on member_id ## 2022-03-21 Group and GroupFolder resources added - Group, GroupFolder and GroupMembership resources are added to the API. - `Group folders` are added and use a tree-like structure. - `Organisation` resources have create, update and delete views added. - `Organisation membership` resources are added - Fix: SDD mandates returned and empty list for Member resources. ## 2021-10-14 Organisation resources added - Both Organisation and Organisation category resources are added to the API. ## 2021-10-02 Additional filters added for Event participations - `Event participations` have additional filter functionality ## 2021-09-22 Added resources for Product folders and Sale invoice workflows - `Product folders` are added, using a tree-like structure. - `Sale invoice workflows` are added as resource. Read-only for this moment. - Updated descriptions for Sale invoice attributes. ## 2021-08-09 additional filters for events and products - Events can now be filtered on published true/false - Products can now be filtered on published and folder_id. More than one folder_id can be given by supplying it more than once as query param, e.g. `products?folder_id=123&folder_id=456` ## 2021-08-04 custom fields and descriptions added, publication options added to events and blogs - The retrieve member resource now also shows the custom field information for a member - Many attributes have an additional description added - Publication attributes are added to Event and Blog resources ## 2021-06-09 website related resources added - Website and Webpage resources added (list and get only) - News resources added - Default order is added for Websites, Webpages, Events and News list endpoints. You can overwrite the default order with the `order` query param - Improved descriptions for several resources, removed some typo's in the documentation ## 2021-04-06 initial release - This initial release contains a minor set of resources to work with.
kruegge82/jumingo
30 Downloads
## About With the JUMINGO shipping API you can import your shipments into your JUMINGO account from any source. The functionalities of the API include creating and updating shipment drafts, fetching suitable shipment rates for a given shipment and purchasing shipping labels. Furthermore, you can retrieve tracking data and fetch shipping labels and documents for all your purchased shipments. The current main purpose of the API is to connect your account to e-commerce systems and marketplaces. ## General The API is organized around REST. Our API has resource-oriented URLs and uses HTTP response codes to indicate API errors. We use built-in HTTP features, like HTTP authentication and HTTP verbs. All API requests must be made over HTTPS. Calls made over plain HTTP will return errors. Request data is passed to the API as JSON objects and JSON is also returned by all API responses, including errors, although our API SDKs convert requests and responses to appropriate language-specific objects. Best practice usage of the API and business logic is described in the supplementary [integration guide](https://www.jumingo.com/cms/JUMiNGO_API-integration-guide.pdf "JUMiNGO API Integration Guide"). ## Base URL The base URL for all calls is: `https://api.jumingo.com/v1` ## HTTP status codes HTTP response codes in the `2xx` range indicate success. Codes in the `4xx` range indicate an error on the client side (e.g. a required parameter is missing). Codes in the `5xx` range indicate an error with our servers. Each error should provide an error code and an error message with further information. HTTP status code | Description ---------------- | ----------- 200, 201, 204 - OK | Everything worked. 400 - Bad Request | The request was unacceptable, often due to missing a required parameter or a validation error. 401 - Unauthorized | No valid API key has been provided or your account is disabled. 403 - Forbidden | You are not allowed to talk to this endpoint. This can either be due to a wrong authentication or when you’re trying to reach an endpoint that your account isn’t allowed to access. 404 - Not Found | The requested resource doesn’t exist. 500, 502, 503, 504 - Server Errors | Something went wrong on our side. Please contact our support if you receive this error. ## Authentication All API requests requires authentication. Unauthorized calls will return errors. Authenticate by including your API key in the `X-AUTH-TOKEN` HTTP header of each API call, e.g.: `X-AUTH-TOKEN: INSERT_YOUR_API_KEY` You can find your API key in your JUMINGO user account. You can get access to the JUMiNGO customer API by enabling it in your [user account](https://www.jumingo.com/de-de/users/connections/create/8). After activation, you will get your personal API key. ## Date/Time Format All values of type `string ` are defined in a specific [RFC 3339](https://tools.ietf.org/html/rfc3339#section-5.6) format and must also be formatted accordingly for requests. The format is: YYYY-MM-DD hh:mm:ss Example: 2018-07-26 15:54:13 All dates and times are specified in UTC (Coordinated Universal Time).
compucie/congressus
141 Downloads
# Introduction The Congressus API allows you to interact with your Congressus administration. The API is RESTful and uses JSON to transport information. This documentation aims to get you started with your first requests. Make sure to read this introduction completely to know all aspects of our API. ## REST basics A REST API describes the resources you can access in a clearly defined path structure. This documentation contains a reference for each resource in the API. Before you can use these resources, you need to know the basics of accessing the Congressus REST API. **Paths and versioning** The Congressus API resides on the following paths: https://api.congressus.nl/ `version` / `resource_path` ? `query_params` - The `version` part of the path indicates the version of the API you want to use. At this moment version v30 is the current version. By pointing to a specific version, we can make sure you always can expect equal behaviour from our API. - The `resource_path` part indicates the path of the resource you want to access. Specific paths to resources can be found in the API documentation. Examples of resource paths are: /members to retrieve all members or /member/ `obj_id` /statuses to create new member status for a member. - The `query_params` contains all filtering, ordering and pagination information. ## Authentication The current authentication flow present at Congressus API is by the use of the Bearer Token suggested by OAuth 2.0. To interact with the Congressus API, you must authenticate by supplying the header `Authorization` with the value `Bearer {access_token}`. **How do I get an API key?** You can create new apps and API keys in Congressus Manager through [this link](https://manager.congressus.nl/settings/integrations/apps). ## Requests There are different approaches for making requests to our API. The command line tool [curl](https://curl.se/) is easy and fast for testing our API. When you want to integrate the API into your own software, you can choose to use a general purpose REST library or to [create your own API client library](https://github.com/OpenAPITools/openapi-generator) based on our OpenAPI specs. ## Responses Congressus uses conventional HTTP response codes to indicate success or failure of an API request. In general, codes in the 2xx range indicate success, codes in the 4xx range indicate an error that resulted from the provided information (e.g. a required parameter was missing or input data was invalid), and codes in the 5xx range indicate an error with the Congressus API. ## Pagination Endpoints returning a list of entities, are paginated to prevent large responses. To control the pagination, you can use the `page` and `page_size` parameters. page determines which page to return (default: 1), page_size controls the amount of entities to return (default: 25, maximum: 100). Each paginated response contains the following information: - `has_prev` bool - `prev_num` int with previous page number - `has next` bool - `next_num` int with next page number - `data` list with results on current page - `total` int with total number of results ## Filtering Most list endpoints support filtering to get a subset of the available information. Filtering is done using the query. For some filter attributes, filtering for multiple options is supported by adding the `=` multiple times. E.g. `category_id=1&category_id=2`. ### Filtering on period For some resources, a period filter is available. This filter is used to get a subset of the available information within a certain period. The period filter is used by adding the `period_filter` query parameter to the endpoint. **Absolute periods** Absolute periods are defined by exact dates. The format is `YYYY(MM(DD))`. E.g. `2024` or `202402` or `20240227`. A different end date can be given by adding `..` and the end date. E.g. `202402..202403` for the period February 2024 to March 2024. **Relative periods** Relative periods are defined by a period in the past or future. Multiple formats are supported: - `today` - today's date - `yesterday` - yesterday's date - `tomorrow` - tomorrow's date - `(last/this/next)_(day/month/quarter/half_year/year)` - e.g. `last_month` or `next_year` or `this_quarter` - `last_x_days` - e.g. `last_7_days` or `last_14_days` ## Ordering Most list endpoints support ordering on one or more attributes. The order is defined using the `order=` parameter in the query part of the endpoint. Multiple columns can be used for ordering, delimited by a comma. E.g. `order=lastname,initials,first_name`. Each attribute used in the order parameter could be extended with a sort property `:`. E.g. `order=lastname:desc`. The following properties are supported throughout our API: - ```:asc``` ASC NULLS LAST (default) [comment]: (- ```:asc_nulls_last``` ASC NULLS LAST) [comment]: (- ```:asc_nulls_first``` ASC NULLS FIRST) - ```:desc``` DESC NULLS FIRST [comment]: (- ```:desc_nulls_last``` DESC NULLS LAST) [comment]: (- ```:desc_nulls_first``` DESC NULLS FIRST) ## Searching and location filtering For some resources a dedicated /search endpoint is available, which is optimized for searching large datasets. We use an Elasticsearch database to deliver these results. The schema for these resources is often a concise version of the schema used for regular endpoints, but always contains the primary key (obj_id). If you need the full schema for a resource found through /search, you can perform an additional call to the GET / endpoint. In most cases, searching has the following query parameters: - `term` - generic term used for the search - `city` or `zip` - a city name or postal code (only Dutch postal codes allowed) - `distance` - distance from the center of the given city or zip (default *5km*) Results from /search endpoints do not support custom ordering, but are ordered based on relevance (i.e. *score* for term queries and *distance* for all location bound search queries). ## Rate limiting Usage of the Congressus API is unlimited within the plan and permissions of the account you are using. To prevent fraud and abuse, requests to the API are throttled. You can request the API 60 times each minute and 1000 times per hour. The API will respond with a **429 Too many requests** response. This response contains the following fields in the headers: - `X-RateLimit-Limit` The total number of requests allowed for the active window - `X-RateLimit-Remaining` The number of requests remaining in the active window. - `X-RateLimit-Reset` UTC seconds since epoch when the window will be reset. - `Retry-After` Seconds to retry after when the Rate Limit will be reset. ## Cross-Origin Resource Sharing This API features Cross-Origin Resource Sharing (CORS) implemented in compliance with W3C spec. This allows cross-domain communication from the browser. All responses have a wildcard same-origin, which allows to use our API from any domain or server. # Webhooks Information in a Congressus administration is constantly changing. If you want to perform actions based on these changes, webhooks help you to achieve this. Instead of querying the API at a certain interval, Congressus will notify you about changes to information in the administration. ## Usage Webhooks are useful in a broad range of situations. When the state of an resource changes, Congressus will perform a HTTP request to the URL you provide. Based on the payload of the request, you can determine which action you need to perform. How it works: - You need a URL that Congressus can call to deliver the payload. The Congressus servers must be able to access this URL. - You can add HTTP basic authentication or other token authentication in the URL, as long as the URL stays valid. - Your URL always needs to respond with a 200 HTTP status. Upon registration this is checked. - When your URL responds with another HTTP status code, Congressus will retry to deliver the call 10 times. The time interval between retries is gradually extended. - After each call, Congressus will store the last HTTP status code and HTTP body. Using the webhooks API, you can retrieve this information for debugging purposes. - You can register as many webhooks as required in an administration. Registration is done by sending a POST request to the webhooks API. > **We strongly recommend that you use a secure HTTPS endpoint for receiving payload from Congressus. If you use > unencrypted HTTP, anyone on the network may be able to listen in on sensitive information like members and invoices.** ## Webhook events Each webhook subscribes to an event. When an event occurs, Congressus will call the webhook using an HTTP request to the provided URL. The following events are available: **Members** - member - All member related events - member_added - Member added to the administration - member_updated - Existing Member is updated - member_deleted - Member is removed from the administration - member_birthday - Triggered once on the birthday of a member **Events** - event - All event related events - event_added - Event added - event_updated - Event updated - event_deleted - Event deleted from the administration **Event participations** - event_participation - All event participation related events - event_participation_added - Event participation added - event_participation_updated - Event participation updated - event_participation_deleted - Event participation deleted from the administration **Form entries** - form_entry - All form entry related events - form_entry_added - Form entry added - form_entry_updated - Form entry updated - form_entry_deleted - Form entry deleted from the administration **Sale invoices** - sale_invoices - All sale invoice related events - sale_invoices_added - Sale invoice added - sale_invoices_updated - Sale invoice updated - sale_invoices_deleted - Sale invoice deleted from the administration ## Payload Each webhook call has a payload based on the category of the event that triggered the webhook. E.g. events in the category **Members** get a payload based on the schema for Members, filled with the data for the resource that triggered the webhook. Each webhook call contains the following information: - `webhook_id`- The id of the webhook that triggered the call - `webhook_event` - The category of events for the webhook - `webhook_event_trigger` - The trigger that caused the webhook call - `created` - Date and time at which the webhook was triggered - `data` - List which contains the payload(s) in the form of the complete resource that triggered the event # Changelog This is version 3.0 of the Congressus API. In this chapter we describe all changes in v3.0. ## 2025-09-30 Endpoint for Filters added - A new endpoint `/filters` is added to retrieve available filters for Members, Events and Organisations. ## 2025-08-13 Filter on folder_id added to Storage - The `folder_id` parameter is added to the `storage` endpoint. This allows you to filter storage resources by folder. ## 2025-07-11 Website added to Magic link endpoint - The `website_id` parameter is added to the `magic-links` endpoint. This allows you to create magic links for a specific website. ## 2025-05-24 Organisation resource improvements - `Organisation` resources now also have the 'published' attribute. - `Organisation` resources now also include custom field data in the `custom_field_data` attribute. - Custom fields are defined per organisation category, so the custom fields available for an organisation depend on the category of the organisation. - `Organisation category` resources now also include metadata for the custom fields available for that category in the `custom_fields` attribute. ## 2025-05-04 Magic links added - `Magic links` are added to the API. These links can be used to authenticate a website visitor without the need for a password. ## 2024-11-25 Form and Form entry resources added - `Form` and `Form entry` resources are added to the API. - `Form` resources can be created and updated through the API. It is currently not possible to delete a form or manage fields and fieldsets. - `forms//entries` endpoint is available to retrieve form entries. - `forms//fields` endpoint is available to retrieve form fields. ## 2024-04-23 Custom fields for Members available in PUT/POST requests - Custom fields for Members can now be added or updated through the API. The custom fields are available in the `custom_field_data` attribute of the Member resource. - The old `custom_fields` attribute is deprecated and will be removed in a future version. - The `members/custom-fields` resource shows the available custom fields for Members, including meta information. ## 2024-02-27 Action endpoints for EventParticipation added - `EventParticipation` status can now be changed through the API, including fines when unsubscribing or declining a participation. - API upgrade guide from v20 to v30 removed from docs, as it is no longer relevant. The v20 API is unavailable since mid 2023. ## 2022-12-09 Event ticket types endpoints - `EventTicketType` resources can now be created, updated and deleted through the API - The context is now applied at row level according to the status of the Member for the `v30/members` endpoint ## 2022-06-28 Events updated, MembershipStatus resources added - `Event` resources are now fully operational, including the possibility to add participants / sell tickets through the API. - `MembershipStatus` is now available for Member resources. ## 2022-06-22 Minor updates and fixes - Feat: /members can be filtered against multiples statuses with the status_id query parameter (i.e: /members?status_id=2&status_id=3). - Feat: the News model now contains a list of websites where the news item is published on - Fix: add the default website to POST /news on create - Fix: sale_invoice_id is now honored when given by the creation of a sale invoice /sale-invoices//send ## 2022-06-03 Minor updates and fixes - Feat: Additional filtering for /sale-invoices endpoint added (invoice_type 'debit', 'is_credited' and 'is_not_credited'). - Feat: Renamed /groups/folders endpoints to /group-folders for more consistency. Deprecated old endpoints. - Feat: Added member status resources through /member-statuses. - Feat: Added profile_picture and formal_picture to Member resources. - Fix: we incorrectly used 'per_page' as parameter in the Pagination-section of these docs. The correct parameter is **'page_size'**. - Fix: all non-recursive endpoints for Group folders and Product folders returned children, this is resolved. ## 2022-05-03 Member validation through context added - Added extended validation options for Member-resources by setting a `context` parameter. This context ensures validation according to the field settings as set in Congressus Manager for the member status. - Description for Context validation added to the Member-resources. - Introduction on Context validation added to the [upgrade guide](#section/Upgrading-from-v20-to-v30) ## 2022-04-22 Upgrade guide from v20 to v30 added - First version for the [upgrade guide](#section/Upgrading-from-v20-to-v30) added ## 2022-03-23 Additional filtering for Group and Organisation resources - `Group` and `Group membership` resources can use a filter on member_id - `Organisation` and `Organisation membership` resources can use a filter on member_id ## 2022-03-21 Group and GroupFolder resources added - Group, GroupFolder and GroupMembership resources are added to the API. - `Group folders` are added and use a tree-like structure. - `Organisation` resources have create, update and delete views added. - `Organisation membership` resources are added - Fix: SDD mandates returned and empty list for Member resources. ## 2021-10-14 Organisation resources added - Both Organisation and Organisation category resources are added to the API. ## 2021-10-02 Additional filters added for Event participations - `Event participations` have additional filter functionality ## 2021-09-22 Added resources for Product folders and Sale invoice workflows - `Product folders` are added, using a tree-like structure. - `Sale invoice workflows` are added as resource. Read-only for this moment. - Updated descriptions for Sale invoice attributes. ## 2021-08-09 additional filters for events and products - Events can now be filtered on published true/false - Products can now be filtered on published and folder_id. More than one folder_id can be given by supplying it more than once as query param, e.g. `products?folder_id=123&folder_id=456` ## 2021-08-04 custom fields and descriptions added, publication options added to events and blogs - The retrieve member resource now also shows the custom field information for a member - Many attributes have an additional description added - Publication attributes are added to Event and Blog resources ## 2021-06-09 website related resources added - Website and Webpage resources added (list and get only) - News resources added - Default order is added for Websites, Webpages, Events and News list endpoints. You can overwrite the default order with the `order` query param - Improved descriptions for several resources, removed some typo's in the documentation ## 2021-04-06 initial release - This initial release contains a minor set of resources to work with.
jfbauer/openai
11 Downloads
This package gives you access to all the API necessary functionalities from OpenAI.
texhub/openai
1 Downloads
Full-featured OpenAI SDK for any PHP framework with first-class Laravel support: chat, tools/function-calling, vision, assistants (v2), files, images, audio, embeddings, models and usage analytics.
marlemiesz/gpt-sdk
25 Downloads
Effortlessly integrate with OpenAI GPT using our PHP library. User-friendly functions and classes simplify complex tasks. Ideal for PHP developers of all levels. Streamline integration with OpenAI GPT.
ezmaxinc/ezmax-sdk-php
213 Downloads
This API expose all the functionnalities for the eZmax and eZsign applications.