Libraries tagged by developer portal
apigee/devportal-kickstart-project
22669 Downloads
Composer project template for the Apigee Developer Portal Drupal distribution.
apigee/apigee_devportal_kickstart
99213 Downloads
A fast demo and starting point for Apigee Developer Portals.
keboola/developer-portal-php-client
44538 Downloads
PHP Client for Keboola Developer Portal
vitexsoftware/rbczpremiumapi
203 Downloads
##### API Overview - Accounts list and balance - Transaction overview (also for saving accounts) - Payments import - Statement list and download - FX rates ##### Authentication Before making a call to Premium API, you need to register your app at our _Developer portal_. This is where you get the **ClientID** that your application must send in the request as `X-IBM-Client-Id`. This is the key that grants your app access to the API. However, this may not be enough. Your application needs to use mTLS to call most operations here. Thus, you not only need _https_ but also a client certificate issued by us. The exception is two operations for FX rates that are accessible also without a client certificate. Each bank client/user can issue several certificates. Each certificate can permit different sets of operations (http methods) on different bank accounts. All this must be configured in Internet Banking first by each bank client/user (bank clients need to look under _Settings_ and do not forget to download the certificate at the last step). The certificate is downloaded in **PKCS#12** format as **\*.p12** file and protected by a password chosen by the bank client/user. Yes, your app needs the password as well to get use of the **\*p12** file for establishing mTLS connection to the bank. Client certificates issued in Internet Banking for bank clients/users have limited validity (e.g. **5 years**). However, **each year** certificates are automatically blocked and bank client/user must unblock them in Internet Banking. It is possible to do it in advance and prolong the time before the certificate is blocked. Your app should be prepared for these scenarios and it should communicate such cases to your user in advance to provide seamless service and high user-experience of your app. ##### Rate Limiting The number of requests in each API operation is limited to 10 per client per sliding second and 5000 per client per sliding day. The exception is the 'Download Statement' operation with the limits lowered to 5 per client per sliding second and 1500 per client per sliding day. This is because it transports potentially sizeable binary files. The consumer must be able to handle HTTP status 429 in case of exceeding these limits. Response headers `X-RateLimit-Limit-Second` and `X-RateLimit-Limit-Day` show the actual limits configured for the specific operation. Response headers `X-RateLimit-Remaining-Second` and `X-RateLimit-Remaining-Day` are returned to help prevent the limits from being exceeded. ##### Notes Be aware, that in certain error situations, API can return specific error structures along with 5xx status code, which is not explicitely defined below. ##### Quick Start Client Feel free to download a simple Java client that gives you quick access to our API.
briqpay/php-sdk
10710 Downloads
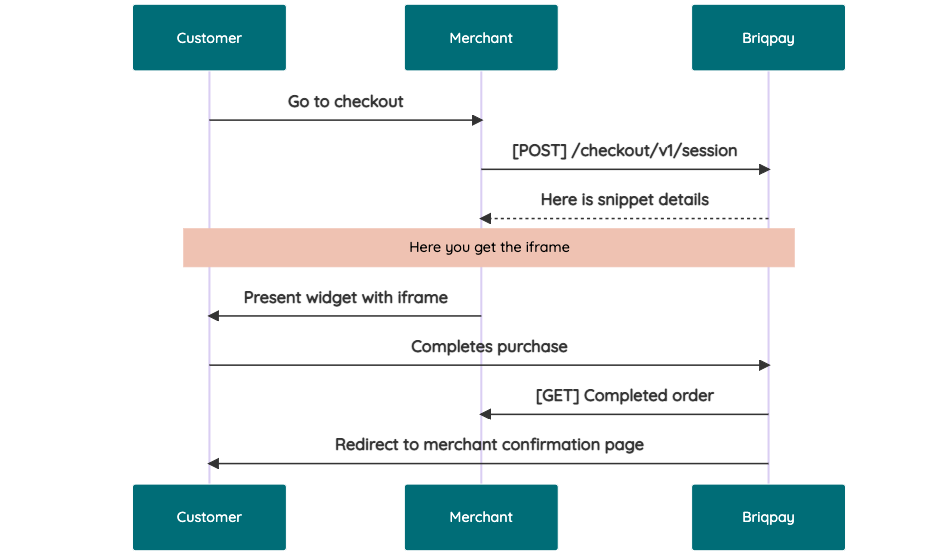
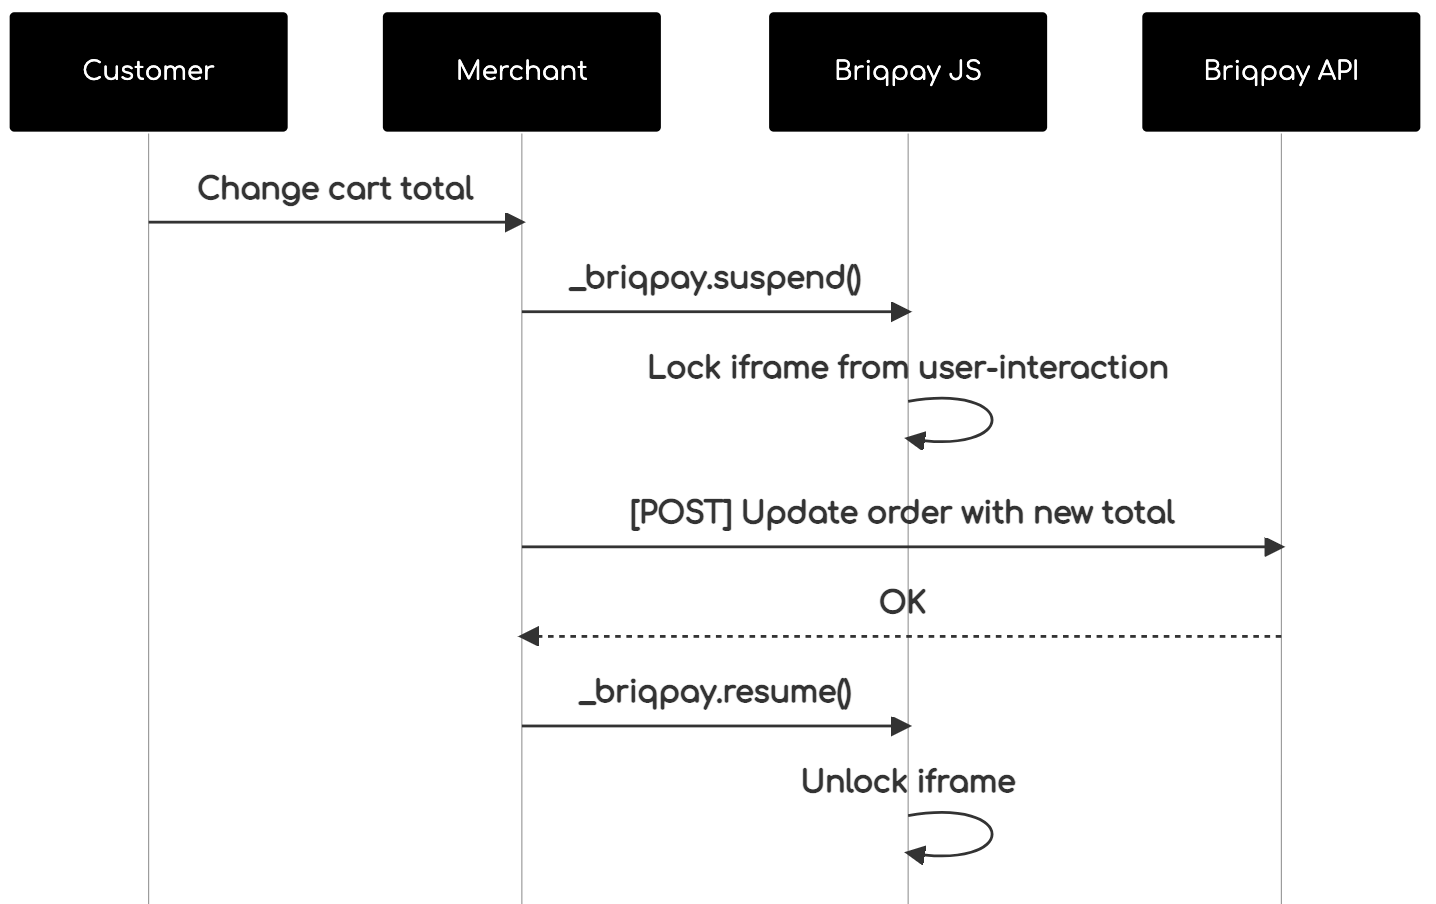
This is the API documentation for Briqpay. You can find out more about us and our offering at our website [https://briqpay.com](https://briqpay.com) In order to get credentials to the playgrund API Please register at [https://app.briqpay.com](https://app.briqpay.com) # Introduction Briqpay Checkout is an inline checkout solution for your b2b ecommerce. Briqpay Checkout gives you the flexibility of controlling your payment methods and credit rules while optimizing the UX for your customers # SDKs Briqpay offers standard SDKs to PHP and .NET based on these swagger definitions. You can download them respively or use our swagger defintitions to codegen your own versions. #### For .NET `` Install-Package Briqpay `` #### For PHP `` composer require briqpay/php-sdk `` # Standard use-case As a first step of integration you will need to create a checkout session. \n\nIn this session you provide Briqpay with the basic information necessary. In the response from briqpay you will recieve a htmlsnippet that is to be inserted into your frontend. The snippet provided by briqpay will render an iframe where the user will complete the purchase. Once completed, briqpay will redirect the customer to a confirmation page that you have defined.  # JavaScript SDK The first step of integration is to add our JS to your site just before closing the ```` tag. This ensures that our JS library is avaliable to load the checkout. ```` Briqpay offers a few methods avaliable through our Javascript SDK. The library is added by our iframe and is avalable on ``window._briqpay`` If you offer the posibility to update the cart or order amonts on the checkout page, the JS library will help you. If your store charges the customer different costs and fees depening on their shipping location, you can listen to the ``addressupdate``event in order to re-calculate the total cost. ```javascript window._briqpay.subscribe('addressupdate', function (data) { console.log(data) }) ``` If your frontend needs to perform an action whe the signup has completed, listen to the ``signup_finalized`` event. ```javascript window._briqpay.subscribe('signup_finalized', function (status) { // redirect or handle status 'success' / 'failure' }) ``` If you allow customers to change the total cart value, you can utilise the JS library to suspend the iframe while you perform a backen update call towards our services. As described below:  The iframe will auto-resume after 7 seconds if you dont call ``_briqpay.resume()`` before # Test Data In order to verify your integration you will neeed to use test data towards our credit engine. ## Company identication numbers * 1111111111 - To recieve a high credit scoring company ( 100 in rating) * 2222222222 - To test the enviournment with a bad credit scoring company (10 in rating) ## Card details In our playground setup your account is by default setup with a Stripe integration. In order to test out the card form you can use the below card numbers: * 4000002500003155 - To mock 3ds authentication window * 4000000000000069 Charge is declined with an expired_card code. You can use any valid expiry and CVC code # Authentication Briqpay utilizes JWT in order to authenticate calls to our platform. Authentication tokens expire after 48 hours, and at that point you can generate a new token for the given resource using the ``/auth`` endpoint. - Basic Auth - only used on the auth endpoint in order to get the Bearer Token - JWT Bearer Token - All calls towards the API utlizes this method"
imokhles/im-portal
32 Downloads
connect to apple developer portal without need any GUI written in PHP
msx-developer/portal
118 Downloads
Pacote simples para listagem dos dados de um portal
sidgs-infra/apigeedev-portal-kickstart
17 Downloads
Composer project template for the Apigee Developer Portal Drupal distribution from SIDGS
portal/devtools
39 Downloads
Tools for portal developers
daphascomp/daphascompsms
2 Downloads
# Authentication Requests made to our APIs must be authenticated, there are two ways to do this: 1. Authenticating using your API apiUsername and apiPassword - `Basic Auth` 2. Authenticating using an Auth Token - `Bearer Token` ## Method 1: Basic Auth Basic Authentication is a method for an HTTP user agent (e.g., a web browser) to provide a apiUsername and apiPassword when making a request. When employing Basic Authentication, users include an encoded string in the Authorization header of each request they make. The string is used by the request’s recipient to verify users’ identity and rights to access a resource. The Authorization header follows this format: > Authorization: Basic base64(apiUsername:apiPassword) So if your apiUsername and apiPassword are `onfon` and `!@pas123`, the combination is `onfon:!@pas123`, and when base64 encoded, this becomes `b25mb246IUBwYXMxMjM=`. So requests made by this user would be sent with the following header: > Authorization: Basic b25mb246IUBwYXMxMjM= | Description | | ---------------------------------------------------------------------------------------------- | | **apiUsername** `String` `Required` Your onfon account apiUsername, retrieved from portal | | **apiPassword** `String` `Required` Your onfon account apiPassword, retrieved from portal | ## Method 2: Bearer Tokens This authentication stategy allows you to authenticate using JSON Web Token ``JWT` that will expire after given duration. Each Access Token is a `JWT`, an encoded JSON object with three parts: the `header`, the `payload`, and the `signature`. The following is an example Access Token generated for Conversations > Authorization: Bearer eyJhbGciOiJIUzI1NiIsInR5cCI6IkpXVCJ9.eyJzdWIiOiIxMjM0NTY3ODkwIiwibmFtZSI6IkpvaG4gRG9lIiwiaWF0IjoxNTE2MjM5MDIyfQ.SflKxwRJSMeKKF2QT4fwpMeJf36POk6yJV_adQssw5c ### Getting the token To generate the token, make a `POST` request to `/v1/authorization` endpoint with your `apiUsername` and `apiPassword` This request should be made from your server and not on the client side such as browser or mobile environment. You will receive a JSON similar to below: `{ "token": "eyJhbGciOiJIUzI1NiIsInR5cCI6IkpXVCJ9.eyJzdWIiOiIxMjM0NTY3ODkwIiwibmFtZSI6IkpvaG4gRG9lIiwiaWF0IjoxNTE2MjM5MDIyfQ.SflKxwRJSMeKKF2QT4fwpMeJf36POk6yJV_adQssw5c", "validDurationSeconds": 3600}` You can use the token received to make API calls. The token will be valid for value of `validDurationSeconds`, before which you should generate a new token. #### Request Body ``` { "apiUsername": "root", "apiPassword": "hakty11" } ``` #### Response Body ``` { "token": "eyJhbGciOiJIUzI1NiIsInR5cCI6IkpXVCJ9.eyJzdWIiOiIxMjM0NTY3ODkwIiwibmFtZSI6IkpvaG4gRG9lIiwiaWF0IjoxNTE2MjM5MDIyfQ.SflKxwRJSMeKKF2QT4fwpMeJf36POk6yJV_adQssw5c", "validDurationSeconds": 3600 } ``` #### Example Curl ``` curl --location --request POST 'https://apis.onfonmedia.co.ke/v1/authorization' \ --data-raw '{ "apiUsername": "correctapiUsername", "apiPassword": "correctapiPassword" } ``` #### Making an API call You will be required to pass the token in `Authorization` header prefixed by `Bearer` when calling other endpoints. Example `Authorization: Bearer eyJhbGciOiJIUzI1NiIsInR5cCI6IkpXVCJ9.eyJzdWIiOiIxMjM0NTY3ODkwIiwibmFtZSI6IkpvaG4gRG9lIiwiaWF0IjoxNTE2MjM5MDIyfQ.SflKxwRJSMeKKF2QT4fwpMeJf36POk6yJV_adQssw5c`
portalium/yii2-core
415 Downloads
Portalium is a Yii2 framework wrapper for developers
stratus-meridian/drupal8-composer-project
787 Downloads
Developer Portal Drupal 8 Composer Root.
gosunilgo/apigee_devportal_kickstart
0 Downloads
A fast demo and starting point for Apigee Developer Portals.
giteshk/devportal-kickstart-project
2 Downloads
Composer project template for the Apigee Developer Portal Drupal distribution.
giteshk/apigee_devportal_kickstart
3 Downloads
A fast demo and starting point for Apigee Developer Portals.