Libraries tagged by call sign
yanlongli/app-store-server-api
63355 Downloads
PHP client for App Store Server API. Manage your customers’ App Store transactions from your server.The App Store Server API is a REST API that you call from your server to request and provide information about your customers' in-app purchases. The App Store signs the transaction and subscription renewal information that this API returns using the JSON Web Signature (JWS) specification.App Store Server API is independent of the app’s installation status on the customer’s devices. The App Store server returns information based on the customer’s in-app purchase history regardless of whether the customer installed, removed, or reinstalled the app on their devices.To request transaction and subscription status information with this API, provide any original transaction identifier that belongs to the customer. The transaction history API responds with a complete list of transactions, 20 at a time, starting with the oldest first. The subscription status API returns the status for all of the customer’s subscriptions, organized by their subscription group identifier.Use the Send Consumption Information endpoint to send information to the App Store when customers request a refund for a consumable in-app purchase, after you receive the CONSUMPTION_REQUEST App Store server notification. Your data helps inform refund decisions.
pdfgeneratorapi/php-client
233658 Downloads
# Introduction [PDF Generator API](https://pdfgeneratorapi.com) allows you easily generate transactional PDF documents and reduce the development and support costs by enabling your users to create and manage their document templates using a browser-based drag-and-drop document editor. The PDF Generator API features a web API architecture, allowing you to code in the language of your choice. This API supports the JSON media type, and uses UTF-8 character encoding. ## Base URL The base URL for all the API endpoints is `https://us1.pdfgeneratorapi.com/api/v4` For example * `https://us1.pdfgeneratorapi.com/api/v4/templates` * `https://us1.pdfgeneratorapi.com/api/v4/workspaces` * `https://us1.pdfgeneratorapi.com/api/v4/templates/123123` ## Editor PDF Generator API comes with a powerful drag & drop editor that allows to create any kind of document templates, from barcode labels to invoices, quotes and reports. You can find tutorials and videos from our [Support Portal](https://support.pdfgeneratorapi.com). * [Component specification](https://support.pdfgeneratorapi.com/en/category/components-1ffseaj/) * [Expression Language documentation](https://support.pdfgeneratorapi.com/en/category/expression-language-q203pa/) * [Frequently asked questions and answers](https://support.pdfgeneratorapi.com/en/category/qanda-1ov519d/) ## Definitions ### Organization Organization is a group of workspaces owned by your account. ### Workspace Workspace contains templates. Each workspace has access to their own templates and organization default templates. ### Master Workspace Master Workspace is the main/default workspace of your Organization. The Master Workspace identifier is the email you signed up with. ### Default Template Default template is a template that is available for all workspaces by default. You can set the template access type under Page Setup. If template has "Organization" access then your users can use them from the "New" menu in the Editor. ### Data Field Data Field is a placeholder for the specific data in your JSON data set. In this example JSON you can access the buyer name using Data Field `{paymentDetails::buyerName}`. The separator between depth levels is :: (two colons). When designing the template you don’t have to know every Data Field, our editor automatically extracts all the available fields from your data set and provides an easy way to insert them into the template. ``` { "documentNumber": 1, "paymentDetails": { "method": "Credit Card", "buyerName": "John Smith" }, "items": [ { "id": 1, "name": "Item one" } ] } ``` ## Rate limiting Our API endpoints use IP-based rate limiting and allow you to make up to 2 requests per second and 60 requests per minute. If you make more requests, you will receive a response with HTTP code 429. Response headers contain additional values: | Header | Description | |--------|--------------------------------| | X-RateLimit-Limit | Maximum requests per minute | | X-RateLimit-Remaining | The requests remaining in the current minute | | Retry-After | How many seconds you need to wait until you are allowed to make requests | * * * * * # Libraries and SDKs ## Postman Collection We have created a [Postman Collection](https://www.postman.com/pdfgeneratorapi/workspace/pdf-generator-api-public-workspace/overview) so you can easily test all the API endpoints without developing and code. ## Client Libraries All our Client Libraries are auto-generated using [OpenAPI Generator](https://openapi-generator.tech/) which uses the OpenAPI v3 specification to automatically generate a client library in specific programming language. * [PHP Client](https://github.com/pdfgeneratorapi/php-client) * [Java Client](https://github.com/pdfgeneratorapi/java-client) * [Ruby Client](https://github.com/pdfgeneratorapi/ruby-client) * [Python Client](https://github.com/pdfgeneratorapi/python-client) * [Javascript Client](https://github.com/pdfgeneratorapi/javascript-client) We have validated the generated libraries, but let us know if you find any anomalies in the client code. ## Model Context Protocol (MCP) Server Integrate document generation directly into your AI agents and LLM applications using our official Model Context Protocol (MCP) Server. The MCP server provides a standardized interface that allows AI assistants (like Claude Desktop and other MCP-compatible clients) to securely interact with the PDF Generator API. With it, your AI applications can automatically fetch workspaces, retrieve templates, merge data, and generate PDF documents on the fly. [Get PDF Generator API MCP Server](https://github.com/pdfgeneratorapi/mcp-server) * * * * * # Authentication The PDF Generator API uses __JSON Web Tokens (JWT)__ to authenticate all API requests. These tokens offer a method to establish secure server-to-server authentication by transferring a compact JSON object with a signed payload of your account’s API Key and Secret. When authenticating to the PDF Generator API, a JWT should be generated uniquely by a __server-side application__ and included as a __Bearer Token__ in the header of each request. ## Accessing your API Key and Secret You can find your __API Key__ and __API Secret__ from the __Account Settings__ page after you login to PDF Generator API [here](https://pdfgeneratorapi.com/login). ## Creating a JWT JSON Web Tokens are composed of three sections: a header, a payload (containing a claim set), and a signature. The header and payload are JSON objects, which are serialized to UTF-8 bytes, then encoded using base64url encoding. The JWT's header, payload, and signature are concatenated with periods (.). As a result, a JWT typically takes the following form: ``` {Base64url encoded header}.{Base64url encoded payload}.{Base64url encoded signature} ``` We recommend and support libraries provided on [jwt.io](https://jwt.io/). While other libraries can create JWT, these recommended libraries are the most robust. ### Header Property `alg` defines which signing algorithm is being used. PDF Generator API users HS256. Property `typ` defines the type of token and it is always JWT. ``` { "alg": "HS256", "typ": "JWT" } ``` ### Payload The second part of the token is the payload, which contains the claims or the pieces of information being passed about the user and any metadata required. It is mandatory to specify the following claims: * issuer (`iss`): Your API key * subject (`sub`): Workspace identifier * expiration time (`exp`): Timestamp (unix epoch time) until the token is valid. It is highly recommended to set the exp timestamp for a short period, i.e. a matter of seconds. This way, if a token is intercepted or shared, the token will only be valid for a short period of time. ``` { "iss": "ad54aaff89ffdfeff178bb8a8f359b29fcb20edb56250b9f584aa2cb0162ed4a", "sub": "[email protected]", "exp": 1586112639 } ``` ### Payload for Partners Our partners can send their unique identifier (provided by us) in JWT's partner_id claim. If the `partner_id` value is specified in the JWT, the organization making the request is automatically connected to the partner account. * Partner ID (`partner_id`): Unique identifier provide by PDF Generator API team ``` { "iss": "ad54aaff89ffdfeff178bb8a8f359b29fcb20edb56250b9f584aa2cb0162ed4a", "sub": "[email protected]", "partner_id": "my-partner-identifier", "exp": 1586112639 } ``` ### Signature To create the signature part you have to take the encoded header, the encoded payload, a secret, the algorithm specified in the header, and sign that. The signature is used to verify the message wasn't changed along the way, and, in the case of tokens signed with a private key, it can also verify that the sender of the JWT is who it says it is. ``` HMACSHA256( base64UrlEncode(header) + "." + base64UrlEncode(payload), API_SECRET) ``` ### Putting all together The output is three Base64-URL strings separated by dots. The following shows a JWT that has the previous header and payload encoded, and it is signed with a secret. ``` eyJhbGciOiJIUzI1NiIsInR5cCI6IkpXVCJ9.eyJpc3MiOiJhZDU0YWFmZjg5ZmZkZmVmZjE3OGJiOGE4ZjM1OWIyOWZjYjIwZWRiNTYyNTBiOWY1ODRhYTJjYjAxNjJlZDRhIiwic3ViIjoiZGVtby5leGFtcGxlQGFjdHVhbHJlcG9ydHMuY29tIn0.SxO-H7UYYYsclS8RGWO1qf0z1cB1m73wF9FLl9RCc1Q // Base64 encoded header: eyJhbGciOiJIUzI1NiIsInR5cCI6IkpXVCJ9 // Base64 encoded payload: eyJpc3MiOiJhZDU0YWFmZjg5ZmZkZmVmZjE3OGJiOGE4ZjM1OWIyOWZjYjIwZWRiNTYyNTBiOWY1ODRhYTJjYjAxNjJlZDRhIiwic3ViIjoiZGVtby5leGFtcGxlQGFjdHVhbHJlcG9ydHMuY29tIn0 // Signature: SxO-H7UYYYsclS8RGWO1qf0z1cB1m73wF9FLl9RCc1Q ``` ## Temporary JWTs You can create a temporary token in [Account Settings](https://pdfgeneratorapi.com/account/organization) page after you login to PDF Generator API. The generated token uses your email address as the subject (`sub`) value and is valid for __15 minutes__. You can also use [jwt.io](https://jwt.io/) to generate test tokens for your API calls. These test tokens should never be used in production applications. * * * * * # Error codes | Code | Description | |--------|--------------------------------| | 401 | Unauthorized | | 402 | Payment Required | | 403 | Forbidden | | 404 | Not Found | | 422 | Unprocessable Entity | | 429 | Too Many Requests | | 500 | Internal Server Error | ## 401 Unauthorized | Description | |-------------------------------------------------------------------------| | Authentication failed: request expired | | Authentication failed: workspace missing | | Authentication failed: key missing | | Authentication failed: property 'iss' (issuer) missing in JWT | | Authentication failed: property 'sub' (subject) missing in JWT | | Authentication failed: property 'exp' (expiration time) missing in JWT | | Authentication failed: incorrect signature | ## 402 Payment Required | Description | |-------------------------------------------------------------------------| | Your account is suspended, please upgrade your account | ## 403 Forbidden | Description | |-------------------------------------------------------------------------| | Your account has exceeded the monthly document generation limit. | | Access not granted: You cannot delete master workspace via API | | Access not granted: Template is not accessible by this organization | | Your session has expired, please close and reopen the editor. | ## 404 Entity not found | Description | |-------------------------------------------------------------------------| | Entity not found | | Resource not found | | None of the templates is available for the workspace. | ## 422 Unprocessable Entity | Description | |-------------------------------------------------------------------------| | Unable to parse JSON, please check formatting | | Required parameter missing | | Required parameter missing: template definition not defined | | Required parameter missing: template not defined | ## 429 Too Many Requests | Description | |-------------------------------------------------------------------------| | You can make up to 2 requests per second and 60 requests per minute. | * * * * *
milpa/console
8205 Downloads
The projection layer of the Milpa PHP framework: surface projectors that turn one declared Operation into the shape each surface speaks — CLI flags, MCP tools — plus the signature gate that makes consent name the call.
alexgeno/phone-verification-laravel
2698 Downloads
A library for phone verification via Laravel notification channels. Any notification channel can be used as a sender, and Redis or MongoDB can be used as a storage.
vortos/vortos-alerts
1967 Downloads
Vortos Alerts — agnostic notifier port, severity routing, dedupe/flap-damper, escalation + on-call, HMAC-signed acknowledgements, and time-boxed maintenance silences. In-core Slack/Telegram/webhook drivers (plain HTTP), SES via vortos-aws-ses. Alert rules are declared config validated at deploy:doctor time.
nekman/aws-ring-http-signer
35530 Downloads
Sign Ring HTTP calls using AWS credentials
alexgeno/phone-verification
6124 Downloads
An extensible and configurable php library for phone verification
crypto-chiefs/cryptochief-crypto-processing-php
6 Downloads
Official PHP SDK for the Crypto Chief crypto processing API. Accept crypto payments, send payouts and mass payouts, sign and broadcast EVM/TRON/Solana/TON/XRP transactions, encode contract calls, and verify webhooks.
sendpost/sendpost-php-sdk
1146 Downloads
# Introduction SendPost provides email API and SMTP relay which can be used not just to send & measure but also alert & optimised email sending. You can use SendPost to: * Send personalised emails to multiple recipients using email API * Track opens and clicks * Analyse statistics around open, clicks, bounce, unsubscribe and spam At and advanced level you can use it to: * Manage multiple sub-accounts which may map to your promotional or transactional sending, multiple product lines or multiple customers * Classify your emails using groups for better analysis * Analyse and fix email sending at sub-account level, IP Pool level or group level * Have automated alerts to notify disruptions regarding email sending * Manage different dedicated IP Pools so to better control your email sending * Automatically know when IP or domain is blacklisted or sender score is down * Leverage pro deliverability tools to get significantly better email deliverability & inboxing [](https://god.gw.postman.com/run-collection/33476323-e6dbd27f-c4a7-4d49-bcac-94b0611b938b?action=collection%2Ffork&source=rip_markdown&collection-url=entityId%3D33476323-e6dbd27f-c4a7-4d49-bcac-94b0611b938b%26entityType%3Dcollection%26workspaceId%3D6b1e4f65-96a9-4136-9512-6266c852517e) # Overview ## REST API SendPost API is built on REST API principles. Authenticated users can interact with any of the API endpoints to perform: * **GET**- to get a resource * **POST** - to create a resource * **PUT** - to update an existing resource * **DELETE** - to delete a resource The API endpoint for all API calls is: https://api.sendpost.io/api/v1 Some conventions that have been followed in the API design overall are following: * All resources have either /api/v1/subaccount or /api/v1/account in their API call resource path based on who is authorised for the resource. All API calls with path /api/v1/subaccount use X-SubAccount-ApiKey in their request header. Likewise all API calls with path /api/v1/account use X-Account-ApiKey in their request header. * All resource endpoints end with singular name and not plural. So we have domain instead of domains for domain resource endpoint. Likewise we have sender instead of senders for sender resource endpoint. * Body submitted for POST / PUT API calls as well as JSON response from SendPost API follow camelcase convention * All timestamps returned in response (created or submittedAt response fields) are UNIX nano epoch timestamp. All resources have either /api/v1/subaccount or /api/v1/account in their API call resource path based on who is authorised for the resource. All API calls with path /api/v1/subaccount use X-SubAccount-ApiKey in their request header. Likewise all API calls with path /api/v1/account use X-Account-ApiKey in their request header. SendPost uses conventional HTTP response codes to indicate the success or failure of an API request. * Codes in the 2xx range indicate success. * Codes in the 4xx range indicate an error owing due to unauthorize access, incorrect request parameters or body etc. * Code in the 5xx range indicate an eror with SendPost's servers ( internal service issue or maintenance ) SendPost all responses return created in UNIX nano epoch timestamp. ## Authentication SendPost uses API keys for authentication. You can register a new SendPost API key at our [developer portal](https://app.sendpost.io/register). SendPost expects the API key to be included in all API requests to the server in a header that looks like the following: `X-SubAccount-ApiKey: AHEZEP8192SEGH` This API key is used for all Sub-Account level operations such as: * Sending emails * Retrieving stats regarding open, click, bounce, unsubscribe and spam * Uploading suppressions list * Verifying sending domains and more In addition to X-SubAccount-ApiKey you also have another API Key X-Account-APIKey which is used for Account level operations such as : * Creating and managing sub-accounts * Allocating IPs for your account * Getting overall billing and usage information * Email List validation * Creating and managing alerts and more You must look at individual API reference page to look at whether X-SubAccount-ApiKey is required or X-Account-ApiKey In case an incorrect API Key header is specified or if it is missed you will get HTTP Response 401 ( Unauthorized ) response from SendPost. ## HTTP Response Headers Code | Reason | Details ---------------| -----------------------| ----------- 200 | Success | Everything went well 401 | Unauthorized | Incorrect or missing API header either X-SubAccount-ApiKey or X-Account-ApiKey 403 | Forbidden | Typically sent when resource with same name or details already exist 406 | Missing resource id | Resource id specified is either missing or doesn't exist 422 | Unprocessable entity | Request body is not in proper format 500 | Internal server error | Some error happened at SendPost while processing API request 503 | Service Unavailable | SendPost is offline for maintenance. Please try again later # API SDKs We have native SendPost SDKs in the following programming languages. You can integrate with them or create your own SDK with our API specification. In case you need any assistance with respect to API then do reachout to our team from website chat or email us at **[email protected]** * [PHP](https://github.com/sendpost/sendpost_php_sdk) * [Javascript](https://github.com/sendpost/sendpost_javascript_sdk) * [Ruby](https://github.com/sendpost/sendpost_ruby_sdk) * [Python](https://github.com/sendpost/sendpost_python_sdk) * [Golang](https://github.com/sendpost/sendpost_go_sdk) # API Reference SendX REST API can be broken down into two major sub-sections: * Sub-Account * Account Sub-Account API operations enable common email sending API use-cases like sending bulk email, adding new domains or senders for email sending programmatically, retrieving stats, adding suppressions etc. All Sub-Account API operations need to pass X-SubAccount-ApiKey header with every API call. The Account API operations allow users to manage multiple sub-accounts and manage IPs. A single parent SendPost account can have 100's of sub-accounts. You may want to create sub-accounts for different products your company is running or to segregate types of emails or for managing email sending across multiple customers of yours. # SMTP Reference Simple Mail Transfer Protocol (SMTP) is a quick and easy way to send email from one server to another. SendPost provides an SMTP service that allows you to deliver your email via our servers instead of your own client or server. This means you can count on SendPost's delivery at scale for your SMTP needs. ## Integrating SMTP 1. Get the SMTP `username` and `password` from your SendPost account. 2. Set the server host in your email client or application to `smtp.sendpost.io`. This setting is sometimes referred to as the external SMTP server or the SMTP relay. 3. Set the `username` and `password`. 4. Set the port to `587` (or as specified below). ## SMTP Ports - For an unencrypted or a TLS connection, use port `25`, `2525` or `587`. - For a SSL connection, use port `465` - Check your firewall and network to ensure they're not blocking any of our SMTP Endpoints. SendPost supports STARTTLS for establishing a TLS-encrypted connection. STARTTLS is a means of upgrading an unencrypted connection to an encrypted connection. There are versions of STARTTLS for a variety of protocols; the SMTP version is defined in [RFC 3207](https://www.ietf.org/rfc/rfc3207.txt). To set up a STARTTLS connection, the SMTP client connects to the SendPost SMTP endpoint `smtp.sendpost.io` on port 25, 587, or 2525, issues an EHLO command, and waits for the server to announce that it supports the STARTTLS SMTP extension. The client then issues the STARTTLS command, initiating TLS negotiation. When negotiation is complete, the client issues an EHLO command over the new encrypted connection, and the SMTP session proceeds normally. If you are unsure which port to use, a TLS connection on port 587 is typically recommended. ## Sending email from your application ```javascript "use strict"; const nodemailer = require("nodemailer"); async function main() { // create reusable transporter object using the default SMTP transport let transporter = nodemailer.createTransport({ host: "smtp.sendpost.io", port: 587, secure: false, // true for 465, false for other ports auth: { user: "" , // generated ethereal user pass: "", // generated ethereal password }, requireTLS: true, debug: true, logger: true, }); // send mail with defined transport object try { let info = await transporter.sendMail({ from: '[email protected]', to: '[email protected]', subject: 'Test Email Subject', html: 'Hello Geeks!!!', }); console.log("Message sent: %s", info.messageId); } catch (e) { console.log(e) } } main().catch(console.error); ``` For PHP ```php
briqpay/php-sdk
12100 Downloads
This is the API documentation for Briqpay. You can find out more about us and our offering at our website [https://briqpay.com](https://briqpay.com) In order to get credentials to the playgrund API Please register at [https://app.briqpay.com](https://app.briqpay.com) # Introduction Briqpay Checkout is an inline checkout solution for your b2b ecommerce. Briqpay Checkout gives you the flexibility of controlling your payment methods and credit rules while optimizing the UX for your customers # SDKs Briqpay offers standard SDKs to PHP and .NET based on these swagger definitions. You can download them respively or use our swagger defintitions to codegen your own versions. #### For .NET `` Install-Package Briqpay `` #### For PHP `` composer require briqpay/php-sdk `` # Standard use-case As a first step of integration you will need to create a checkout session. \n\nIn this session you provide Briqpay with the basic information necessary. In the response from briqpay you will recieve a htmlsnippet that is to be inserted into your frontend. The snippet provided by briqpay will render an iframe where the user will complete the purchase. Once completed, briqpay will redirect the customer to a confirmation page that you have defined. 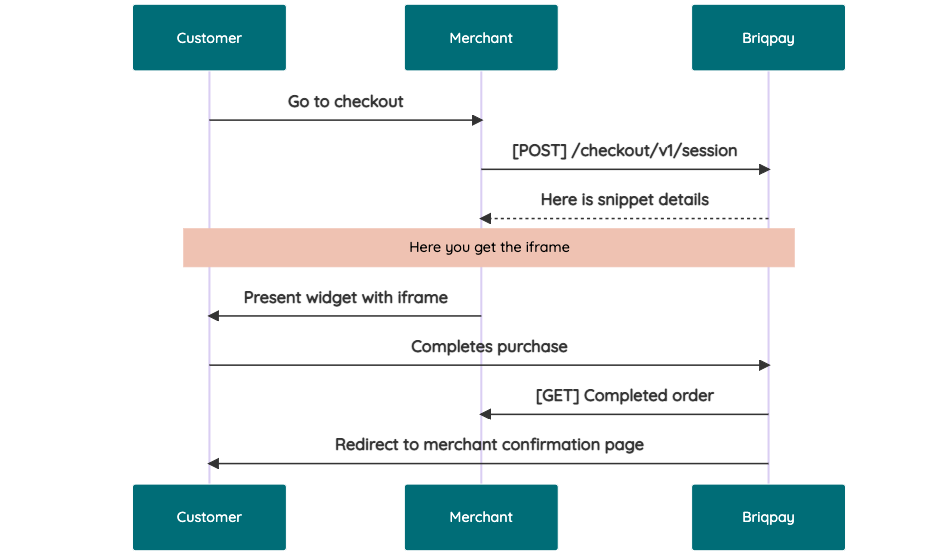 # JavaScript SDK The first step of integration is to add our JS to your site just before closing the ```` tag. This ensures that our JS library is avaliable to load the checkout. ```` Briqpay offers a few methods avaliable through our Javascript SDK. The library is added by our iframe and is avalable on ``window._briqpay`` If you offer the posibility to update the cart or order amonts on the checkout page, the JS library will help you. If your store charges the customer different costs and fees depening on their shipping location, you can listen to the ``addressupdate``event in order to re-calculate the total cost. ```javascript window._briqpay.subscribe('addressupdate', function (data) { console.log(data) }) ``` If your frontend needs to perform an action whe the signup has completed, listen to the ``signup_finalized`` event. ```javascript window._briqpay.subscribe('signup_finalized', function (status) { // redirect or handle status 'success' / 'failure' }) ``` If you allow customers to change the total cart value, you can utilise the JS library to suspend the iframe while you perform a backen update call towards our services. As described below: 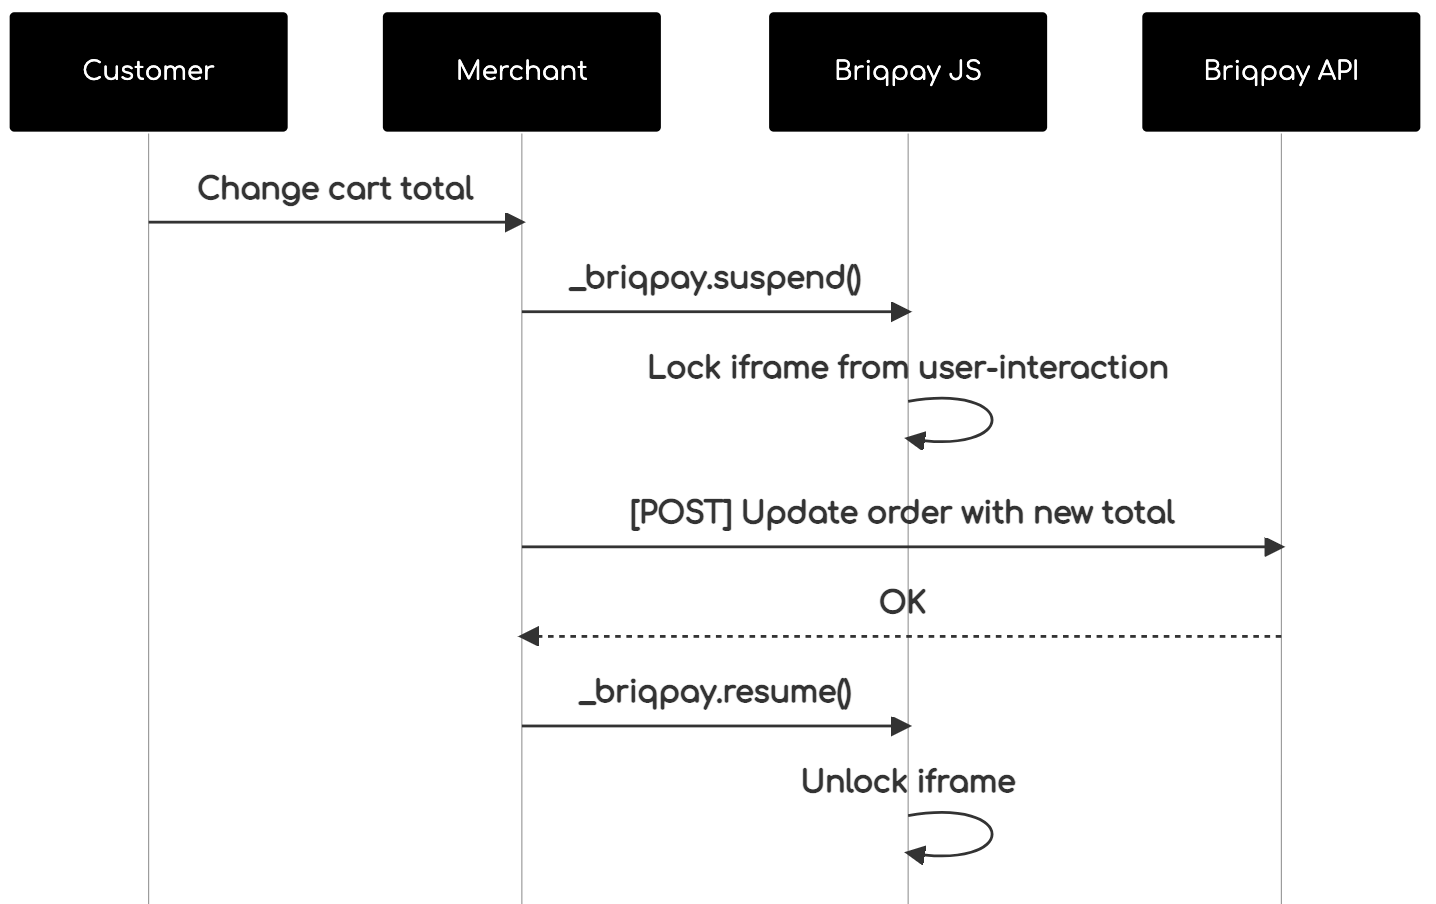 The iframe will auto-resume after 7 seconds if you dont call ``_briqpay.resume()`` before # Test Data In order to verify your integration you will neeed to use test data towards our credit engine. ## Company identication numbers * 1111111111 - To recieve a high credit scoring company ( 100 in rating) * 2222222222 - To test the enviournment with a bad credit scoring company (10 in rating) ## Card details In our playground setup your account is by default setup with a Stripe integration. In order to test out the card form you can use the below card numbers: * 4000002500003155 - To mock 3ds authentication window * 4000000000000069 Charge is declined with an expired_card code. You can use any valid expiry and CVC code # Authentication Briqpay utilizes JWT in order to authenticate calls to our platform. Authentication tokens expire after 48 hours, and at that point you can generate a new token for the given resource using the ``/auth`` endpoint. - Basic Auth - only used on the auth endpoint in order to get the Bearer Token - JWT Bearer Token - All calls towards the API utlizes this method"
signes/vbulletin-api-php
5542 Downloads
This package gives you possibility to easy integrate your system with vBulletin 5 API using simple methods calls.
cdma-numiscorner/ebay-developer-key-management-api
679 Downloads
Due to regulatory requirements applicable to our EU/UK sellers, for certain APIs, developers need to add digital signatures to the respective HTTP call. The Key Management API creates keypairs that are required when creating digital signatures for the following APIs:All methods in the Finances APIissueRefund in the Fulfillment APIGetAccount in the Trading APIThe following methods in the Post-Order API:Issue Inquiry RefundIssue case refundIssue return refundProcess Return RequestApprove Cancellation RequestCreate Cancellation RequestNote: For additional information about keypairs and creating Message Signatures, refer to Digital Signatures for APIs.
sunnysideup/social_integration
29 Downloads
This module allows users to easily let users sign up and login using facebook and twitter. After a user has signed up using this module, a OAuth token for that social service will be stored against the users account. This allows your application to call the facebook and twitter apis on behalf of the user and implement whatever interesting social integration features you want. The SelectFriendPage is an example of the type of functionality that can be easily implemented once you have access to the users OAuth tokens.
factpulse/sdk
73 Downloads
REST API for electronic invoicing in France: Factur-X (CII), UBL 2.1, AFNOR PDP/PA, electronic signatures. ## 🎯 Main Features ### 📄 Invoice Generation - **Formats**: CII XML, UBL 2.1 XML, or Factur-X PDF/A-3 - **Profiles** (CII/PDF): MINIMUM, BASIC, EN16931, EXTENDED - **UBL**: Always EN16931 compliant - **Standards**: EN 16931 (EU directive 2014/55), ISO 19005-3 (PDF/A-3), CII (UN/CEFACT), UBL 2.1 (OASIS) - **Simplified Format**: Generation from SIRET + auto-enrichment (Chorus Pro API + Business Search) ### ✅ Factur-X - Validation - **XML Validation**: Schematron (45 to 210+ rules depending on profile) - **PDF Validation**: PDF/A-3, Factur-X XMP metadata - **VeraPDF**: Strict PDF/A validation (146+ ISO 19005-3 rules) ### ✍️ Electronic Signature - **Standards**: PAdES-B-B, PAdES-B-T (RFC 3161 timestamping), PAdES-B-LT (long-term archival) - **eIDAS Levels**: SES (self-signed), AdES (commercial CA), QES (QTSP) - **Validation**: Cryptographic integrity and certificate verification ### 📋 Flux 6 - Invoice Lifecycle (CDAR) - **CDAR Messages**: Acknowledgements, invoice statuses - **PPF Statuses**: REFUSED (210), PAID (212) ### 📊 Flux 10 - E-Reporting - **Tax Declarations**: International B2B, B2C - **Flow Types**: 10.1 (B2B transactions), 10.2 (B2B payments), 10.3 (B2C transactions), 10.4 (B2C payments) ### 📡 AFNOR PDP/PA (XP Z12-013) - **Flow Service**: Submit and search flows to PDPs - **Directory Service**: Company search (SIREN/SIRET) - **Multi-client**: Support for multiple PDP configs per user ### 🏛️ Chorus Pro - **Public Sector Invoicing**: Complete API for Chorus Pro ### ⏳ Async Tasks - **Celery**: Asynchronous generation, validation and signing - **Polling**: Status tracking via `/tasks/{task_id}/status` - **Webhooks**: Automatic notifications when tasks complete ## 🔒 Authentication All requests require a **JWT token** in the Authorization header: ``` Authorization: Bearer YOUR_JWT_TOKEN ``` ### How to obtain a JWT token? #### 🔑 Method 1: `/api/token/` API (Recommended) **URL:** `https://factpulse.fr/api/token/` This method is **recommended** for integration in your applications and CI/CD workflows. **Prerequisites:** Having set a password on your account **For users registered via email/password:** - You already have a password, use it directly **For users registered via OAuth (Google/GitHub):** - You must first set a password at: https://factpulse.fr/accounts/password/set/ - Once the password is created, you can use the API **Request example:** ```bash curl -X POST https://factpulse.fr/api/token/ \ -H "Content-Type: application/json" \ -d '{ "username": "[email protected]", "password": "your_password" }' ``` **Optional `client_uid` parameter:** To select credentials for a specific client (PA/PDP, Chorus Pro, signing certificates), add `client_uid`: ```bash curl -X POST https://factpulse.fr/api/token/ \ -H "Content-Type: application/json" \ -d '{ "username": "[email protected]", "password": "your_password", "client_uid": "550e8400-e29b-41d4-a716-446655440000" }' ``` The `client_uid` will be included in the JWT and allow the API to automatically use: - AFNOR/PDP credentials configured for this client - Chorus Pro credentials configured for this client - Electronic signature certificates configured for this client **Response:** ```json { "access": "eyJ0eXAiOiJKV1QiLCJhbGc...", // Access token (validity: 30 min) "refresh": "eyJ0eXAiOiJKV1QiLCJhbGc..." // Refresh token (validity: 7 days) } ``` **Advantages:** - ✅ Full automation (CI/CD, scripts) - ✅ Programmatic token management - ✅ Refresh token support for automatic access renewal - ✅ Easy integration in any language/tool #### 🖥️ Method 2: Dashboard Generation (Alternative) **URL:** https://factpulse.fr/api/dashboard/ This method is suitable for quick tests or occasional use via the graphical interface. **How it works:** - Log in to the dashboard - Use the "Generate Test Token" or "Generate Production Token" buttons - Works for **all** users (OAuth and email/password), without requiring a password **Token types:** - **Test Token**: 24h validity, 1000 calls/day quota (free) - **Production Token**: 7 days validity, quota based on your plan **Advantages:** - ✅ Quick for API testing - ✅ No password required - ✅ Simple visual interface **Disadvantages:** - ❌ Requires manual action - ❌ No refresh token - ❌ Less suited for automation ### 📚 Full Documentation For more information on authentication and API usage: https://factpulse.fr/documentation-api/
towoju/one2one-calls
5 Downloads
One-on-one video/audio call scaffolding for Laravel (WebRTC signaling + permissions + events).