Libraries tagged by php http status
eciboadaptech/finapi-access
367 Downloads
RESTful API for Account Information Services (AIS) and Payment Initiation Services (PIS) Application Version: 2.29.4 The following pages give you some general information on how to use our APIs. The actual API services documentation then follows further below. You can use the menu to jump between API sections. This page has a built-in HTTP(S) client, so you can test the services directly from within this page, by filling in the request parameters and/or body in the respective services, and then hitting the TRY button. Note that you need to be authorized to make a successful API call. To authorize, refer to the 'Authorization' section of the API, or just use the OAUTH button that can be found near the TRY button. General information Error Responses When an API call returns with an error, then in general it has the structure shown in the following example: { "errors": [ { "message": "Interface 'FINTS_SERVER' is not supported for this operation.", "code": "BAD_REQUEST", "type": "TECHNICAL" } ], "date": "2020-11-19T16:54:06.854+01:00", "requestId": "selfgen-312042e7-df55-47e4-bffd-956a68ef37b5", "endpoint": "POST /api/v2/bankConnections/import", "authContext": "1/21", "bank": "DEMO0002 - finAPI Test Redirect Bank (id: 280002, location: none)" } If an API call requires an additional authentication by the user, HTTP code 510 is returned and the error response contains the additional "multiStepAuthentication" object, see the following example: { "errors": [ { "message": "Es ist eine zusätzliche Authentifizierung erforderlich. Bitte geben Sie folgenden Code an: 123456", "code": "ADDITIONAL_AUTHENTICATION_REQUIRED", "type": "BUSINESS", "multiStepAuthentication": { "hash": "678b13f4be9ed7d981a840af8131223a", "status": "CHALLENGE_RESPONSE_REQUIRED", "challengeMessage": "Es ist eine zusätzliche Authentifizierung erforderlich. Bitte geben Sie folgenden Code an: 123456", "answerFieldLabel": "TAN", "redirectUrl": null, "redirectContext": null, "redirectContextField": null, "twoStepProcedures": null, "photoTanMimeType": null, "photoTanData": null, "opticalData": null, "opticalDataAsReinerSct": false } } ], "date": "2019-11-29T09:51:55.931+01:00", "requestId": "selfgen-45059c99-1b14-4df7-9bd3-9d5f126df294", "endpoint": "POST /api/v2/bankConnections/import", "authContext": "1/18", "bank": "DEMO0001 - finAPI Test Bank" } An exception to this error format are API authentication errors, where the following structure is returned: { "error": "invalid_token", "error_description": "Invalid access token: cccbce46-xxxx-xxxx-xxxx-xxxxxxxxxx" } Paging API services that may potentially return a lot of data implement paging. They return a limited number of entries within a "page". Further entries must be fetched with subsequent calls. Any API service that implements paging provides the following input parameters: • "page": the number of the page to be retrieved (starting with 1). • "perPage": the number of entries within a page. The default and maximum value is stated in the documentation of the respective services. A paged response contains an additional "paging" object with the following structure: { ... , "paging": { "page": 1, "perPage": 20, "pageCount": 234, "totalCount": 4662 } } Internationalization The finAPI services support internationalization which means you can define the language you prefer for API service responses. The following languages are available: German, English, Czech, Slovak. The preferred language can be defined by providing the official HTTP Accept-Language header. finAPI reacts on the official iso language codes "de", "en", "cs" and "sk" for the named languages. Additional subtags supported by the Accept-Language header may be provided, e.g. "en-US", but are ignored. If no Accept-Language header is given, German is used as the default language. Exceptions: • Bank login hints and login fields are only available in the language of the bank and not being translated. • Direct messages from the bank systems typically returned as BUSINESS errors will not be translated. • BUSINESS errors created by finAPI directly are available in German and English. • TECHNICAL errors messages meant for developers are mostly in English, but also may be translated. Request IDs With any API call, you can pass a request ID via a header with name "X-Request-Id". The request ID can be an arbitrary string with up to 255 characters. Passing a longer string will result in an error. If you don't pass a request ID for a call, finAPI will generate a random ID internally. The request ID is always returned back in the response of a service, as a header with name "X-Request-Id". We highly recommend to always pass a (preferably unique) request ID, and include it into your client application logs whenever you make a request or receive a response (especially in the case of an error response). finAPI is also logging request IDs on its end. Having a request ID can help the finAPI support team to work more efficiently and solve tickets faster. Overriding HTTP methods Some HTTP clients do not support the HTTP methods PATCH or DELETE. If you are using such a client in your application, you can use a POST request instead with a special HTTP header indicating the originally intended HTTP method. The header's name is X-HTTP-Method-Override. Set its value to either PATCH or DELETE. POST Requests having this header set will be treated either as PATCH or DELETE by the finAPI servers. Example: X-HTTP-Method-Override: PATCH POST /api/v2/label/51 {"name": "changed label"} will be interpreted by finAPI as: PATCH /api/v2/label/51 {"name": "changed label"} User metadata With the migration to PSD2 APIs, a new term called "User metadata" (also known as "PSU metadata") has been introduced to the API. This user metadata aims to inform the banking API if there was a real end-user behind an HTTP request or if the request was triggered by a system (e.g. by an automatic batch update). In the latter case, the bank may apply some restrictions such as limiting the number of HTTP requests for a single consent. Also, some operations may be forbidden entirely by the banking API. For example, some banks do not allow issuing a new consent without the end-user being involved. Therefore, it is certainly necessary and obligatory for the customer to provide the PSU metadata for such operations. As finAPI does not have direct interaction with the end-user, it is the client application's responsibility to provide all the necessary information about the end-user. This must be done by sending additional headers with every request triggered on behalf of the end-user. At the moment, the following headers are supported by the API: • "PSU-IP-Address" - the IP address of the user's device. It has to be an IPv4 address, as some banks cannot work with IPv6 addresses. If a non-IPv4 address is passed, we will replace the value with our own IPv4 address as a fallback. • "PSU-Device-OS" - the user's device and/or operating system identification. • "PSU-User-Agent" - the user's web browser or other client device identification. FAQ Is there a finAPI SDK? Currently we do not offer a native SDK, but there is the option to generate an SDK for almost any target language via OpenAPI. Use the 'Download SDK' button on this page for SDK generation. How can I enable finAPI's automatic batch update? Currently there is no way to set up the batch update via the API. Please contact [email protected] for this. Why do I need to keep authorizing when calling services on this page? This page is a "one-page-app". Reloading the page resets the OAuth authorization context. There is generally no need to reload the page, so just don't do it and your authorization will persist.
compucie/congressus
141 Downloads
# Introduction The Congressus API allows you to interact with your Congressus administration. The API is RESTful and uses JSON to transport information. This documentation aims to get you started with your first requests. Make sure to read this introduction completely to know all aspects of our API. ## REST basics A REST API describes the resources you can access in a clearly defined path structure. This documentation contains a reference for each resource in the API. Before you can use these resources, you need to know the basics of accessing the Congressus REST API. **Paths and versioning** The Congressus API resides on the following paths: https://api.congressus.nl/ `version` / `resource_path` ? `query_params` - The `version` part of the path indicates the version of the API you want to use. At this moment version v30 is the current version. By pointing to a specific version, we can make sure you always can expect equal behaviour from our API. - The `resource_path` part indicates the path of the resource you want to access. Specific paths to resources can be found in the API documentation. Examples of resource paths are: /members to retrieve all members or /member/ `obj_id` /statuses to create new member status for a member. - The `query_params` contains all filtering, ordering and pagination information. ## Authentication The current authentication flow present at Congressus API is by the use of the Bearer Token suggested by OAuth 2.0. To interact with the Congressus API, you must authenticate by supplying the header `Authorization` with the value `Bearer {access_token}`. **How do I get an API key?** You can create new apps and API keys in Congressus Manager through [this link](https://manager.congressus.nl/settings/integrations/apps). ## Requests There are different approaches for making requests to our API. The command line tool [curl](https://curl.se/) is easy and fast for testing our API. When you want to integrate the API into your own software, you can choose to use a general purpose REST library or to [create your own API client library](https://github.com/OpenAPITools/openapi-generator) based on our OpenAPI specs. ## Responses Congressus uses conventional HTTP response codes to indicate success or failure of an API request. In general, codes in the 2xx range indicate success, codes in the 4xx range indicate an error that resulted from the provided information (e.g. a required parameter was missing or input data was invalid), and codes in the 5xx range indicate an error with the Congressus API. ## Pagination Endpoints returning a list of entities, are paginated to prevent large responses. To control the pagination, you can use the `page` and `page_size` parameters. page determines which page to return (default: 1), page_size controls the amount of entities to return (default: 25, maximum: 100). Each paginated response contains the following information: - `has_prev` bool - `prev_num` int with previous page number - `has next` bool - `next_num` int with next page number - `data` list with results on current page - `total` int with total number of results ## Filtering Most list endpoints support filtering to get a subset of the available information. Filtering is done using the query. For some filter attributes, filtering for multiple options is supported by adding the `=` multiple times. E.g. `category_id=1&category_id=2`. ### Filtering on period For some resources, a period filter is available. This filter is used to get a subset of the available information within a certain period. The period filter is used by adding the `period_filter` query parameter to the endpoint. **Absolute periods** Absolute periods are defined by exact dates. The format is `YYYY(MM(DD))`. E.g. `2024` or `202402` or `20240227`. A different end date can be given by adding `..` and the end date. E.g. `202402..202403` for the period February 2024 to March 2024. **Relative periods** Relative periods are defined by a period in the past or future. Multiple formats are supported: - `today` - today's date - `yesterday` - yesterday's date - `tomorrow` - tomorrow's date - `(last/this/next)_(day/month/quarter/half_year/year)` - e.g. `last_month` or `next_year` or `this_quarter` - `last_x_days` - e.g. `last_7_days` or `last_14_days` ## Ordering Most list endpoints support ordering on one or more attributes. The order is defined using the `order=` parameter in the query part of the endpoint. Multiple columns can be used for ordering, delimited by a comma. E.g. `order=lastname,initials,first_name`. Each attribute used in the order parameter could be extended with a sort property `:`. E.g. `order=lastname:desc`. The following properties are supported throughout our API: - ```:asc``` ASC NULLS LAST (default) [comment]: (- ```:asc_nulls_last``` ASC NULLS LAST) [comment]: (- ```:asc_nulls_first``` ASC NULLS FIRST) - ```:desc``` DESC NULLS FIRST [comment]: (- ```:desc_nulls_last``` DESC NULLS LAST) [comment]: (- ```:desc_nulls_first``` DESC NULLS FIRST) ## Searching and location filtering For some resources a dedicated /search endpoint is available, which is optimized for searching large datasets. We use an Elasticsearch database to deliver these results. The schema for these resources is often a concise version of the schema used for regular endpoints, but always contains the primary key (obj_id). If you need the full schema for a resource found through /search, you can perform an additional call to the GET / endpoint. In most cases, searching has the following query parameters: - `term` - generic term used for the search - `city` or `zip` - a city name or postal code (only Dutch postal codes allowed) - `distance` - distance from the center of the given city or zip (default *5km*) Results from /search endpoints do not support custom ordering, but are ordered based on relevance (i.e. *score* for term queries and *distance* for all location bound search queries). ## Rate limiting Usage of the Congressus API is unlimited within the plan and permissions of the account you are using. To prevent fraud and abuse, requests to the API are throttled. You can request the API 60 times each minute and 1000 times per hour. The API will respond with a **429 Too many requests** response. This response contains the following fields in the headers: - `X-RateLimit-Limit` The total number of requests allowed for the active window - `X-RateLimit-Remaining` The number of requests remaining in the active window. - `X-RateLimit-Reset` UTC seconds since epoch when the window will be reset. - `Retry-After` Seconds to retry after when the Rate Limit will be reset. ## Cross-Origin Resource Sharing This API features Cross-Origin Resource Sharing (CORS) implemented in compliance with W3C spec. This allows cross-domain communication from the browser. All responses have a wildcard same-origin, which allows to use our API from any domain or server. # Webhooks Information in a Congressus administration is constantly changing. If you want to perform actions based on these changes, webhooks help you to achieve this. Instead of querying the API at a certain interval, Congressus will notify you about changes to information in the administration. ## Usage Webhooks are useful in a broad range of situations. When the state of an resource changes, Congressus will perform a HTTP request to the URL you provide. Based on the payload of the request, you can determine which action you need to perform. How it works: - You need a URL that Congressus can call to deliver the payload. The Congressus servers must be able to access this URL. - You can add HTTP basic authentication or other token authentication in the URL, as long as the URL stays valid. - Your URL always needs to respond with a 200 HTTP status. Upon registration this is checked. - When your URL responds with another HTTP status code, Congressus will retry to deliver the call 10 times. The time interval between retries is gradually extended. - After each call, Congressus will store the last HTTP status code and HTTP body. Using the webhooks API, you can retrieve this information for debugging purposes. - You can register as many webhooks as required in an administration. Registration is done by sending a POST request to the webhooks API. > **We strongly recommend that you use a secure HTTPS endpoint for receiving payload from Congressus. If you use > unencrypted HTTP, anyone on the network may be able to listen in on sensitive information like members and invoices.** ## Webhook events Each webhook subscribes to an event. When an event occurs, Congressus will call the webhook using an HTTP request to the provided URL. The following events are available: **Members** - member - All member related events - member_added - Member added to the administration - member_updated - Existing Member is updated - member_deleted - Member is removed from the administration - member_birthday - Triggered once on the birthday of a member **Events** - event - All event related events - event_added - Event added - event_updated - Event updated - event_deleted - Event deleted from the administration **Event participations** - event_participation - All event participation related events - event_participation_added - Event participation added - event_participation_updated - Event participation updated - event_participation_deleted - Event participation deleted from the administration **Form entries** - form_entry - All form entry related events - form_entry_added - Form entry added - form_entry_updated - Form entry updated - form_entry_deleted - Form entry deleted from the administration **Sale invoices** - sale_invoices - All sale invoice related events - sale_invoices_added - Sale invoice added - sale_invoices_updated - Sale invoice updated - sale_invoices_deleted - Sale invoice deleted from the administration ## Payload Each webhook call has a payload based on the category of the event that triggered the webhook. E.g. events in the category **Members** get a payload based on the schema for Members, filled with the data for the resource that triggered the webhook. Each webhook call contains the following information: - `webhook_id`- The id of the webhook that triggered the call - `webhook_event` - The category of events for the webhook - `webhook_event_trigger` - The trigger that caused the webhook call - `created` - Date and time at which the webhook was triggered - `data` - List which contains the payload(s) in the form of the complete resource that triggered the event # Changelog This is version 3.0 of the Congressus API. In this chapter we describe all changes in v3.0. ## 2025-09-30 Endpoint for Filters added - A new endpoint `/filters` is added to retrieve available filters for Members, Events and Organisations. ## 2025-08-13 Filter on folder_id added to Storage - The `folder_id` parameter is added to the `storage` endpoint. This allows you to filter storage resources by folder. ## 2025-07-11 Website added to Magic link endpoint - The `website_id` parameter is added to the `magic-links` endpoint. This allows you to create magic links for a specific website. ## 2025-05-24 Organisation resource improvements - `Organisation` resources now also have the 'published' attribute. - `Organisation` resources now also include custom field data in the `custom_field_data` attribute. - Custom fields are defined per organisation category, so the custom fields available for an organisation depend on the category of the organisation. - `Organisation category` resources now also include metadata for the custom fields available for that category in the `custom_fields` attribute. ## 2025-05-04 Magic links added - `Magic links` are added to the API. These links can be used to authenticate a website visitor without the need for a password. ## 2024-11-25 Form and Form entry resources added - `Form` and `Form entry` resources are added to the API. - `Form` resources can be created and updated through the API. It is currently not possible to delete a form or manage fields and fieldsets. - `forms//entries` endpoint is available to retrieve form entries. - `forms//fields` endpoint is available to retrieve form fields. ## 2024-04-23 Custom fields for Members available in PUT/POST requests - Custom fields for Members can now be added or updated through the API. The custom fields are available in the `custom_field_data` attribute of the Member resource. - The old `custom_fields` attribute is deprecated and will be removed in a future version. - The `members/custom-fields` resource shows the available custom fields for Members, including meta information. ## 2024-02-27 Action endpoints for EventParticipation added - `EventParticipation` status can now be changed through the API, including fines when unsubscribing or declining a participation. - API upgrade guide from v20 to v30 removed from docs, as it is no longer relevant. The v20 API is unavailable since mid 2023. ## 2022-12-09 Event ticket types endpoints - `EventTicketType` resources can now be created, updated and deleted through the API - The context is now applied at row level according to the status of the Member for the `v30/members` endpoint ## 2022-06-28 Events updated, MembershipStatus resources added - `Event` resources are now fully operational, including the possibility to add participants / sell tickets through the API. - `MembershipStatus` is now available for Member resources. ## 2022-06-22 Minor updates and fixes - Feat: /members can be filtered against multiples statuses with the status_id query parameter (i.e: /members?status_id=2&status_id=3). - Feat: the News model now contains a list of websites where the news item is published on - Fix: add the default website to POST /news on create - Fix: sale_invoice_id is now honored when given by the creation of a sale invoice /sale-invoices//send ## 2022-06-03 Minor updates and fixes - Feat: Additional filtering for /sale-invoices endpoint added (invoice_type 'debit', 'is_credited' and 'is_not_credited'). - Feat: Renamed /groups/folders endpoints to /group-folders for more consistency. Deprecated old endpoints. - Feat: Added member status resources through /member-statuses. - Feat: Added profile_picture and formal_picture to Member resources. - Fix: we incorrectly used 'per_page' as parameter in the Pagination-section of these docs. The correct parameter is **'page_size'**. - Fix: all non-recursive endpoints for Group folders and Product folders returned children, this is resolved. ## 2022-05-03 Member validation through context added - Added extended validation options for Member-resources by setting a `context` parameter. This context ensures validation according to the field settings as set in Congressus Manager for the member status. - Description for Context validation added to the Member-resources. - Introduction on Context validation added to the [upgrade guide](#section/Upgrading-from-v20-to-v30) ## 2022-04-22 Upgrade guide from v20 to v30 added - First version for the [upgrade guide](#section/Upgrading-from-v20-to-v30) added ## 2022-03-23 Additional filtering for Group and Organisation resources - `Group` and `Group membership` resources can use a filter on member_id - `Organisation` and `Organisation membership` resources can use a filter on member_id ## 2022-03-21 Group and GroupFolder resources added - Group, GroupFolder and GroupMembership resources are added to the API. - `Group folders` are added and use a tree-like structure. - `Organisation` resources have create, update and delete views added. - `Organisation membership` resources are added - Fix: SDD mandates returned and empty list for Member resources. ## 2021-10-14 Organisation resources added - Both Organisation and Organisation category resources are added to the API. ## 2021-10-02 Additional filters added for Event participations - `Event participations` have additional filter functionality ## 2021-09-22 Added resources for Product folders and Sale invoice workflows - `Product folders` are added, using a tree-like structure. - `Sale invoice workflows` are added as resource. Read-only for this moment. - Updated descriptions for Sale invoice attributes. ## 2021-08-09 additional filters for events and products - Events can now be filtered on published true/false - Products can now be filtered on published and folder_id. More than one folder_id can be given by supplying it more than once as query param, e.g. `products?folder_id=123&folder_id=456` ## 2021-08-04 custom fields and descriptions added, publication options added to events and blogs - The retrieve member resource now also shows the custom field information for a member - Many attributes have an additional description added - Publication attributes are added to Event and Blog resources ## 2021-06-09 website related resources added - Website and Webpage resources added (list and get only) - News resources added - Default order is added for Websites, Webpages, Events and News list endpoints. You can overwrite the default order with the `order` query param - Improved descriptions for several resources, removed some typo's in the documentation ## 2021-04-06 initial release - This initial release contains a minor set of resources to work with.
citomni/jobrunner
0 Downloads
Small DB-backed job runner for CitOmni: HTTP/UI-started long-running jobs executed by CLI workers with status, steps, logs, heartbeat, and results.
adaptech/finapi-access
515 Downloads
RESTful API for Account Information Services (AIS) and Payment Initiation Services (PIS) The following pages give you some general information on how to use our APIs. The actual API services documentation then follows further below. You can use the menu to jump between API sections. This page has a built-in HTTP(S) client, so you can test the services directly from within this page, by filling in the request parameters and/or body in the respective services, and then hitting the TRY button. Note that you need to be authorized to make a successful API call. To authorize, refer to the 'Authorization' section of the API, or just use the OAUTH button that can be found near the TRY button. General information Error Responses When an API call returns with an error, then in general it has the structure shown in the following example: { "errors": [ { "message": "Interface 'FINTS_SERVER' is not supported for this operation.", "code": "BAD_REQUEST", "type": "TECHNICAL" } ], "date": "2020-11-19 16:54:06.854", "requestId": "selfgen-312042e7-df55-47e4-bffd-956a68ef37b5", "endpoint": "POST /api/v1/bankConnections/import", "authContext": "1/21", "bank": "DEMO0002 - finAPI Test Redirect Bank" } If an API call requires an additional authentication by the user, HTTP code 510 is returned and the error response contains the additional "multiStepAuthentication" object, see the following example: { "errors": [ { "message": "Es ist eine zusätzliche Authentifizierung erforderlich. Bitte geben Sie folgenden Code an: 123456", "code": "ADDITIONAL_AUTHENTICATION_REQUIRED", "type": "BUSINESS", "multiStepAuthentication": { "hash": "678b13f4be9ed7d981a840af8131223a", "status": "CHALLENGE_RESPONSE_REQUIRED", "challengeMessage": "Es ist eine zusätzliche Authentifizierung erforderlich. Bitte geben Sie folgenden Code an: 123456", "answerFieldLabel": "TAN", "redirectUrl": null, "redirectContext": null, "redirectContextField": null, "twoStepProcedures": null, "photoTanMimeType": null, "photoTanData": null, "opticalData": null } } ], "date": "2019-11-29 09:51:55.931", "requestId": "selfgen-45059c99-1b14-4df7-9bd3-9d5f126df294", "endpoint": "POST /api/v1/bankConnections/import", "authContext": "1/18", "bank": "DEMO0001 - finAPI Test Bank" } An exception to this error format are API authentication errors, where the following structure is returned: { "error": "invalid_token", "error_description": "Invalid access token: cccbce46-xxxx-xxxx-xxxx-xxxxxxxxxx" } Paging API services that may potentially return a lot of data implement paging. They return a limited number of entries within a "page". Further entries must be fetched with subsequent calls. Any API service that implements paging provides the following input parameters: • "page": the number of the page to be retrieved (starting with 1). • "perPage": the number of entries within a page. The default and maximum value is stated in the documentation of the respective services. A paged response contains an additional "paging" object with the following structure: { ... , "paging": { "page": 1, "perPage": 20, "pageCount": 234, "totalCount": 4662 } } Internationalization The finAPI services support internationalization which means you can define the language you prefer for API service responses. The following languages are available: German, English, Czech, Slovak. The preferred language can be defined by providing the official HTTP Accept-Language header. finAPI reacts on the official iso language codes "de", "en", "cs" and "sk" for the named languages. Additional subtags supported by the Accept-Language header may be provided, e.g. "en-US", but are ignored. If no Accept-Language header is given, German is used as the default language. Exceptions: • Bank login hints and login fields are only available in the language of the bank and not being translated. • Direct messages from the bank systems typically returned as BUSINESS errors will not be translated. • BUSINESS errors created by finAPI directly are available in German and English. • TECHNICAL errors messages meant for developers are mostly in English, but also may be translated. Request IDs With any API call, you can pass a request ID via a header with name "X-Request-Id". The request ID can be an arbitrary string with up to 255 characters. Passing a longer string will result in an error. If you don't pass a request ID for a call, finAPI will generate a random ID internally. The request ID is always returned back in the response of a service, as a header with name "X-Request-Id". We highly recommend to always pass a (preferably unique) request ID, and include it into your client application logs whenever you make a request or receive a response (especially in the case of an error response). finAPI is also logging request IDs on its end. Having a request ID can help the finAPI support team to work more efficiently and solve tickets faster. Overriding HTTP methods Some HTTP clients do not support the HTTP methods PATCH or DELETE. If you are using such a client in your application, you can use a POST request instead with a special HTTP header indicating the originally intended HTTP method. The header's name is X-HTTP-Method-Override. Set its value to either PATCH or DELETE. POST Requests having this header set will be treated either as PATCH or DELETE by the finAPI servers. Example: X-HTTP-Method-Override: PATCH POST /api/v1/label/51 {"name": "changed label"} will be interpreted by finAPI as: PATCH /api/v1/label/51 {"name": "changed label"} User metadata With the migration to PSD2 APIs, a new term called "User metadata" (also known as "PSU metadata") has been introduced to the API. This user metadata aims to inform the banking API if there was a real end-user behind an HTTP request or if the request was triggered by a system (e.g. by an automatic batch update). In the latter case, the bank may apply some restrictions such as limiting the number of HTTP requests for a single consent. Also, some operations may be forbidden entirely by the banking API. For example, some banks do not allow issuing a new consent without the end-user being involved. Therefore, it is certainly necessary and obligatory for the customer to provide the PSU metadata for such operations. As finAPI does not have direct interaction with the end-user, it is the client application's responsibility to provide all the necessary information about the end-user. This must be done by sending additional headers with every request triggered on behalf of the end-user. At the moment, the following headers are supported by the API: • "PSU-IP-Address" - the IP address of the user's device. • "PSU-Device-OS" - the user's device and/or operating system identification. • "PSU-User-Agent" - the user's web browser or other client device identification. FAQ Is there a finAPI SDK? Currently we do not offer a native SDK, but there is the option to generate a SDK for almost any target language via OpenAPI. Use the 'Download SDK' button on this page for SDK generation. How can I enable finAPI's automatic batch update? Currently there is no way to set up the batch update via the API. Please contact [email protected] for this. Why do I need to keep authorizing when calling services on this page? This page is a "one-page-app". Reloading the page resets the OAuth authorization context. There is generally no need to reload the page, so just don't do it and your authorization will persist.
balt-technologies/standards
444 Downloads
PHP Package with a bunch of enums for standards, eg. ISO countries, languages, http status code etc.
edsonr-coosta/response-json
16 Downloads
O Projeto Response é uma biblioteca PHP para criar respostas JSON com códigos de status HTTP personalizados, simplificando o desenvolvimento de APIs web eficazes em projetos PHP.
muhammadhuzaifa/telescope-guzzle-watcher
282680 Downloads
Telescope Guzzle Watcher provide a custom watcher for intercepting http requests made via guzzlehttp/guzzle php library. The package uses the on_stats request option for extracting the request/response data. The watcher intercept and log the request into the Laravel Telescope HTTP Client Watcher.
emergentmethods/asknews-php-sdk
18936 Downloads
AskNews API [](https://status.asknews.app/status/prod)
paypaplane/svix-client
23977 Downloads
Welcome to the Svix API documentation! Useful links: [Homepage](https://www.svix.com) | [Support email](mailto:[email protected]) | [Blog](https://www.svix.com/blog/) | [Slack Community](https://www.svix.com/slack/) # Introduction This is the reference documentation and schemas for the [Svix webhook service](https://www.svix.com) API. For tutorials and other documentation please refer to [the documentation](https://docs.svix.com). ## Main concepts In Svix you have four important entities you will be interacting with: - `messages`: these are the webhooks being sent. They can have contents and a few other properties. - `application`: this is where `messages` are sent to. Usually you want to create one application for each user on your platform. - `endpoint`: endpoints are the URLs messages will be sent to. Each application can have multiple `endpoints` and each message sent to that application will be sent to all of them (unless they are not subscribed to the sent event type). - `event-type`: event types are identifiers denoting the type of the message being sent. Event types are primarily used to decide which events are sent to which endpoint. ## Authentication Get your authentication token (`AUTH_TOKEN`) from the [Svix dashboard](https://dashboard.svix.com) and use it as part of the `Authorization` header as such: `Authorization: Bearer ${AUTH_TOKEN}`. For more information on authentication, please refer to the [authentication token docs](https://docs.svix.com/api-keys). ## Code samples The code samples assume you already have the respective libraries installed and you know how to use them. For the latest information on how to do that, please refer to [the documentation](https://docs.svix.com/). ## Idempotency Svix supports [idempotency](https://en.wikipedia.org/wiki/Idempotence) for safely retrying requests without accidentally performing the same operation twice. This is useful when an API call is disrupted in transit and you do not receive a response. To perform an idempotent request, pass the idempotency key in the `Idempotency-Key` header to the request. The idempotency key should be a unique value generated by the client. You can create the key in however way you like, though we suggest using UUID v4, or any other string with enough entropy to avoid collisions. Svix's idempotency works by saving the resulting status code and body of the first request made for any given idempotency key for any successful request. Subsequent requests with the same key return the same result. Please note that idempotency is only supported for `POST` requests. ## Cross-Origin Resource Sharing This API features Cross-Origin Resource Sharing (CORS) implemented in compliance with [W3C spec](https://www.w3.org/TR/cors/). And that allows cross-domain communication from the browser. All responses have a wildcard same-origin which makes them completely public and accessible to everyone, including any code on any site.
sendpost/sendpost-php-sdk
640 Downloads
# Introduction SendPost provides email API and SMTP relay which can be used not just to send & measure but also alert & optimised email sending. You can use SendPost to: * Send personalised emails to multiple recipients using email API * Track opens and clicks * Analyse statistics around open, clicks, bounce, unsubscribe and spam At and advanced level you can use it to: * Manage multiple sub-accounts which may map to your promotional or transactional sending, multiple product lines or multiple customers * Classify your emails using groups for better analysis * Analyse and fix email sending at sub-account level, IP Pool level or group level * Have automated alerts to notify disruptions regarding email sending * Manage different dedicated IP Pools so to better control your email sending * Automatically know when IP or domain is blacklisted or sender score is down * Leverage pro deliverability tools to get significantly better email deliverability & inboxing [](https://god.gw.postman.com/run-collection/33476323-e6dbd27f-c4a7-4d49-bcac-94b0611b938b?action=collection%2Ffork&source=rip_markdown&collection-url=entityId%3D33476323-e6dbd27f-c4a7-4d49-bcac-94b0611b938b%26entityType%3Dcollection%26workspaceId%3D6b1e4f65-96a9-4136-9512-6266c852517e) # Overview ## REST API SendPost API is built on REST API principles. Authenticated users can interact with any of the API endpoints to perform: * **GET**- to get a resource * **POST** - to create a resource * **PUT** - to update an existing resource * **DELETE** - to delete a resource The API endpoint for all API calls is: https://api.sendpost.io/api/v1 Some conventions that have been followed in the API design overall are following: * All resources have either /api/v1/subaccount or /api/v1/account in their API call resource path based on who is authorised for the resource. All API calls with path /api/v1/subaccount use X-SubAccount-ApiKey in their request header. Likewise all API calls with path /api/v1/account use X-Account-ApiKey in their request header. * All resource endpoints end with singular name and not plural. So we have domain instead of domains for domain resource endpoint. Likewise we have sender instead of senders for sender resource endpoint. * Body submitted for POST / PUT API calls as well as JSON response from SendPost API follow camelcase convention * All timestamps returned in response (created or submittedAt response fields) are UNIX nano epoch timestamp. All resources have either /api/v1/subaccount or /api/v1/account in their API call resource path based on who is authorised for the resource. All API calls with path /api/v1/subaccount use X-SubAccount-ApiKey in their request header. Likewise all API calls with path /api/v1/account use X-Account-ApiKey in their request header. SendPost uses conventional HTTP response codes to indicate the success or failure of an API request. * Codes in the 2xx range indicate success. * Codes in the 4xx range indicate an error owing due to unauthorize access, incorrect request parameters or body etc. * Code in the 5xx range indicate an eror with SendPost's servers ( internal service issue or maintenance ) SendPost all responses return created in UNIX nano epoch timestamp. ## Authentication SendPost uses API keys for authentication. You can register a new SendPost API key at our [developer portal](https://app.sendpost.io/register). SendPost expects the API key to be included in all API requests to the server in a header that looks like the following: `X-SubAccount-ApiKey: AHEZEP8192SEGH` This API key is used for all Sub-Account level operations such as: * Sending emails * Retrieving stats regarding open, click, bounce, unsubscribe and spam * Uploading suppressions list * Verifying sending domains and more In addition to X-SubAccount-ApiKey you also have another API Key X-Account-APIKey which is used for Account level operations such as : * Creating and managing sub-accounts * Allocating IPs for your account * Getting overall billing and usage information * Email List validation * Creating and managing alerts and more You must look at individual API reference page to look at whether X-SubAccount-ApiKey is required or X-Account-ApiKey In case an incorrect API Key header is specified or if it is missed you will get HTTP Response 401 ( Unauthorized ) response from SendPost. ## HTTP Response Headers Code | Reason | Details ---------------| -----------------------| ----------- 200 | Success | Everything went well 401 | Unauthorized | Incorrect or missing API header either X-SubAccount-ApiKey or X-Account-ApiKey 403 | Forbidden | Typically sent when resource with same name or details already exist 406 | Missing resource id | Resource id specified is either missing or doesn't exist 422 | Unprocessable entity | Request body is not in proper format 500 | Internal server error | Some error happened at SendPost while processing API request 503 | Service Unavailable | SendPost is offline for maintenance. Please try again later # API SDKs We have native SendPost SDKs in the following programming languages. You can integrate with them or create your own SDK with our API specification. In case you need any assistance with respect to API then do reachout to our team from website chat or email us at **[email protected]** * [PHP](https://github.com/sendpost/sendpost_php_sdk) * [Javascript](https://github.com/sendpost/sendpost_javascript_sdk) * [Ruby](https://github.com/sendpost/sendpost_ruby_sdk) * [Python](https://github.com/sendpost/sendpost_python_sdk) * [Golang](https://github.com/sendpost/sendpost_go_sdk) # API Reference SendX REST API can be broken down into two major sub-sections: * Sub-Account * Account Sub-Account API operations enable common email sending API use-cases like sending bulk email, adding new domains or senders for email sending programmatically, retrieving stats, adding suppressions etc. All Sub-Account API operations need to pass X-SubAccount-ApiKey header with every API call. The Account API operations allow users to manage multiple sub-accounts and manage IPs. A single parent SendPost account can have 100's of sub-accounts. You may want to create sub-accounts for different products your company is running or to segregate types of emails or for managing email sending across multiple customers of yours. # SMTP Reference Simple Mail Transfer Protocol (SMTP) is a quick and easy way to send email from one server to another. SendPost provides an SMTP service that allows you to deliver your email via our servers instead of your own client or server. This means you can count on SendPost's delivery at scale for your SMTP needs. ## Integrating SMTP 1. Get the SMTP `username` and `password` from your SendPost account. 2. Set the server host in your email client or application to `smtp.sendpost.io`. This setting is sometimes referred to as the external SMTP server or the SMTP relay. 3. Set the `username` and `password`. 4. Set the port to `587` (or as specified below). ## SMTP Ports - For an unencrypted or a TLS connection, use port `25`, `2525` or `587`. - For a SSL connection, use port `465` - Check your firewall and network to ensure they're not blocking any of our SMTP Endpoints. SendPost supports STARTTLS for establishing a TLS-encrypted connection. STARTTLS is a means of upgrading an unencrypted connection to an encrypted connection. There are versions of STARTTLS for a variety of protocols; the SMTP version is defined in [RFC 3207](https://www.ietf.org/rfc/rfc3207.txt). To set up a STARTTLS connection, the SMTP client connects to the SendPost SMTP endpoint `smtp.sendpost.io` on port 25, 587, or 2525, issues an EHLO command, and waits for the server to announce that it supports the STARTTLS SMTP extension. The client then issues the STARTTLS command, initiating TLS negotiation. When negotiation is complete, the client issues an EHLO command over the new encrypted connection, and the SMTP session proceeds normally. If you are unsure which port to use, a TLS connection on port 587 is typically recommended. ## Sending email from your application ```javascript "use strict"; const nodemailer = require("nodemailer"); async function main() { // create reusable transporter object using the default SMTP transport let transporter = nodemailer.createTransport({ host: "smtp.sendpost.io", port: 587, secure: false, // true for 465, false for other ports auth: { user: "" , // generated ethereal user pass: "", // generated ethereal password }, requireTLS: true, debug: true, logger: true, }); // send mail with defined transport object try { let info = await transporter.sendMail({ from: '[email protected]', to: '[email protected]', subject: 'Test Email Subject', html: 'Hello Geeks!!!', }); console.log("Message sent: %s", info.messageId); } catch (e) { console.log(e) } } main().catch(console.error); ``` For PHP ```php
briqpay/php-sdk
11940 Downloads
This is the API documentation for Briqpay. You can find out more about us and our offering at our website [https://briqpay.com](https://briqpay.com) In order to get credentials to the playgrund API Please register at [https://app.briqpay.com](https://app.briqpay.com) # Introduction Briqpay Checkout is an inline checkout solution for your b2b ecommerce. Briqpay Checkout gives you the flexibility of controlling your payment methods and credit rules while optimizing the UX for your customers # SDKs Briqpay offers standard SDKs to PHP and .NET based on these swagger definitions. You can download them respively or use our swagger defintitions to codegen your own versions. #### For .NET `` Install-Package Briqpay `` #### For PHP `` composer require briqpay/php-sdk `` # Standard use-case As a first step of integration you will need to create a checkout session. \n\nIn this session you provide Briqpay with the basic information necessary. In the response from briqpay you will recieve a htmlsnippet that is to be inserted into your frontend. The snippet provided by briqpay will render an iframe where the user will complete the purchase. Once completed, briqpay will redirect the customer to a confirmation page that you have defined. 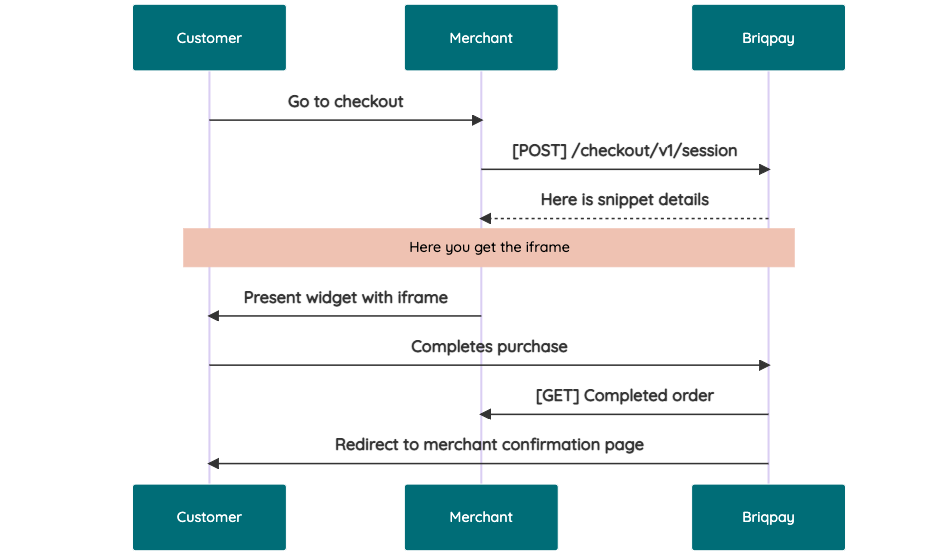 # JavaScript SDK The first step of integration is to add our JS to your site just before closing the ```` tag. This ensures that our JS library is avaliable to load the checkout. ```` Briqpay offers a few methods avaliable through our Javascript SDK. The library is added by our iframe and is avalable on ``window._briqpay`` If you offer the posibility to update the cart or order amonts on the checkout page, the JS library will help you. If your store charges the customer different costs and fees depening on their shipping location, you can listen to the ``addressupdate``event in order to re-calculate the total cost. ```javascript window._briqpay.subscribe('addressupdate', function (data) { console.log(data) }) ``` If your frontend needs to perform an action whe the signup has completed, listen to the ``signup_finalized`` event. ```javascript window._briqpay.subscribe('signup_finalized', function (status) { // redirect or handle status 'success' / 'failure' }) ``` If you allow customers to change the total cart value, you can utilise the JS library to suspend the iframe while you perform a backen update call towards our services. As described below: 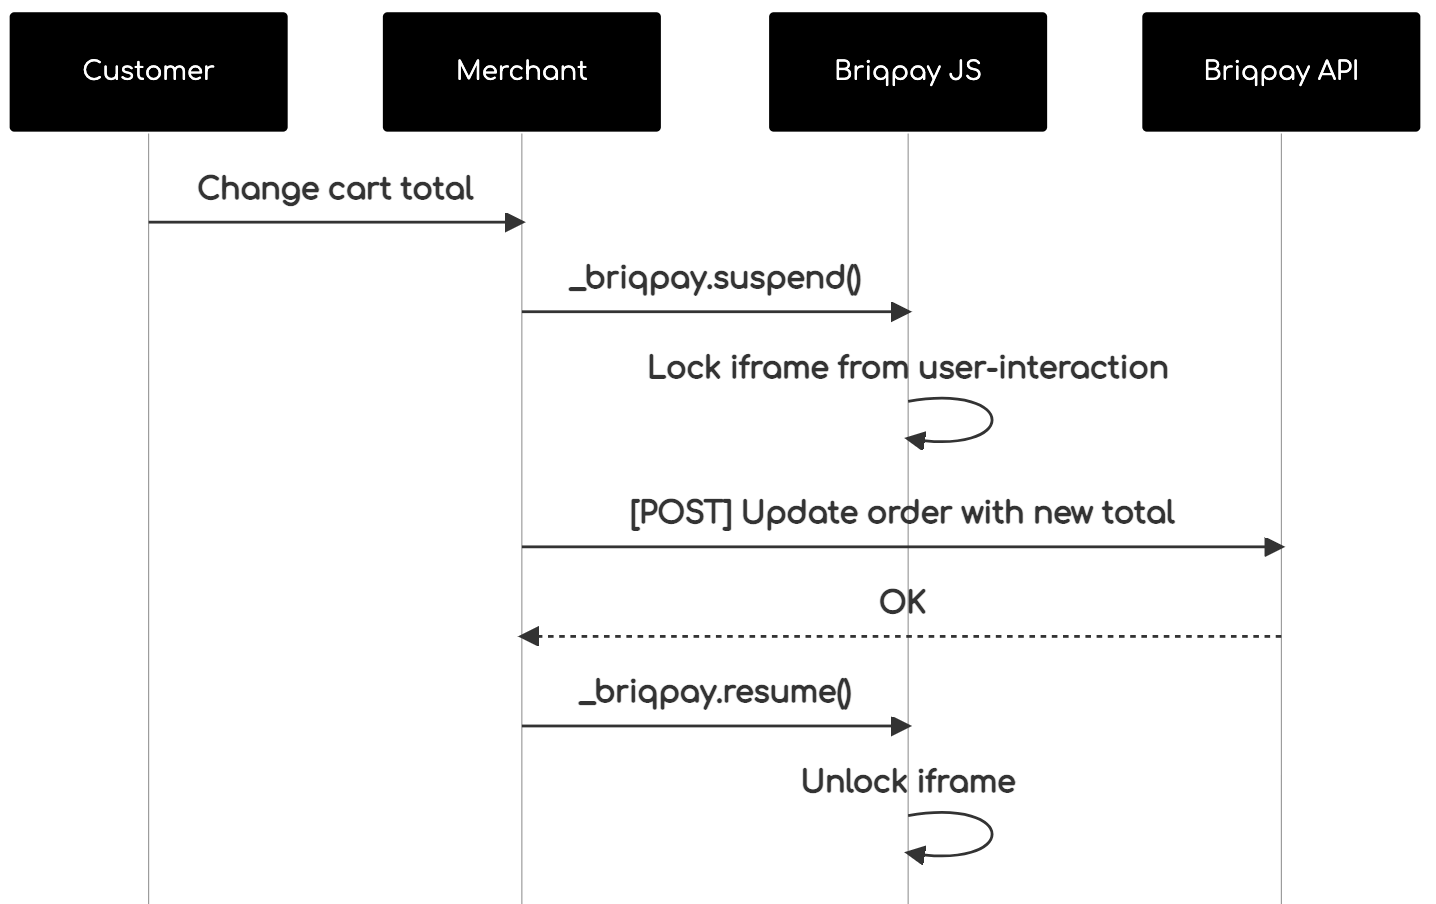 The iframe will auto-resume after 7 seconds if you dont call ``_briqpay.resume()`` before # Test Data In order to verify your integration you will neeed to use test data towards our credit engine. ## Company identication numbers * 1111111111 - To recieve a high credit scoring company ( 100 in rating) * 2222222222 - To test the enviournment with a bad credit scoring company (10 in rating) ## Card details In our playground setup your account is by default setup with a Stripe integration. In order to test out the card form you can use the below card numbers: * 4000002500003155 - To mock 3ds authentication window * 4000000000000069 Charge is declined with an expired_card code. You can use any valid expiry and CVC code # Authentication Briqpay utilizes JWT in order to authenticate calls to our platform. Authentication tokens expire after 48 hours, and at that point you can generate a new token for the given resource using the ``/auth`` endpoint. - Basic Auth - only used on the auth endpoint in order to get the Bearer Token - JWT Bearer Token - All calls towards the API utlizes this method"
mathiasgrimm/netwatch
297 Downloads
Network service latency probing tool for PHP — measures Redis, PostgreSQL, MySQL, S3, HTTP endpoints with statistical analysis
nietonchique/sofascore-api-bundle
220 Downloads
Symfony bundle and standalone PHP client for the unofficial SofaScore API: matches, players, teams, tournaments and live per-sport statistics, with a pluggable HTTP / headless-Chrome transport.
payherokenya/payhero-php
133 Downloads
This PHP client library enables easy interaction with the PayHero API, allowing developers to integrate PayHero's payment processing capabilities into their PHP applications. With this client, you can perform operations like checking wallet balances, topping up service wallets, initiating payments, and querying transaction statuses.To be able to generate API keys with Pay Hero to use our API services you need to create an account with us. Create an account using below link and verify your account to be able to proceed. Go To: https://app.payhero.co.ke
stage/tool
4 Downloads
Tools for Stage Framework.