Libraries tagged by http response status
adaptech/finapi-access
515 Downloads
RESTful API for Account Information Services (AIS) and Payment Initiation Services (PIS) The following pages give you some general information on how to use our APIs. The actual API services documentation then follows further below. You can use the menu to jump between API sections. This page has a built-in HTTP(S) client, so you can test the services directly from within this page, by filling in the request parameters and/or body in the respective services, and then hitting the TRY button. Note that you need to be authorized to make a successful API call. To authorize, refer to the 'Authorization' section of the API, or just use the OAUTH button that can be found near the TRY button. General information Error Responses When an API call returns with an error, then in general it has the structure shown in the following example: { "errors": [ { "message": "Interface 'FINTS_SERVER' is not supported for this operation.", "code": "BAD_REQUEST", "type": "TECHNICAL" } ], "date": "2020-11-19 16:54:06.854", "requestId": "selfgen-312042e7-df55-47e4-bffd-956a68ef37b5", "endpoint": "POST /api/v1/bankConnections/import", "authContext": "1/21", "bank": "DEMO0002 - finAPI Test Redirect Bank" } If an API call requires an additional authentication by the user, HTTP code 510 is returned and the error response contains the additional "multiStepAuthentication" object, see the following example: { "errors": [ { "message": "Es ist eine zusätzliche Authentifizierung erforderlich. Bitte geben Sie folgenden Code an: 123456", "code": "ADDITIONAL_AUTHENTICATION_REQUIRED", "type": "BUSINESS", "multiStepAuthentication": { "hash": "678b13f4be9ed7d981a840af8131223a", "status": "CHALLENGE_RESPONSE_REQUIRED", "challengeMessage": "Es ist eine zusätzliche Authentifizierung erforderlich. Bitte geben Sie folgenden Code an: 123456", "answerFieldLabel": "TAN", "redirectUrl": null, "redirectContext": null, "redirectContextField": null, "twoStepProcedures": null, "photoTanMimeType": null, "photoTanData": null, "opticalData": null } } ], "date": "2019-11-29 09:51:55.931", "requestId": "selfgen-45059c99-1b14-4df7-9bd3-9d5f126df294", "endpoint": "POST /api/v1/bankConnections/import", "authContext": "1/18", "bank": "DEMO0001 - finAPI Test Bank" } An exception to this error format are API authentication errors, where the following structure is returned: { "error": "invalid_token", "error_description": "Invalid access token: cccbce46-xxxx-xxxx-xxxx-xxxxxxxxxx" } Paging API services that may potentially return a lot of data implement paging. They return a limited number of entries within a "page". Further entries must be fetched with subsequent calls. Any API service that implements paging provides the following input parameters: • "page": the number of the page to be retrieved (starting with 1). • "perPage": the number of entries within a page. The default and maximum value is stated in the documentation of the respective services. A paged response contains an additional "paging" object with the following structure: { ... , "paging": { "page": 1, "perPage": 20, "pageCount": 234, "totalCount": 4662 } } Internationalization The finAPI services support internationalization which means you can define the language you prefer for API service responses. The following languages are available: German, English, Czech, Slovak. The preferred language can be defined by providing the official HTTP Accept-Language header. finAPI reacts on the official iso language codes "de", "en", "cs" and "sk" for the named languages. Additional subtags supported by the Accept-Language header may be provided, e.g. "en-US", but are ignored. If no Accept-Language header is given, German is used as the default language. Exceptions: • Bank login hints and login fields are only available in the language of the bank and not being translated. • Direct messages from the bank systems typically returned as BUSINESS errors will not be translated. • BUSINESS errors created by finAPI directly are available in German and English. • TECHNICAL errors messages meant for developers are mostly in English, but also may be translated. Request IDs With any API call, you can pass a request ID via a header with name "X-Request-Id". The request ID can be an arbitrary string with up to 255 characters. Passing a longer string will result in an error. If you don't pass a request ID for a call, finAPI will generate a random ID internally. The request ID is always returned back in the response of a service, as a header with name "X-Request-Id". We highly recommend to always pass a (preferably unique) request ID, and include it into your client application logs whenever you make a request or receive a response (especially in the case of an error response). finAPI is also logging request IDs on its end. Having a request ID can help the finAPI support team to work more efficiently and solve tickets faster. Overriding HTTP methods Some HTTP clients do not support the HTTP methods PATCH or DELETE. If you are using such a client in your application, you can use a POST request instead with a special HTTP header indicating the originally intended HTTP method. The header's name is X-HTTP-Method-Override. Set its value to either PATCH or DELETE. POST Requests having this header set will be treated either as PATCH or DELETE by the finAPI servers. Example: X-HTTP-Method-Override: PATCH POST /api/v1/label/51 {"name": "changed label"} will be interpreted by finAPI as: PATCH /api/v1/label/51 {"name": "changed label"} User metadata With the migration to PSD2 APIs, a new term called "User metadata" (also known as "PSU metadata") has been introduced to the API. This user metadata aims to inform the banking API if there was a real end-user behind an HTTP request or if the request was triggered by a system (e.g. by an automatic batch update). In the latter case, the bank may apply some restrictions such as limiting the number of HTTP requests for a single consent. Also, some operations may be forbidden entirely by the banking API. For example, some banks do not allow issuing a new consent without the end-user being involved. Therefore, it is certainly necessary and obligatory for the customer to provide the PSU metadata for such operations. As finAPI does not have direct interaction with the end-user, it is the client application's responsibility to provide all the necessary information about the end-user. This must be done by sending additional headers with every request triggered on behalf of the end-user. At the moment, the following headers are supported by the API: • "PSU-IP-Address" - the IP address of the user's device. • "PSU-Device-OS" - the user's device and/or operating system identification. • "PSU-User-Agent" - the user's web browser or other client device identification. FAQ Is there a finAPI SDK? Currently we do not offer a native SDK, but there is the option to generate a SDK for almost any target language via OpenAPI. Use the 'Download SDK' button on this page for SDK generation. How can I enable finAPI's automatic batch update? Currently there is no way to set up the batch update via the API. Please contact [email protected] for this. Why do I need to keep authorizing when calling services on this page? This page is a "one-page-app". Reloading the page resets the OAuth authorization context. There is generally no need to reload the page, so just don't do it and your authorization will persist.
optimistdigital/laravel-set-cache-headers
177 Downloads
This Laravel package is a bug fix for not caching successful responses, especially the ones with the HTTP status code 204 (No Content).
acrnogor/flowroute-sdk-v3-php
23 Downloads
The Flowroute APIs are organized around REST. Our APIs have resource-oriented URLs, support HTTP Verbs, and respond with HTTP Status Codes. All API requests and responses, including errors, will be represented as JSON objects. You can use the Flowroute APIs to manage your Flowroute phone numbers including setting primary and failover routes for inbound calls, and sending text messages (SMS and MMS) using long-code or toll-free numbers in your account.
piurafunk/docker-php
9 Downloads
The Engine API is an HTTP API served by Docker Engine. It is the API the Docker client uses to communicate with the Engine, so everything the Docker client can do can be done with the API. Most of the client's commands map directly to API endpoints (e.g. `docker ps` is `GET /containers/json`). The notable exception is running containers, which consists of several API calls. # Errors The API uses standard HTTP status codes to indicate the success or failure of the API call. The body of the response will be JSON in the following format: ``` { "message": "page not found" } ``` # Versioning The API is usually changed in each release, so API calls are versioned to ensure that clients don't break. To lock to a specific version of the API, you prefix the URL with its version, for example, call `/v1.30/info` to use the v1.30 version of the `/info` endpoint. If the API version specified in the URL is not supported by the daemon, a HTTP `400 Bad Request` error message is returned. If you omit the version-prefix, the current version of the API (v1.40) is used. For example, calling `/info` is the same as calling `/v1.40/info`. Using the API without a version-prefix is deprecated and will be removed in a future release. Engine releases in the near future should support this version of the API, so your client will continue to work even if it is talking to a newer Engine. The API uses an open schema model, which means server may add extra properties to responses. Likewise, the server will ignore any extra query parameters and request body properties. When you write clients, you need to ignore additional properties in responses to ensure they do not break when talking to newer daemons. # Authentication Authentication for registries is handled client side. The client has to send authentication details to various endpoints that need to communicate with registries, such as `POST /images/(name)/push`. These are sent as `X-Registry-Auth` header as a Base64 encoded (JSON) string with the following structure: ``` { "username": "string", "password": "string", "email": "string", "serveraddress": "string" } ``` The `serveraddress` is a domain/IP without a protocol. Throughout this structure, double quotes are required. If you have already got an identity token from the [`/auth` endpoint](#operation/SystemAuth), you can just pass this instead of credentials: ``` { "identitytoken": "9cbaf023786cd7..." } ```
maxvaer/docker-openapi-php-client
4 Downloads
The Engine API is an HTTP API served by Docker Engine. It is the API the Docker client uses to communicate with the Engine, so everything the Docker client can do can be done with the API. Most of the client's commands map directly to API endpoints (e.g. `docker ps` is `GET /containers/json`). The notable exception is running containers, which consists of several API calls. # Errors The API uses standard HTTP status codes to indicate the success or failure of the API call. The body of the response will be JSON in the following format: ``` { "message": "page not found" } ``` # Versioning The API is usually changed in each release, so API calls are versioned to ensure that clients don't break. To lock to a specific version of the API, you prefix the URL with its version, for example, call `/v1.30/info` to use the v1.30 version of the `/info` endpoint. If the API version specified in the URL is not supported by the daemon, a HTTP `400 Bad Request` error message is returned. If you omit the version-prefix, the current version of the API (v1.40) is used. For example, calling `/info` is the same as calling `/v1.40/info`. Using the API without a version-prefix is deprecated and will be removed in a future release. Engine releases in the near future should support this version of the API, so your client will continue to work even if it is talking to a newer Engine. The API uses an open schema model, which means server may add extra properties to responses. Likewise, the server will ignore any extra query parameters and request body properties. When you write clients, you need to ignore additional properties in responses to ensure they do not break when talking to newer daemons. # Authentication Authentication for registries is handled client side. The client has to send authentication details to various endpoints that need to communicate with registries, such as `POST /images/(name)/push`. These are sent as `X-Registry-Auth` header as a Base64 encoded (JSON) string with the following structure: ``` { "username": "string", "password": "string", "email": "string", "serveraddress": "string" } ``` The `serveraddress` is a domain/IP without a protocol. Throughout this structure, double quotes are required. If you have already got an identity token from the [`/auth` endpoint](#operation/SystemAuth), you can just pass this instead of credentials: ``` { "identitytoken": "9cbaf023786cd7..." } ```
matthewbaggett/docker-api-php-client
7 Downloads
The Engine API is an HTTP API served by Docker Engine. It is the API the Docker client uses to communicate with the Engine, so everything the Docker client can do can be done with the API. Most of the client's commands map directly to API endpoints (e.g. `docker ps` is `GET /containers/json`). The notable exception is running containers, which consists of several API calls. # Errors The API uses standard HTTP status codes to indicate the success or failure of the API call. The body of the response will be JSON in the following format: ``` { "message": "page not found" } ``` # Versioning The API is usually changed in each release, so API calls are versioned to ensure that clients don't break. To lock to a specific version of the API, you prefix the URL with its version, for example, call `/v1.30/info` to use the v1.30 version of the `/info` endpoint. If the API version specified in the URL is not supported by the daemon, a HTTP `400 Bad Request` error message is returned. If you omit the version-prefix, the current version of the API (v1.43) is used. For example, calling `/info` is the same as calling `/v1.43/info`. Using the API without a version-prefix is deprecated and will be removed in a future release. Engine releases in the near future should support this version of the API, so your client will continue to work even if it is talking to a newer Engine. The API uses an open schema model, which means server may add extra properties to responses. Likewise, the server will ignore any extra query parameters and request body properties. When you write clients, you need to ignore additional properties in responses to ensure they do not break when talking to newer daemons. # Authentication Authentication for registries is handled client side. The client has to send authentication details to various endpoints that need to communicate with registries, such as `POST /images/(name)/push`. These are sent as `X-Registry-Auth` header as a [base64url encoded](https://tools.ietf.org/html/rfc4648#section-5) (JSON) string with the following structure: ``` { "username": "string", "password": "string", "email": "string", "serveraddress": "string" } ``` The `serveraddress` is a domain/IP without a protocol. Throughout this structure, double quotes are required. If you have already got an identity token from the [`/auth` endpoint](#operation/SystemAuth), you can just pass this instead of credentials: ``` { "identitytoken": "9cbaf023786cd7..." } ```
leibbrand-development/php-docker-client
28 Downloads
The Engine API is an HTTP API served by Docker Engine. It is the API the Docker client uses to communicate with the Engine, so everything the Docker client can do can be done with the API. Most of the client's commands map directly to API endpoints (e.g. `docker ps` is `GET /containers/json`). The notable exception is running containers, which consists of several API calls. # Errors The API uses standard HTTP status codes to indicate the success or failure of the API call. The body of the response will be JSON in the following format: ``` { "message": "page not found" } ``` # Versioning The API is usually changed in each release, so API calls are versioned to ensure that clients don't break. To lock to a specific version of the API, you prefix the URL with its version, for example, call `/v1.30/info` to use the v1.30 version of the `/info` endpoint. If the API version specified in the URL is not supported by the daemon, a HTTP `400 Bad Request` error message is returned. If you omit the version-prefix, the current version of the API (v1.41) is used. For example, calling `/info` is the same as calling `/v1.41/info`. Using the API without a version-prefix is deprecated and will be removed in a future release. Engine releases in the near future should support this version of the API, so your client will continue to work even if it is talking to a newer Engine. The API uses an open schema model, which means server may add extra properties to responses. Likewise, the server will ignore any extra query parameters and request body properties. When you write clients, you need to ignore additional properties in responses to ensure they do not break when talking to newer daemons. # Authentication Authentication for registries is handled client side. The client has to send authentication details to various endpoints that need to communicate with registries, such as `POST /images/(name)/push`. These are sent as `X-Registry-Auth` header as a [base64url encoded](https://tools.ietf.org/html/rfc4648#section-5) (JSON) string with the following structure: ``` { "username": "string", "password": "string", "email": "string", "serveraddress": "string" } ``` The `serveraddress` is a domain/IP without a protocol. Throughout this structure, double quotes are required. If you have already got an identity token from the [`/auth` endpoint](#operation/SystemAuth), you can just pass this instead of credentials: ``` { "identitytoken": "9cbaf023786cd7..." } ```
fwrepae/fwrepae
0 Downloads
The Inter TT REST API is described using OpenAPI 3.0. The descriptor for the api can be downloaded in both [YAML](http://localhost:8080/cyclos/api/openapi.yaml) or [JSON](http://localhost:8080/cyclos/api/openapi.json) formats. These files can be used in tools that support the OpenAPI specification, such as the [OpenAPI Generator](https://openapi-generator.tech). In the API, whenever some data is referenced, for example, a group, or payment type, either id or internal name can be used. When an user is to be referenced, the special word 'self' (sans quotes) always refers to the currently authenticated user, and any identification method (login name, e-mail, mobile phone, account number or custom field) that can be used on keywords search (as configured in the products) can also be used to identify users. Some specific data types have other identification fields, like accounts can have a number and payments can have a transaction number. This all depends on the current configuration. ----------- Most of the operations that return data allow selecting which fields to include in the response. This is useful to avoid calculating data that finally won't be needed and also for reducing the transfer over the network. If nothing is set, all object fields are returned. Fields are handled in 3 modes. Given an example object `{"a": {"x": 1, "y": 2, "z": 3}, "b": 0}`, the modes are: - **Include**: the field is unprefixed or prefixed with `+`. All fields which are not explicitly included are excluded from the result. Examples: - `["a"]` results in `{"a": {"x": 1, "y": 2, "z": 3}}` - `["+b"]` results in `{"b": 0}` - `["a.x"]` results in `{"a": {"x": 1}}`. This is a nested include. At root level, includes only `a` then, on `a`'s level, includes only `x`. - **Exclude**: the field is prefixed by `-` (or, for compatibility purposes, `!`). Only explicitly excluded fields are excluded from the result. Examples: - `["-a"]` results in `{"b": 0}` - `["-b"]` results in `{"a": {"x": 1, "y": 2, "z": 3}}` - `["a.-x"]` results in `{"a": {"y": 2, "z": 3}}`. In this example, `a` is actually an include at the root level, hence, excludes `b`. - **Nested only**: when a field is prefixed by `*` and has a nested path, it only affects includes / excludes for the nested fields, without affecting the current level. Only nested fields are configured. Examples: - `["*a.x"]` results in `{"a": {"x": 1}, "b": 0}`. In this example, `a` is configured to include only `x`. `b` is also included because, there is no explicit includes at root level. - `["*a.-x"]` results in `{"a": {"y": 2, "z": 3}, "b": 0}`. In this example, `a` is configured to exclude only `x`. `b` is also included because there is no explicit includes at the root level. For backwards compatibility, this can also be expressed in a special syntax `-a.x`. Also, keep in mind that `-x.y.z` is equivalent to `*x.*y.-z`. You cannot have the same field included and excluded at the same time - a HTTP `422` status will be returned. Also, when mixing nested excludes with explicit includes or excludes, the nested exclude will be ignored. For example, using `["*a.x", "a.y"]` will ignore the `*a.x` definition, resulting in `{"a": {"y": 2}}`. ----------- For details of the deprecated elements (operations and model) please visit the [deprecation notes page](https://documentation.cyclos.org/4.16.3/api-deprecation.html) for this version.
muhammadhuzaifa/telescope-guzzle-watcher
319782 Downloads
Telescope Guzzle Watcher provide a custom watcher for intercepting http requests made via guzzlehttp/guzzle php library. The package uses the on_stats request option for extracting the request/response data. The watcher intercept and log the request into the Laravel Telescope HTTP Client Watcher.
sendpost/sendpost-php-sdk
1182 Downloads
# Introduction SendPost provides email API and SMTP relay which can be used not just to send & measure but also alert & optimised email sending. You can use SendPost to: * Send personalised emails to multiple recipients using email API * Track opens and clicks * Analyse statistics around open, clicks, bounce, unsubscribe and spam At and advanced level you can use it to: * Manage multiple sub-accounts which may map to your promotional or transactional sending, multiple product lines or multiple customers * Classify your emails using groups for better analysis * Analyse and fix email sending at sub-account level, IP Pool level or group level * Have automated alerts to notify disruptions regarding email sending * Manage different dedicated IP Pools so to better control your email sending * Automatically know when IP or domain is blacklisted or sender score is down * Leverage pro deliverability tools to get significantly better email deliverability & inboxing [](https://god.gw.postman.com/run-collection/33476323-e6dbd27f-c4a7-4d49-bcac-94b0611b938b?action=collection%2Ffork&source=rip_markdown&collection-url=entityId%3D33476323-e6dbd27f-c4a7-4d49-bcac-94b0611b938b%26entityType%3Dcollection%26workspaceId%3D6b1e4f65-96a9-4136-9512-6266c852517e) # Overview ## REST API SendPost API is built on REST API principles. Authenticated users can interact with any of the API endpoints to perform: * **GET**- to get a resource * **POST** - to create a resource * **PUT** - to update an existing resource * **DELETE** - to delete a resource The API endpoint for all API calls is: https://api.sendpost.io/api/v1 Some conventions that have been followed in the API design overall are following: * All resources have either /api/v1/subaccount or /api/v1/account in their API call resource path based on who is authorised for the resource. All API calls with path /api/v1/subaccount use X-SubAccount-ApiKey in their request header. Likewise all API calls with path /api/v1/account use X-Account-ApiKey in their request header. * All resource endpoints end with singular name and not plural. So we have domain instead of domains for domain resource endpoint. Likewise we have sender instead of senders for sender resource endpoint. * Body submitted for POST / PUT API calls as well as JSON response from SendPost API follow camelcase convention * All timestamps returned in response (created or submittedAt response fields) are UNIX nano epoch timestamp. All resources have either /api/v1/subaccount or /api/v1/account in their API call resource path based on who is authorised for the resource. All API calls with path /api/v1/subaccount use X-SubAccount-ApiKey in their request header. Likewise all API calls with path /api/v1/account use X-Account-ApiKey in their request header. SendPost uses conventional HTTP response codes to indicate the success or failure of an API request. * Codes in the 2xx range indicate success. * Codes in the 4xx range indicate an error owing due to unauthorize access, incorrect request parameters or body etc. * Code in the 5xx range indicate an eror with SendPost's servers ( internal service issue or maintenance ) SendPost all responses return created in UNIX nano epoch timestamp. ## Authentication SendPost uses API keys for authentication. You can register a new SendPost API key at our [developer portal](https://app.sendpost.io/register). SendPost expects the API key to be included in all API requests to the server in a header that looks like the following: `X-SubAccount-ApiKey: AHEZEP8192SEGH` This API key is used for all Sub-Account level operations such as: * Sending emails * Retrieving stats regarding open, click, bounce, unsubscribe and spam * Uploading suppressions list * Verifying sending domains and more In addition to X-SubAccount-ApiKey you also have another API Key X-Account-APIKey which is used for Account level operations such as : * Creating and managing sub-accounts * Allocating IPs for your account * Getting overall billing and usage information * Email List validation * Creating and managing alerts and more You must look at individual API reference page to look at whether X-SubAccount-ApiKey is required or X-Account-ApiKey In case an incorrect API Key header is specified or if it is missed you will get HTTP Response 401 ( Unauthorized ) response from SendPost. ## HTTP Response Headers Code | Reason | Details ---------------| -----------------------| ----------- 200 | Success | Everything went well 401 | Unauthorized | Incorrect or missing API header either X-SubAccount-ApiKey or X-Account-ApiKey 403 | Forbidden | Typically sent when resource with same name or details already exist 406 | Missing resource id | Resource id specified is either missing or doesn't exist 422 | Unprocessable entity | Request body is not in proper format 500 | Internal server error | Some error happened at SendPost while processing API request 503 | Service Unavailable | SendPost is offline for maintenance. Please try again later # API SDKs We have native SendPost SDKs in the following programming languages. You can integrate with them or create your own SDK with our API specification. In case you need any assistance with respect to API then do reachout to our team from website chat or email us at **[email protected]** * [PHP](https://github.com/sendpost/sendpost_php_sdk) * [Javascript](https://github.com/sendpost/sendpost_javascript_sdk) * [Ruby](https://github.com/sendpost/sendpost_ruby_sdk) * [Python](https://github.com/sendpost/sendpost_python_sdk) * [Golang](https://github.com/sendpost/sendpost_go_sdk) # API Reference SendX REST API can be broken down into two major sub-sections: * Sub-Account * Account Sub-Account API operations enable common email sending API use-cases like sending bulk email, adding new domains or senders for email sending programmatically, retrieving stats, adding suppressions etc. All Sub-Account API operations need to pass X-SubAccount-ApiKey header with every API call. The Account API operations allow users to manage multiple sub-accounts and manage IPs. A single parent SendPost account can have 100's of sub-accounts. You may want to create sub-accounts for different products your company is running or to segregate types of emails or for managing email sending across multiple customers of yours. # SMTP Reference Simple Mail Transfer Protocol (SMTP) is a quick and easy way to send email from one server to another. SendPost provides an SMTP service that allows you to deliver your email via our servers instead of your own client or server. This means you can count on SendPost's delivery at scale for your SMTP needs. ## Integrating SMTP 1. Get the SMTP `username` and `password` from your SendPost account. 2. Set the server host in your email client or application to `smtp.sendpost.io`. This setting is sometimes referred to as the external SMTP server or the SMTP relay. 3. Set the `username` and `password`. 4. Set the port to `587` (or as specified below). ## SMTP Ports - For an unencrypted or a TLS connection, use port `25`, `2525` or `587`. - For a SSL connection, use port `465` - Check your firewall and network to ensure they're not blocking any of our SMTP Endpoints. SendPost supports STARTTLS for establishing a TLS-encrypted connection. STARTTLS is a means of upgrading an unencrypted connection to an encrypted connection. There are versions of STARTTLS for a variety of protocols; the SMTP version is defined in [RFC 3207](https://www.ietf.org/rfc/rfc3207.txt). To set up a STARTTLS connection, the SMTP client connects to the SendPost SMTP endpoint `smtp.sendpost.io` on port 25, 587, or 2525, issues an EHLO command, and waits for the server to announce that it supports the STARTTLS SMTP extension. The client then issues the STARTTLS command, initiating TLS negotiation. When negotiation is complete, the client issues an EHLO command over the new encrypted connection, and the SMTP session proceeds normally. If you are unsure which port to use, a TLS connection on port 587 is typically recommended. ## Sending email from your application ```javascript "use strict"; const nodemailer = require("nodemailer"); async function main() { // create reusable transporter object using the default SMTP transport let transporter = nodemailer.createTransport({ host: "smtp.sendpost.io", port: 587, secure: false, // true for 465, false for other ports auth: { user: "" , // generated ethereal user pass: "", // generated ethereal password }, requireTLS: true, debug: true, logger: true, }); // send mail with defined transport object try { let info = await transporter.sendMail({ from: '[email protected]', to: '[email protected]', subject: 'Test Email Subject', html: 'Hello Geeks!!!', }); console.log("Message sent: %s", info.messageId); } catch (e) { console.log(e) } } main().catch(console.error); ``` For PHP ```php
briqpay/php-sdk
12105 Downloads
This is the API documentation for Briqpay. You can find out more about us and our offering at our website [https://briqpay.com](https://briqpay.com) In order to get credentials to the playgrund API Please register at [https://app.briqpay.com](https://app.briqpay.com) # Introduction Briqpay Checkout is an inline checkout solution for your b2b ecommerce. Briqpay Checkout gives you the flexibility of controlling your payment methods and credit rules while optimizing the UX for your customers # SDKs Briqpay offers standard SDKs to PHP and .NET based on these swagger definitions. You can download them respively or use our swagger defintitions to codegen your own versions. #### For .NET `` Install-Package Briqpay `` #### For PHP `` composer require briqpay/php-sdk `` # Standard use-case As a first step of integration you will need to create a checkout session. \n\nIn this session you provide Briqpay with the basic information necessary. In the response from briqpay you will recieve a htmlsnippet that is to be inserted into your frontend. The snippet provided by briqpay will render an iframe where the user will complete the purchase. Once completed, briqpay will redirect the customer to a confirmation page that you have defined. 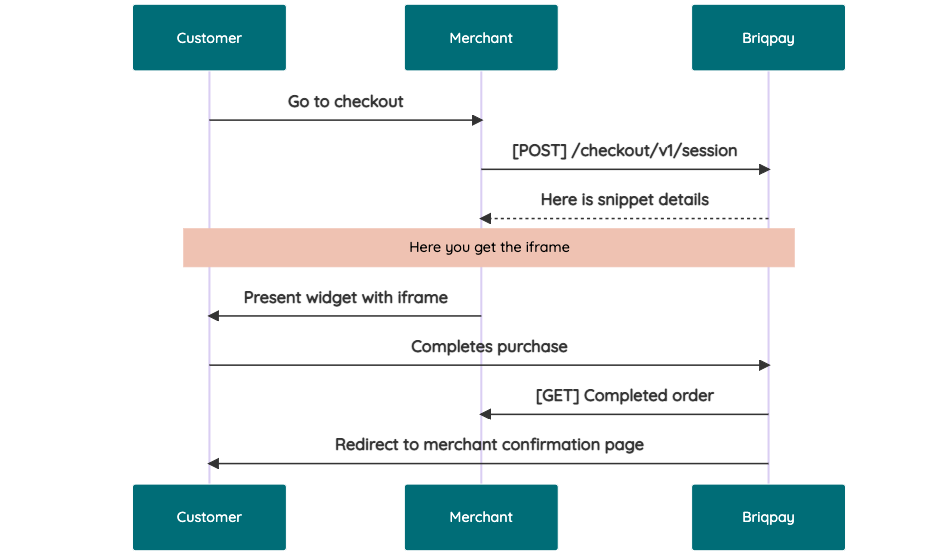 # JavaScript SDK The first step of integration is to add our JS to your site just before closing the ```` tag. This ensures that our JS library is avaliable to load the checkout. ```` Briqpay offers a few methods avaliable through our Javascript SDK. The library is added by our iframe and is avalable on ``window._briqpay`` If you offer the posibility to update the cart or order amonts on the checkout page, the JS library will help you. If your store charges the customer different costs and fees depening on their shipping location, you can listen to the ``addressupdate``event in order to re-calculate the total cost. ```javascript window._briqpay.subscribe('addressupdate', function (data) { console.log(data) }) ``` If your frontend needs to perform an action whe the signup has completed, listen to the ``signup_finalized`` event. ```javascript window._briqpay.subscribe('signup_finalized', function (status) { // redirect or handle status 'success' / 'failure' }) ``` If you allow customers to change the total cart value, you can utilise the JS library to suspend the iframe while you perform a backen update call towards our services. As described below: 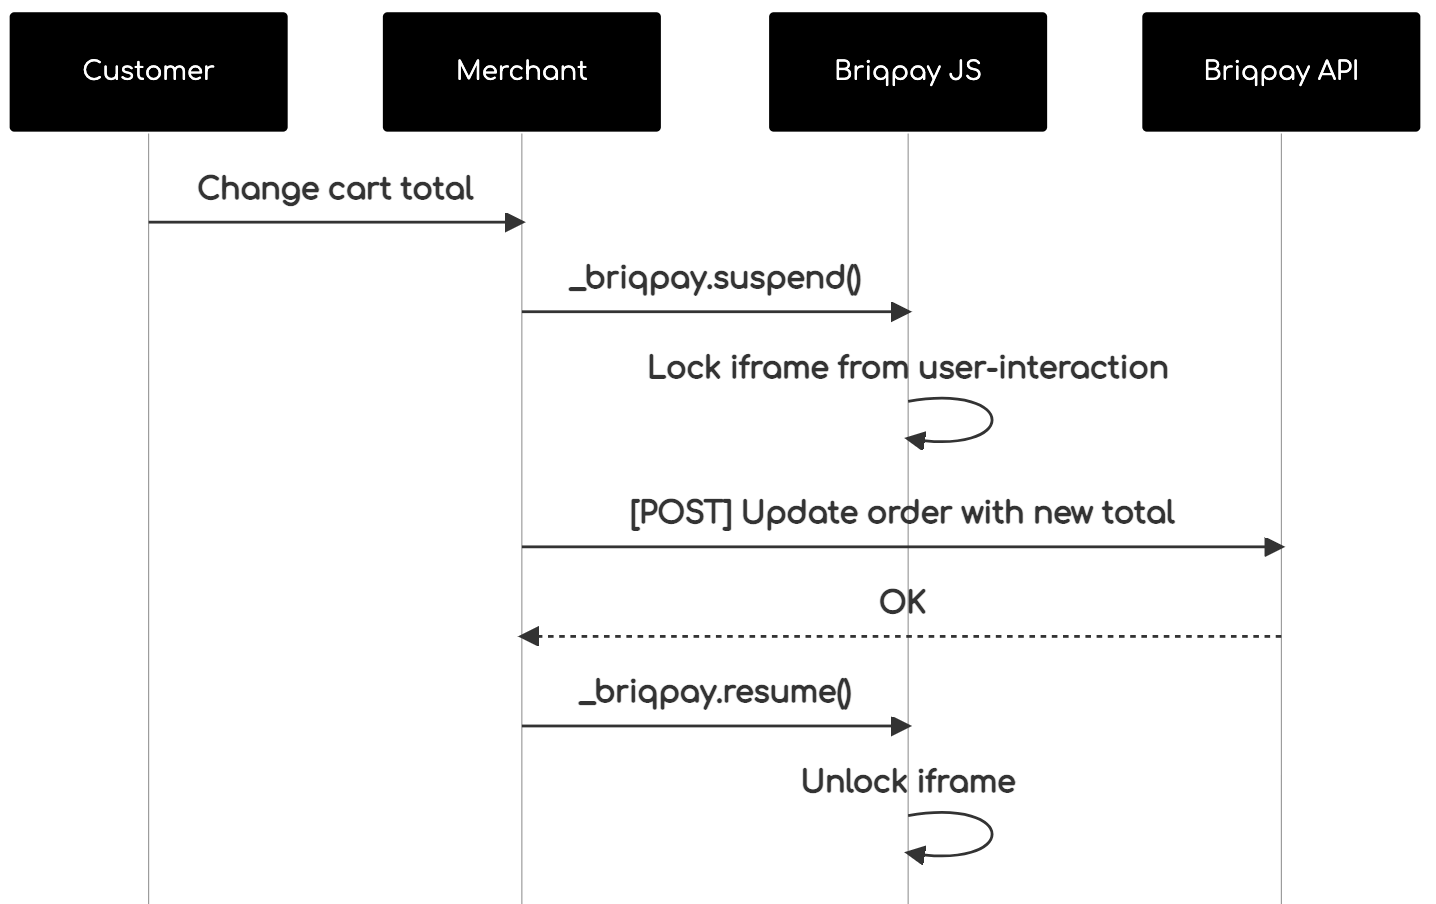 The iframe will auto-resume after 7 seconds if you dont call ``_briqpay.resume()`` before # Test Data In order to verify your integration you will neeed to use test data towards our credit engine. ## Company identication numbers * 1111111111 - To recieve a high credit scoring company ( 100 in rating) * 2222222222 - To test the enviournment with a bad credit scoring company (10 in rating) ## Card details In our playground setup your account is by default setup with a Stripe integration. In order to test out the card form you can use the below card numbers: * 4000002500003155 - To mock 3ds authentication window * 4000000000000069 Charge is declined with an expired_card code. You can use any valid expiry and CVC code # Authentication Briqpay utilizes JWT in order to authenticate calls to our platform. Authentication tokens expire after 48 hours, and at that point you can generate a new token for the given resource using the ``/auth`` endpoint. - Basic Auth - only used on the auth endpoint in order to get the Bearer Token - JWT Bearer Token - All calls towards the API utlizes this method"
paypaplane/svix-client
24620 Downloads
Welcome to the Svix API documentation! Useful links: [Homepage](https://www.svix.com) | [Support email](mailto:[email protected]) | [Blog](https://www.svix.com/blog/) | [Slack Community](https://www.svix.com/slack/) # Introduction This is the reference documentation and schemas for the [Svix webhook service](https://www.svix.com) API. For tutorials and other documentation please refer to [the documentation](https://docs.svix.com). ## Main concepts In Svix you have four important entities you will be interacting with: - `messages`: these are the webhooks being sent. They can have contents and a few other properties. - `application`: this is where `messages` are sent to. Usually you want to create one application for each user on your platform. - `endpoint`: endpoints are the URLs messages will be sent to. Each application can have multiple `endpoints` and each message sent to that application will be sent to all of them (unless they are not subscribed to the sent event type). - `event-type`: event types are identifiers denoting the type of the message being sent. Event types are primarily used to decide which events are sent to which endpoint. ## Authentication Get your authentication token (`AUTH_TOKEN`) from the [Svix dashboard](https://dashboard.svix.com) and use it as part of the `Authorization` header as such: `Authorization: Bearer ${AUTH_TOKEN}`. For more information on authentication, please refer to the [authentication token docs](https://docs.svix.com/api-keys). ## Code samples The code samples assume you already have the respective libraries installed and you know how to use them. For the latest information on how to do that, please refer to [the documentation](https://docs.svix.com/). ## Idempotency Svix supports [idempotency](https://en.wikipedia.org/wiki/Idempotence) for safely retrying requests without accidentally performing the same operation twice. This is useful when an API call is disrupted in transit and you do not receive a response. To perform an idempotent request, pass the idempotency key in the `Idempotency-Key` header to the request. The idempotency key should be a unique value generated by the client. You can create the key in however way you like, though we suggest using UUID v4, or any other string with enough entropy to avoid collisions. Svix's idempotency works by saving the resulting status code and body of the first request made for any given idempotency key for any successful request. Subsequent requests with the same key return the same result. Please note that idempotency is only supported for `POST` requests. ## Cross-Origin Resource Sharing This API features Cross-Origin Resource Sharing (CORS) implemented in compliance with [W3C spec](https://www.w3.org/TR/cors/). And that allows cross-domain communication from the browser. All responses have a wildcard same-origin which makes them completely public and accessible to everyone, including any code on any site.
factpulse/sdk
73 Downloads
REST API for electronic invoicing in France: Factur-X (CII), UBL 2.1, AFNOR PDP/PA, electronic signatures. ## 🎯 Main Features ### 📄 Invoice Generation - **Formats**: CII XML, UBL 2.1 XML, or Factur-X PDF/A-3 - **Profiles** (CII/PDF): MINIMUM, BASIC, EN16931, EXTENDED - **UBL**: Always EN16931 compliant - **Standards**: EN 16931 (EU directive 2014/55), ISO 19005-3 (PDF/A-3), CII (UN/CEFACT), UBL 2.1 (OASIS) - **Simplified Format**: Generation from SIRET + auto-enrichment (Chorus Pro API + Business Search) ### ✅ Factur-X - Validation - **XML Validation**: Schematron (45 to 210+ rules depending on profile) - **PDF Validation**: PDF/A-3, Factur-X XMP metadata - **VeraPDF**: Strict PDF/A validation (146+ ISO 19005-3 rules) ### ✍️ Electronic Signature - **Standards**: PAdES-B-B, PAdES-B-T (RFC 3161 timestamping), PAdES-B-LT (long-term archival) - **eIDAS Levels**: SES (self-signed), AdES (commercial CA), QES (QTSP) - **Validation**: Cryptographic integrity and certificate verification ### 📋 Flux 6 - Invoice Lifecycle (CDAR) - **CDAR Messages**: Acknowledgements, invoice statuses - **PPF Statuses**: REFUSED (210), PAID (212) ### 📊 Flux 10 - E-Reporting - **Tax Declarations**: International B2B, B2C - **Flow Types**: 10.1 (B2B transactions), 10.2 (B2B payments), 10.3 (B2C transactions), 10.4 (B2C payments) ### 📡 AFNOR PDP/PA (XP Z12-013) - **Flow Service**: Submit and search flows to PDPs - **Directory Service**: Company search (SIREN/SIRET) - **Multi-client**: Support for multiple PDP configs per user ### 🏛️ Chorus Pro - **Public Sector Invoicing**: Complete API for Chorus Pro ### ⏳ Async Tasks - **Celery**: Asynchronous generation, validation and signing - **Polling**: Status tracking via `/tasks/{task_id}/status` - **Webhooks**: Automatic notifications when tasks complete ## 🔒 Authentication All requests require a **JWT token** in the Authorization header: ``` Authorization: Bearer YOUR_JWT_TOKEN ``` ### How to obtain a JWT token? #### 🔑 Method 1: `/api/token/` API (Recommended) **URL:** `https://factpulse.fr/api/token/` This method is **recommended** for integration in your applications and CI/CD workflows. **Prerequisites:** Having set a password on your account **For users registered via email/password:** - You already have a password, use it directly **For users registered via OAuth (Google/GitHub):** - You must first set a password at: https://factpulse.fr/accounts/password/set/ - Once the password is created, you can use the API **Request example:** ```bash curl -X POST https://factpulse.fr/api/token/ \ -H "Content-Type: application/json" \ -d '{ "username": "[email protected]", "password": "your_password" }' ``` **Optional `client_uid` parameter:** To select credentials for a specific client (PA/PDP, Chorus Pro, signing certificates), add `client_uid`: ```bash curl -X POST https://factpulse.fr/api/token/ \ -H "Content-Type: application/json" \ -d '{ "username": "[email protected]", "password": "your_password", "client_uid": "550e8400-e29b-41d4-a716-446655440000" }' ``` The `client_uid` will be included in the JWT and allow the API to automatically use: - AFNOR/PDP credentials configured for this client - Chorus Pro credentials configured for this client - Electronic signature certificates configured for this client **Response:** ```json { "access": "eyJ0eXAiOiJKV1QiLCJhbGc...", // Access token (validity: 30 min) "refresh": "eyJ0eXAiOiJKV1QiLCJhbGc..." // Refresh token (validity: 7 days) } ``` **Advantages:** - ✅ Full automation (CI/CD, scripts) - ✅ Programmatic token management - ✅ Refresh token support for automatic access renewal - ✅ Easy integration in any language/tool #### 🖥️ Method 2: Dashboard Generation (Alternative) **URL:** https://factpulse.fr/api/dashboard/ This method is suitable for quick tests or occasional use via the graphical interface. **How it works:** - Log in to the dashboard - Use the "Generate Test Token" or "Generate Production Token" buttons - Works for **all** users (OAuth and email/password), without requiring a password **Token types:** - **Test Token**: 24h validity, 1000 calls/day quota (free) - **Production Token**: 7 days validity, quota based on your plan **Advantages:** - ✅ Quick for API testing - ✅ No password required - ✅ Simple visual interface **Disadvantages:** - ❌ Requires manual action - ❌ No refresh token - ❌ Less suited for automation ### 📚 Full Documentation For more information on authentication and API usage: https://factpulse.fr/documentation-api/
ellipse-online/json-response
5 Downloads
A simple class that returns a properly formatted json response with HYTP status
rstmgsnvimax/irisnet-ai-php-api-client
2 Downloads
Artificial Intelligence (AI) for image- and video-processing in real-time. This is an interactive documentation where you can quickly look up the endpoints and their schemas, while having the opportunity to try things out for yourself. In the list below, you can see the available endpoints of the API, which can be expanded by clicking on them. Each expanded endpoint lists the request parameters (if available) and the request body (if available). The request body can list some example bodies and the schema, explaining each model in detail. Additionally you'll find a 'Try it out' button that allows you to enter your custom parameters and custom body and execute that against the API. Be sure to enter your license key to authorize the requests before using this documentation interactively. The responses section in the expanded endpoint lists the possible responses with their corresponding status codes. If you've executed an API call it will also show you the response from the server. Underneath the endpoints you'll find the model schemas. These are the models used for the requests and responses. If you click on the right arrow, you can expand the model and get a description of the model and the model parameters. For nested models, you can keep clicking the right arrow for further details. Clicking the link below the title at the top of this page opens the [OpenAPI specification](https://swagger.io/specification/) (OAS3) in JSON format. The OAS3 Spec allows the generation of clients in many programming languages. There are several free client generators available that can be used to get started easily.