Libraries tagged by http basic authentication
briqpay/php-sdk
11908 Downloads
This is the API documentation for Briqpay. You can find out more about us and our offering at our website [https://briqpay.com](https://briqpay.com) In order to get credentials to the playgrund API Please register at [https://app.briqpay.com](https://app.briqpay.com) # Introduction Briqpay Checkout is an inline checkout solution for your b2b ecommerce. Briqpay Checkout gives you the flexibility of controlling your payment methods and credit rules while optimizing the UX for your customers # SDKs Briqpay offers standard SDKs to PHP and .NET based on these swagger definitions. You can download them respively or use our swagger defintitions to codegen your own versions. #### For .NET `` Install-Package Briqpay `` #### For PHP `` composer require briqpay/php-sdk `` # Standard use-case As a first step of integration you will need to create a checkout session. \n\nIn this session you provide Briqpay with the basic information necessary. In the response from briqpay you will recieve a htmlsnippet that is to be inserted into your frontend. The snippet provided by briqpay will render an iframe where the user will complete the purchase. Once completed, briqpay will redirect the customer to a confirmation page that you have defined. 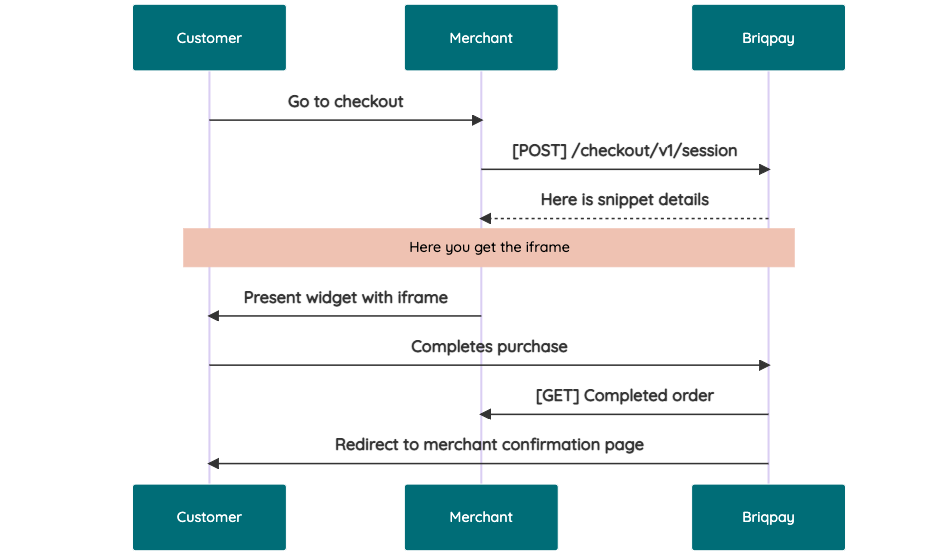 # JavaScript SDK The first step of integration is to add our JS to your site just before closing the ```` tag. This ensures that our JS library is avaliable to load the checkout. ```` Briqpay offers a few methods avaliable through our Javascript SDK. The library is added by our iframe and is avalable on ``window._briqpay`` If you offer the posibility to update the cart or order amonts on the checkout page, the JS library will help you. If your store charges the customer different costs and fees depening on their shipping location, you can listen to the ``addressupdate``event in order to re-calculate the total cost. ```javascript window._briqpay.subscribe('addressupdate', function (data) { console.log(data) }) ``` If your frontend needs to perform an action whe the signup has completed, listen to the ``signup_finalized`` event. ```javascript window._briqpay.subscribe('signup_finalized', function (status) { // redirect or handle status 'success' / 'failure' }) ``` If you allow customers to change the total cart value, you can utilise the JS library to suspend the iframe while you perform a backen update call towards our services. As described below: 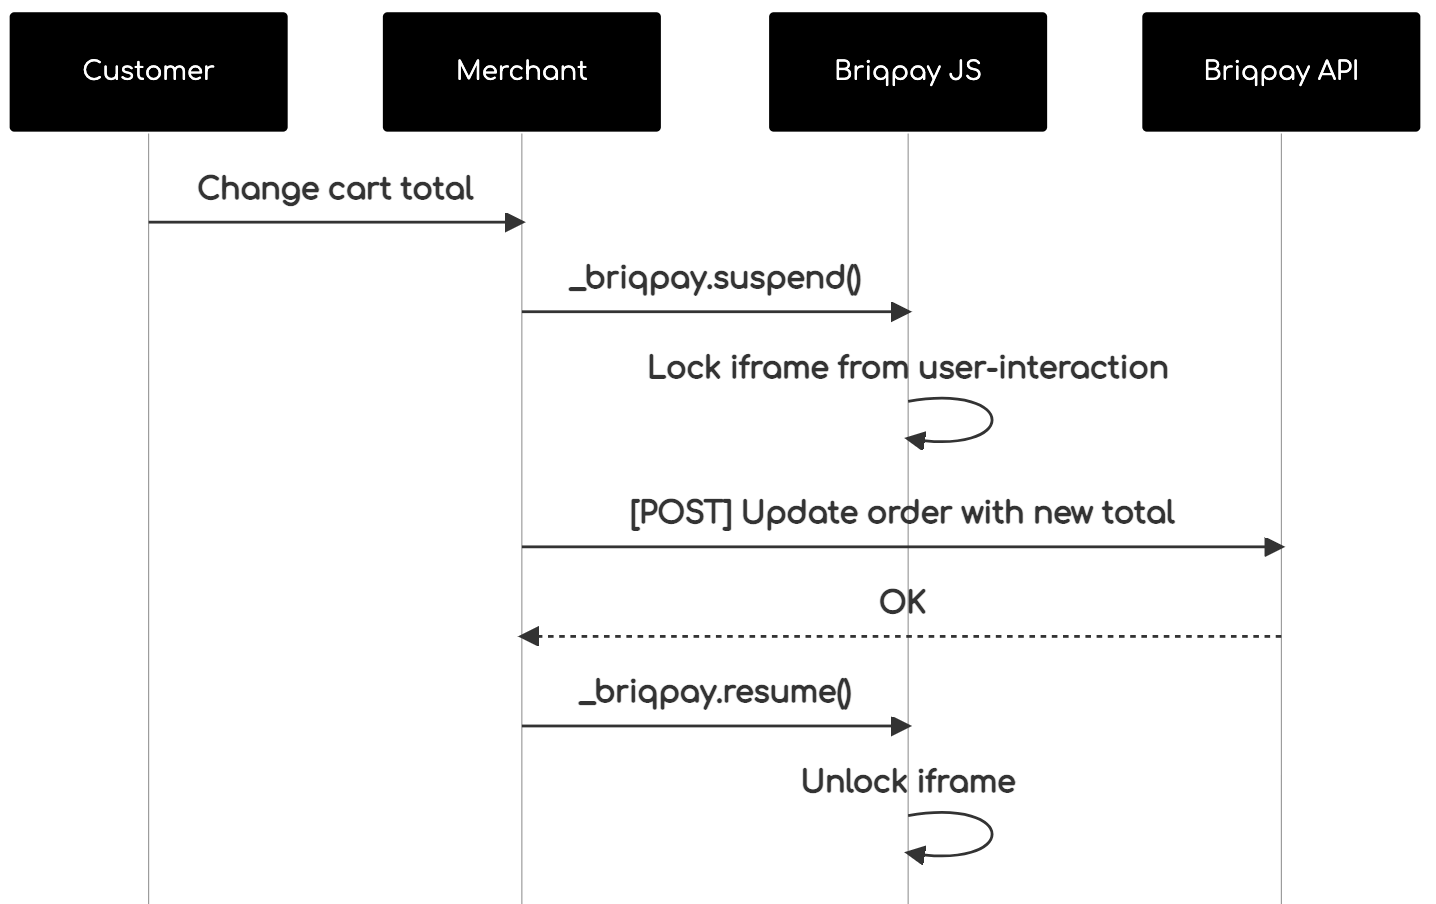 The iframe will auto-resume after 7 seconds if you dont call ``_briqpay.resume()`` before # Test Data In order to verify your integration you will neeed to use test data towards our credit engine. ## Company identication numbers * 1111111111 - To recieve a high credit scoring company ( 100 in rating) * 2222222222 - To test the enviournment with a bad credit scoring company (10 in rating) ## Card details In our playground setup your account is by default setup with a Stripe integration. In order to test out the card form you can use the below card numbers: * 4000002500003155 - To mock 3ds authentication window * 4000000000000069 Charge is declined with an expired_card code. You can use any valid expiry and CVC code # Authentication Briqpay utilizes JWT in order to authenticate calls to our platform. Authentication tokens expire after 48 hours, and at that point you can generate a new token for the given resource using the ``/auth`` endpoint. - Basic Auth - only used on the auth endpoint in order to get the Bearer Token - JWT Bearer Token - All calls towards the API utlizes this method"
factpulse/sdk
60 Downloads
REST API for electronic invoicing in France: Factur-X (CII), UBL 2.1, AFNOR PDP/PA, electronic signatures. ## 🎯 Main Features ### 📄 Invoice Generation - **Formats**: CII XML, UBL 2.1 XML, or Factur-X PDF/A-3 - **Profiles** (CII/PDF): MINIMUM, BASIC, EN16931, EXTENDED - **UBL**: Always EN16931 compliant - **Standards**: EN 16931 (EU directive 2014/55), ISO 19005-3 (PDF/A-3), CII (UN/CEFACT), UBL 2.1 (OASIS) - **Simplified Format**: Generation from SIRET + auto-enrichment (Chorus Pro API + Business Search) ### ✅ Factur-X - Validation - **XML Validation**: Schematron (45 to 210+ rules depending on profile) - **PDF Validation**: PDF/A-3, Factur-X XMP metadata - **VeraPDF**: Strict PDF/A validation (146+ ISO 19005-3 rules) ### ✍️ Electronic Signature - **Standards**: PAdES-B-B, PAdES-B-T (RFC 3161 timestamping), PAdES-B-LT (long-term archival) - **eIDAS Levels**: SES (self-signed), AdES (commercial CA), QES (QTSP) - **Validation**: Cryptographic integrity and certificate verification ### 📋 Flux 6 - Invoice Lifecycle (CDAR) - **CDAR Messages**: Acknowledgements, invoice statuses - **PPF Statuses**: REFUSED (210), PAID (212) ### 📊 Flux 10 - E-Reporting - **Tax Declarations**: International B2B, B2C - **Flow Types**: 10.1 (B2B transactions), 10.2 (B2B payments), 10.3 (B2C transactions), 10.4 (B2C payments) ### 📡 AFNOR PDP/PA (XP Z12-013) - **Flow Service**: Submit and search flows to PDPs - **Directory Service**: Company search (SIREN/SIRET) - **Multi-client**: Support for multiple PDP configs per user ### 🏛️ Chorus Pro - **Public Sector Invoicing**: Complete API for Chorus Pro ### ⏳ Async Tasks - **Celery**: Asynchronous generation, validation and signing - **Polling**: Status tracking via `/tasks/{task_id}/status` - **Webhooks**: Automatic notifications when tasks complete ## 🔒 Authentication All requests require a **JWT token** in the Authorization header: ``` Authorization: Bearer YOUR_JWT_TOKEN ``` ### How to obtain a JWT token? #### 🔑 Method 1: `/api/token/` API (Recommended) **URL:** `https://factpulse.fr/api/token/` This method is **recommended** for integration in your applications and CI/CD workflows. **Prerequisites:** Having set a password on your account **For users registered via email/password:** - You already have a password, use it directly **For users registered via OAuth (Google/GitHub):** - You must first set a password at: https://factpulse.fr/accounts/password/set/ - Once the password is created, you can use the API **Request example:** ```bash curl -X POST https://factpulse.fr/api/token/ \ -H "Content-Type: application/json" \ -d '{ "username": "[email protected]", "password": "your_password" }' ``` **Optional `client_uid` parameter:** To select credentials for a specific client (PA/PDP, Chorus Pro, signing certificates), add `client_uid`: ```bash curl -X POST https://factpulse.fr/api/token/ \ -H "Content-Type: application/json" \ -d '{ "username": "[email protected]", "password": "your_password", "client_uid": "550e8400-e29b-41d4-a716-446655440000" }' ``` The `client_uid` will be included in the JWT and allow the API to automatically use: - AFNOR/PDP credentials configured for this client - Chorus Pro credentials configured for this client - Electronic signature certificates configured for this client **Response:** ```json { "access": "eyJ0eXAiOiJKV1QiLCJhbGc...", // Access token (validity: 30 min) "refresh": "eyJ0eXAiOiJKV1QiLCJhbGc..." // Refresh token (validity: 7 days) } ``` **Advantages:** - ✅ Full automation (CI/CD, scripts) - ✅ Programmatic token management - ✅ Refresh token support for automatic access renewal - ✅ Easy integration in any language/tool #### 🖥️ Method 2: Dashboard Generation (Alternative) **URL:** https://factpulse.fr/api/dashboard/ This method is suitable for quick tests or occasional use via the graphical interface. **How it works:** - Log in to the dashboard - Use the "Generate Test Token" or "Generate Production Token" buttons - Works for **all** users (OAuth and email/password), without requiring a password **Token types:** - **Test Token**: 24h validity, 1000 calls/day quota (free) - **Production Token**: 7 days validity, quota based on your plan **Advantages:** - ✅ Quick for API testing - ✅ No password required - ✅ Simple visual interface **Disadvantages:** - ❌ Requires manual action - ❌ No refresh token - ❌ Less suited for automation ### 📚 Full Documentation For more information on authentication and API usage: https://factpulse.fr/documentation-api/
cloudinary/permissions
3 Downloads
Accounts with Permissions API access can manage custom permission policies. These policies assign permissions for a principal, allowing the principal to perform a specific action on a designated resource within a particular scope (your account or a product environment). Refer to the [Permissions API guide](permissions_api_guide) for instructions on what to specify in the `policy_statement` to control Cloudinary activities, and to the Cedar schema, which defines the possible values for principals, actions, and resources. The API uses **Basic Authentication** over HTTPS. Your **Provisioning Key** and **Provisioning Secret** are used for the authentication. These credentials (as well as your ACCOUNT_ID) are located in the [Cloudinary Console](https://console.cloudinary.com/pm) under **Settings > Account > Provisioning API Access**. The Permissions API has dedicated SDKs for the following languages: * JavaScript * PHP * Java
cloudinary/video-live-streaming
3 Downloads
Use the Video Live Streaming API to create and manage your RTMP live streams. This includes managing outputs as well as manually starting and stopping streams. See the [live streaming guide](https://cloudinary.com/documentation/video_live_streaming) for information on how to use the Live Streaming API to stream video to your users. **Note**: The Live Streaming API is currently in development and is available as a Public Beta, which means we value your feedback, so please feel free to [share any thoughts with us](https://support.cloudinary.com/hc/en-us/requests/new). The API supports Basic Authentication using your Cloudinary API Key and API Secret (which can be found on the Dashboard page of your [Cloudinary Console](https://console.cloudinary.com/pm)).
cloudinary/analysis
8 Downloads
Use the Analyze API to analyze any external asset and return details based on the type of analysis requested. Currently supports the following analysis options: * [AI Vision - Tagging](https://cloudinary.com/documentation/cloudinary_ai_vision_addon#tagging_mode) * [AI Vision - Moderation](https://cloudinary.com/documentation/cloudinary_ai_vision_addon#moderation_mode) * [AI Vision - General](https://cloudinary.com/documentation/cloudinary_ai_vision_addon#general_mode) * [Google tagging](https://cloudinary.com/documentation/google_auto_tagging_addon) * [Captioning](https://cloudinary.com/documentation/cloudinary_ai_content_analysis_addon#ai_based_image_captioning) * [Cld Fashion](https://cloudinary.com/documentation/cloudinary_ai_content_analysis_addon#supported_content_aware_detection_models) * [Coco](https://cloudinary.com/documentation/cloudinary_ai_content_analysis_addon#supported_content_aware_detection_models) * [Lvis](https://cloudinary.com/documentation/cloudinary_ai_content_analysis_addon#supported_content_aware_detection_models) * [Unidet](https://cloudinary.com/documentation/cloudinary_ai_content_analysis_addon#supported_content_aware_detection_models) * [Human Anatomy](https://cloudinary.com/documentation/cloudinary_ai_content_analysis_addon#supported_content_aware_detection_models) * [Cld Text](https://cloudinary.com/documentation/cloudinary_ai_content_analysis_addon#supported_content_aware_detection_models) * [Shop Classifier](https://cloudinary.com/documentation/cloudinary_ai_content_analysis_addon#supported_content_aware_detection_models) **Notes**: * The Analyze API is currently in development and is available as a Public Beta, which means we value your feedback, so please feel free to [share any thoughts with us](https://support.cloudinary.com/hc/en-us/requests/new). * The analysis options require an active subscription to the relevant add-on. Learn more about [registering for add-ons](https://cloudinary.com/documentation/cloudinary_add_ons#registering_for_add_ons). The API supports both Basic Authentication using your Cloudinary API Key and API Secret (which can be found on the Dashboard page of your [Cloudinary Console](https://console.cloudinary.com/pm)) or OAuth2 ([Contact support](https://support.cloudinary.com/hc/en-us/requests/new) for more information regarding OAuth).
segnivo/php-sdk
0 Downloads
**API Version**: 1.7 **Date**: 9th July, 2024 ## 📄 Getting Started This API is based on the REST API architecture, allowing the user to easily manage their data with this resource-based approach. Every API call is established on which specific request type (GET, POST, PUT, DELETE) will be used. The API must not be abused and should be used within acceptable limits. To start using this API, you will need not create or access an existing Segnivo account to obtain your API key ([retrievable from your account settings](https://messaging.segnivo.com/account/api)). - You must use a valid API Key to send requests to the API endpoints. - The API only responds to HTTPS-secured communications. Any requests sent via HTTP return an HTTP 301 redirect to the corresponding HTTPS resources. - The API returns request responses in JSON format. When an API request returns an error, it is sent in the JSON response as an error key or with details in the message key. ### 🔖 **Need some help?** In case you have questions or need clarity with interacting with some endpoints feel free to create a support ticket on your account or you can send an email ([[email protected]](https://mailto:[email protected])) directly and we would be happy to help. --- ## Authentication As noted earlier, this API uses API keys for authentication. You can generate a Segnivo API key in the [API](https://messaging.segnivo.com/account/api) section of your account settings. You must include an API key in each request to this API with the `X-API-KEY` request header. ### Authentication error response If an API key is missing, malformed, or invalid, you will receive an HTTP 401 Unauthorized response code. ## Rate and usage limits API access rate limits apply on a per-API endpoint basis in unit time. The limit is 10k requests per hour for most endpoints and 1m requests per hour for transactional/relay email-sending endpoints. Also, depending on your plan, you may have usage limits. If you exceed either limit, your request will return an HTTP 429 Too Many Requests status code or HTTP 403 if sending credits have been exhausted. ### 503 response An HTTP `503` response from our servers may indicate there is an unexpected spike in API access traffic, while this rarely happens, we ensure the server is usually operational within the next two to five minutes. If the outage persists or you receive any other form of an HTTP `5XX` error, contact support ([[email protected]](https://mailto:[email protected])). ### Request headers To make a successful request, some or all of the following headers must be passed with the request. | **Header** | **Description** | | --- | --- | | Content-Type | Required and should be `application/json` in most cases. | | Accept | Required and should be `application/json` in most cases | | Content-Length | Required for `POST`, `PATCH`, and `PUT` requests containing a request body. The value must be the number of bytes rather than the number of characters in the request body. | | X-API-KEY | Required. Specifies the API key used for authorization. | ##### 🔖 Note with example requests and code snippets If/when you use the code snippets used as example requests, remember to calculate and add the `Content-Length` header. Some request libraries, frameworks, and tools automatically add this header for you while a few do not. Kindly check and ensure yours does or add it yourself.
symfony-notes/http-basic-authenticator-bundle
25594 Downloads
Symfony Http Basic Authenticator Bundle