Libraries tagged by Test Cases
wpify/raynet-api-php-sdk
732 Downloads
Cloud CRM REST API je programové rozhraní systému RAYNET CRM, které umožňuje pracovat s daty uvnitř CRM z aplikací třetích stran. Komunikace probíhá standardním protokolem HTTP s ohledem na [REST](https://en.wikipedia.org/wiki/Representational_state_transfer) principy. ## Připojení k RAYNET CRM Komunikačním protokolem je HTTP, proto je možné použít libovolnou aplikaci nebo knihovnu, která tento protokol podporuje. Pro demonstraci bude využita aplikace [curl](https://curl.haxx.se/). Alternativou je například add-on [Talend API Tester](https://chrome.google.com/webstore/detail/talend-api-tester-free-ed/aejoelaoggembcahagimdiliamlcdmfm) do prohlížeče Google Chrome. Přístup je zabezpečen pomocí basic authentication (uživatelským jménem a API klíčem) a šifrován protokolem TLSv1.2 a vyšším (HTTPS) pro zajištění maximální bezpečnosti. V hlavičce požadavku je nutné zaslat název Vaší instance (např. `moje-crm`). ```bash curl -X GET -u 'uzivatel:api-klic' -H 'X-Instance-Name: moje-crm' 'https://app.raynet.cz/api/v2/company/' ``` ## Datové typy Hodnoty jednotlivých atributů v systému RAYNET CRM jsou tvořeny několika základními datovými typy: + `Řetězec` - Textová hodnota. + `Číslo` - Číselná hodnota. V závislosti na kontextu se může jednat buď o číslo celé nebo o číslo desetinné. V desetinných číslech se používá desetinná tečka. + `Pravdivostní hodnota` - Hodnota ANO/NE. Pro hodnotu ANO lze využít true, on, yes a 1; pro hodnotu NE pak false, off, no a 0. + `Datum` - Datum jako řetězec ve formátu `yyyy-MM-dd`. + `Datum a čas` - Datum a čas jako řetězec ve formátu `yyyy-MM-dd HH:mm`. Akceptovány jsou také datum a čas ve formátu ISO8601 (např. `2022-01-01T12:00:00.000+01:00`). + `Reference` - Datový typ reference odkazuje na jiný záznam v systému RAYNET CRM. V příchozích datech je reference mapou (JavaScriptový objektem), která obsahuje klíče: + id - Identifikátor referencovaného záznamu. ### Datum a čas Datum a čas jako řetězec ve formátu `yyyy-MM-dd HH:mm` je v časové zóně uživatele, přes kterého jsou API požadavky realizovány. Pro filtrování a zápis (`PUT`, `POST`) je možné využít oba formáty (`yyyy-MM-dd HH:mm`, ISO8601). V response je ve výchozím stavu datum a čas formátován jako `yyyy-MM-dd HH:mm` v časové zóně uživatele. Přidáním parametru `dateFormat=ISO8601` lze ovlivnit výstupní formát, kdy bude hodnota formátována do tvaru `2022-01-01T12:00:00.000+01:00`. např. `https://ww....company/?dateFormat=ISO8601` ## Filtrování seznamu Operátory pracující nad atributy a hodnotami jsou následující: + `EQ` - Test na rovnost hodnot. + `EQ_OR_NULL` - Test na rovnost nebo prázdnou hodnotu. + `NE` - Test na nerovnost hodnot. + `NE_OR_NULL` - Test na nerovnost nebo prázdnou hodnotu. + `LT` - Hodnota v databázi je menší než zadaná. + `LE` - Hodnota v databázi je menší nebo rovna než zadaná. + `GT` - Hodnota v databázi je větší než zadaná. + `GE` - Hodnota v databázi je větší nebo rovna než zadaná. + `LIKE` - Test na hodnotu odpovídající výrazu (např. hodnota filtru ABC% nalezne všechny záznamy, které začínají znaky ABC). + `LIKE_NOCASE` - Obdoba LIKE, ale bez ohledu na malá a velká písmena. + `IN` - Test na rovnost (více) hodnot oddělených čárkou. Správný formát vstupu je např.: `1,2,3,4`. + `NOT_IN` - Test na nerovnost (více) hodnot oddělených čárkou. Správný formát vstupu je např.: `1,2,3,4`. + `CUSTOM` - Speciální operátor - chování testu je popsáno dále v dokumentaci. Výchozím operátorem je rovnost `EQ`. Operátor se zapisuje do hranatých závorek za název atributu. Je tak možné zadat více filtrovacích kritérií nad stejným atributem. `https://app..../?validFrom[GT]="2014-06-01"&validTill[LT]="2014-06-10"` Častým scénářem je vyfiltrování všech záznamů, které mají daný atribut prázdný nebo naopak neprázdný. Pro tyto účely lze použít hodnotu `prázdný řetězec` v kombinaci s operátorem `EQ` nebo `NE`. ## Uspořádání seznamu Uspořádání seznamu je kontrolováno parametrem `sortColumn` a `sortDirection`. U každého API je výčet hodnot, pomocí kterých lze seznam řadit. Parametr `sortDirection` může nabývat hodnot: + `ASC` - Hodnoty jsou řazeny vzestupně + `DESC` - Hodnoty jsou řazeny sestupně ## Stránkování seznamu Seznam je možné stránkovat nastavením parametrů `offset` a `limit`. Offset udává první záznam, který bude zobrazen, limit pak počet záznamů. Maximální velikost stránky je 1 000 položek. Například `https://app..../?offset=0&limit=2` ## Fulltext Ve většině seznamů je možné využít fulltextové vyhledání podle zadaného textového řetězce. Slouží k tomu parametr `fulltext`, který se aplikuje např. takto: `https://app..../?fulltext=nejakytext` ## Limity API Každá API odpověď obsahuje hlavičky, které popisují stav využití API pro danou instanci. ``` curl -X GET -u 'uzivatel:api-klic' -H 'X-Instance-Name: moje-crm' 'https://app.raynet.cz/api/v2/company/' HTTP/1.1 200 OK Status: 200 OK X-Ratelimit-Limit: 24000 X-Ratelimit-Remaining: 23999 X-Ratelimit-Reset: 1508889600 ``` Význam jednotlivých hlaviček je následující: | Hlavička | Význam | | -------- | ------ | | X-Ratelimit-Limit | Celkový limit pro aktuální časové okno a instanci. | | X-Ratelimit-Remaining | Zbývající počet požadavků. | | X-Ratelimit-Reset | Čas, kdy bude vyprší časové okno a limit bude resetován. Hodnota udává [unixový čas](https://cs.wikipedia.org/wiki/Unixov%C3%BD_%C4%8Das). | Pokud je limit překročen, je navrácena chybová hláška s HTTP kódem `429 Too Many Requests`: ```json { "type": "RequestLimitReached", "message": "API request limit reached. See the X-RateLimit-* headers and check out the API documentation for more details." } ``` ### Co když mi limity nestačí Ve výchozím stavu je přístup limitován na 24 000 požadavků za den (uvažováno od půlnoci do další půlnoci v časové zóně UTC). V případě, že limit pro vaši integraci nestačí, kontaktujte naší zákaznickou podporu na e-mailu [email protected] a spolu se určitě dobereme vhodného řešení. ### Špatné přihlášení V případě zaslaní více než 20 požadavků se špatnými přihlašovacími údaji, bude tento přístup na 60 minut zablokován. Toto omezení platí pro konkrétní IP adresu.
sendpost/sendpost-php-sdk
1291 Downloads
# Introduction > ### 📌 API versioning & the v1 response contract > > This reference documents the **v1 response contract** — the stable, camelCase > response shape that SendPost commits to. This is the shape you should build against. > > **During the current deprecation window**, requests authenticated with an account > or sub-account API key receive the **legacy** response shape by default, so existing > integrations keep working unchanged. To receive the documented v1 shape today, send: > > ``` > X-SendPost-Public-Contract: v1 > ``` > > **How to tell which shape you got.** Every public response echoes the applied > contract in the `X-SendPost-Public-Contract` response header. While the legacy > shape is being served, responses also carry standard deprecation signals: > `Deprecation: true`, a `Sunset` header with the exact cut-over date, and a > `Link: ; rel="deprecation"` header pointing at the migration guide. **Read the > `Sunset` header for the authoritative end date** rather than hardcoding one. > > **After the sunset date**, v1 becomes the default and the legacy shape is no longer > served. New integrations should send `X-SendPost-Public-Contract: v1` now and rely on > the shapes in this reference. SendPost provides email API and SMTP relay which can be used not just to send & measure but also alert & optimised email sending. You can use SendPost to: * Send personalised emails to multiple recipients using email API * Track opens and clicks * Analyse statistics around open, clicks, bounce, unsubscribe and spam At and advanced level you can use it to: * Manage multiple sub-accounts which may map to your promotional or transactional sending, multiple product lines or multiple customers * Classify your emails using groups for better analysis * Analyse and fix email sending at sub-account level, IP Pool level or group level * Have automated alerts to notify disruptions regarding email sending * Manage different dedicated IP Pools so to better control your email sending * Automatically know when IP or domain is blacklisted or sender score is down * Leverage pro deliverability tools to get significantly better email deliverability & inboxing [](https://god.gw.postman.com/run-collection/33476323-e6dbd27f-c4a7-4d49-bcac-94b0611b938b?action=collection%2Ffork&source=rip_markdown&collection-url=entityId%3D33476323-e6dbd27f-c4a7-4d49-bcac-94b0611b938b%26entityType%3Dcollection%26workspaceId%3D6b1e4f65-96a9-4136-9512-6266c852517e) # Overview ## REST API SendPost API is built on REST API principles. Authenticated users can interact with any of the API endpoints to perform: * **GET**- to get a resource * **POST** - to create a resource * **PUT** - to update an existing resource * **DELETE** - to delete a resource The API endpoint for all API calls is: https://api.sendpost.io/api/v1 Some conventions that have been followed in the API design overall are following: * All resources have either /api/v1/subaccount or /api/v1/account in their API call resource path based on who is authorised for the resource. All API calls with path /api/v1/subaccount use X-SubAccount-ApiKey in their request header. Likewise all API calls with path /api/v1/account use X-Account-ApiKey in their request header. * All resource endpoints end with singular name and not plural. So we have domain instead of domains for domain resource endpoint. Likewise we have sender instead of senders for sender resource endpoint. * Body submitted for POST / PUT API calls as well as JSON response from SendPost API follow camelcase convention * All timestamps returned in response (created or submittedAt response fields) are UNIX nano epoch timestamp. All resources have either /api/v1/subaccount or /api/v1/account in their API call resource path based on who is authorised for the resource. All API calls with path /api/v1/subaccount use X-SubAccount-ApiKey in their request header. Likewise all API calls with path /api/v1/account use X-Account-ApiKey in their request header. SendPost uses conventional HTTP response codes to indicate the success or failure of an API request. * Codes in the 2xx range indicate success. * Codes in the 4xx range indicate an error owing due to unauthorize access, incorrect request parameters or body etc. * Code in the 5xx range indicate an eror with SendPost's servers ( internal service issue or maintenance ) SendPost all responses return created in UNIX nano epoch timestamp. ## Authentication SendPost uses API keys for authentication. You can register a new SendPost API key at our [developer portal](https://app.sendpost.io/register). SendPost expects the API key to be included in all API requests to the server in a header that looks like the following: `X-SubAccount-ApiKey: AHEZEP8192SEGH` This API key is used for all Sub-Account level operations such as: * Sending emails * Retrieving stats regarding open, click, bounce, unsubscribe and spam * Uploading suppressions list * Verifying sending domains and more In addition to X-SubAccount-ApiKey you also have another API Key X-Account-APIKey which is used for Account level operations such as : * Creating and managing sub-accounts * Allocating IPs for your account * Getting overall billing and usage information * Email List validation * Creating and managing alerts and more You must look at individual API reference page to look at whether X-SubAccount-ApiKey is required or X-Account-ApiKey In case an incorrect API Key header is specified or if it is missed you will get HTTP Response 401 ( Unauthorized ) response from SendPost. ## HTTP Response Headers Code | Reason | Details ---------------| -----------------------| ----------- 200 | Success | Everything went well 401 | Unauthorized | Incorrect or missing API header either X-SubAccount-ApiKey or X-Account-ApiKey 403 | Forbidden | Typically sent when resource with same name or details already exist 406 | Missing resource id | Resource id specified is either missing or doesn't exist 422 | Unprocessable entity | Request body is not in proper format 500 | Internal server error | Some error happened at SendPost while processing API request 503 | Service Unavailable | SendPost is offline for maintenance. Please try again later # API SDKs We have native SendPost SDKs in the following programming languages. You can integrate with them or create your own SDK with our API specification. In case you need any assistance with respect to API then do reachout to our team from website chat or email us at **[email protected]** * [PHP](https://github.com/sendpost/sendpost_php_sdk) * [Javascript](https://github.com/sendpost/sendpost_javascript_sdk) * [Ruby](https://github.com/sendpost/sendpost_ruby_sdk) * [Python](https://github.com/sendpost/sendpost_python_sdk) * [Golang](https://github.com/sendpost/sendpost_go_sdk) # API Reference SendX REST API can be broken down into two major sub-sections: * Sub-Account * Account Sub-Account API operations enable common email sending API use-cases like sending bulk email, adding new domains or senders for email sending programmatically, retrieving stats, adding suppressions etc. All Sub-Account API operations need to pass X-SubAccount-ApiKey header with every API call. The Account API operations allow users to manage multiple sub-accounts and manage IPs. A single parent SendPost account can have 100's of sub-accounts. You may want to create sub-accounts for different products your company is running or to segregate types of emails or for managing email sending across multiple customers of yours. # SMTP Reference Simple Mail Transfer Protocol (SMTP) is a quick and easy way to send email from one server to another. SendPost provides an SMTP service that allows you to deliver your email via our servers instead of your own client or server. This means you can count on SendPost's delivery at scale for your SMTP needs. ## Integrating SMTP 1. Get the SMTP `username` and `password` from your SendPost account. 2. Set the server host in your email client or application to `smtp.sendpost.io`. This setting is sometimes referred to as the external SMTP server or the SMTP relay. 3. Set the `username` and `password`. 4. Set the port to `587` (or as specified below). ## SMTP Ports - For an unencrypted or a TLS connection, use port `25`, `2525` or `587`. - For a SSL connection, use port `465` - Check your firewall and network to ensure they're not blocking any of our SMTP Endpoints. SendPost supports STARTTLS for establishing a TLS-encrypted connection. STARTTLS is a means of upgrading an unencrypted connection to an encrypted connection. There are versions of STARTTLS for a variety of protocols; the SMTP version is defined in [RFC 3207](https://www.ietf.org/rfc/rfc3207.txt). To set up a STARTTLS connection, the SMTP client connects to the SendPost SMTP endpoint `smtp.sendpost.io` on port 25, 587, or 2525, issues an EHLO command, and waits for the server to announce that it supports the STARTTLS SMTP extension. The client then issues the STARTTLS command, initiating TLS negotiation. When negotiation is complete, the client issues an EHLO command over the new encrypted connection, and the SMTP session proceeds normally. If you are unsure which port to use, a TLS connection on port 587 is typically recommended. ## Sending email from your application ```javascript "use strict"; const nodemailer = require("nodemailer"); async function main() { // create reusable transporter object using the default SMTP transport let transporter = nodemailer.createTransport({ host: "smtp.sendpost.io", port: 587, secure: false, // true for 465, false for other ports auth: { user: "" , // generated ethereal user pass: "", // generated ethereal password }, requireTLS: true, debug: true, logger: true, }); // send mail with defined transport object try { let info = await transporter.sendMail({ from: '[email protected]', to: '[email protected]', subject: 'Test Email Subject', html: 'Hello Geeks!!!', }); console.log("Message sent: %s", info.messageId); } catch (e) { console.log(e) } } main().catch(console.error); ``` For PHP ```php
briqpay/php-sdk
12156 Downloads
This is the API documentation for Briqpay. You can find out more about us and our offering at our website [https://briqpay.com](https://briqpay.com) In order to get credentials to the playgrund API Please register at [https://app.briqpay.com](https://app.briqpay.com) # Introduction Briqpay Checkout is an inline checkout solution for your b2b ecommerce. Briqpay Checkout gives you the flexibility of controlling your payment methods and credit rules while optimizing the UX for your customers # SDKs Briqpay offers standard SDKs to PHP and .NET based on these swagger definitions. You can download them respively or use our swagger defintitions to codegen your own versions. #### For .NET `` Install-Package Briqpay `` #### For PHP `` composer require briqpay/php-sdk `` # Standard use-case As a first step of integration you will need to create a checkout session. \n\nIn this session you provide Briqpay with the basic information necessary. In the response from briqpay you will recieve a htmlsnippet that is to be inserted into your frontend. The snippet provided by briqpay will render an iframe where the user will complete the purchase. Once completed, briqpay will redirect the customer to a confirmation page that you have defined. 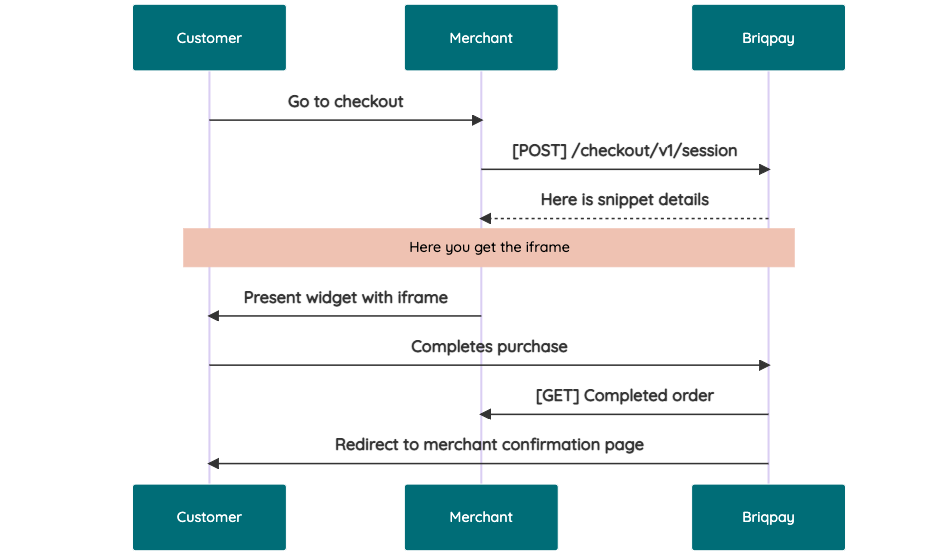 # JavaScript SDK The first step of integration is to add our JS to your site just before closing the ```` tag. This ensures that our JS library is avaliable to load the checkout. ```` Briqpay offers a few methods avaliable through our Javascript SDK. The library is added by our iframe and is avalable on ``window._briqpay`` If you offer the posibility to update the cart or order amonts on the checkout page, the JS library will help you. If your store charges the customer different costs and fees depening on their shipping location, you can listen to the ``addressupdate``event in order to re-calculate the total cost. ```javascript window._briqpay.subscribe('addressupdate', function (data) { console.log(data) }) ``` If your frontend needs to perform an action whe the signup has completed, listen to the ``signup_finalized`` event. ```javascript window._briqpay.subscribe('signup_finalized', function (status) { // redirect or handle status 'success' / 'failure' }) ``` If you allow customers to change the total cart value, you can utilise the JS library to suspend the iframe while you perform a backen update call towards our services. As described below: 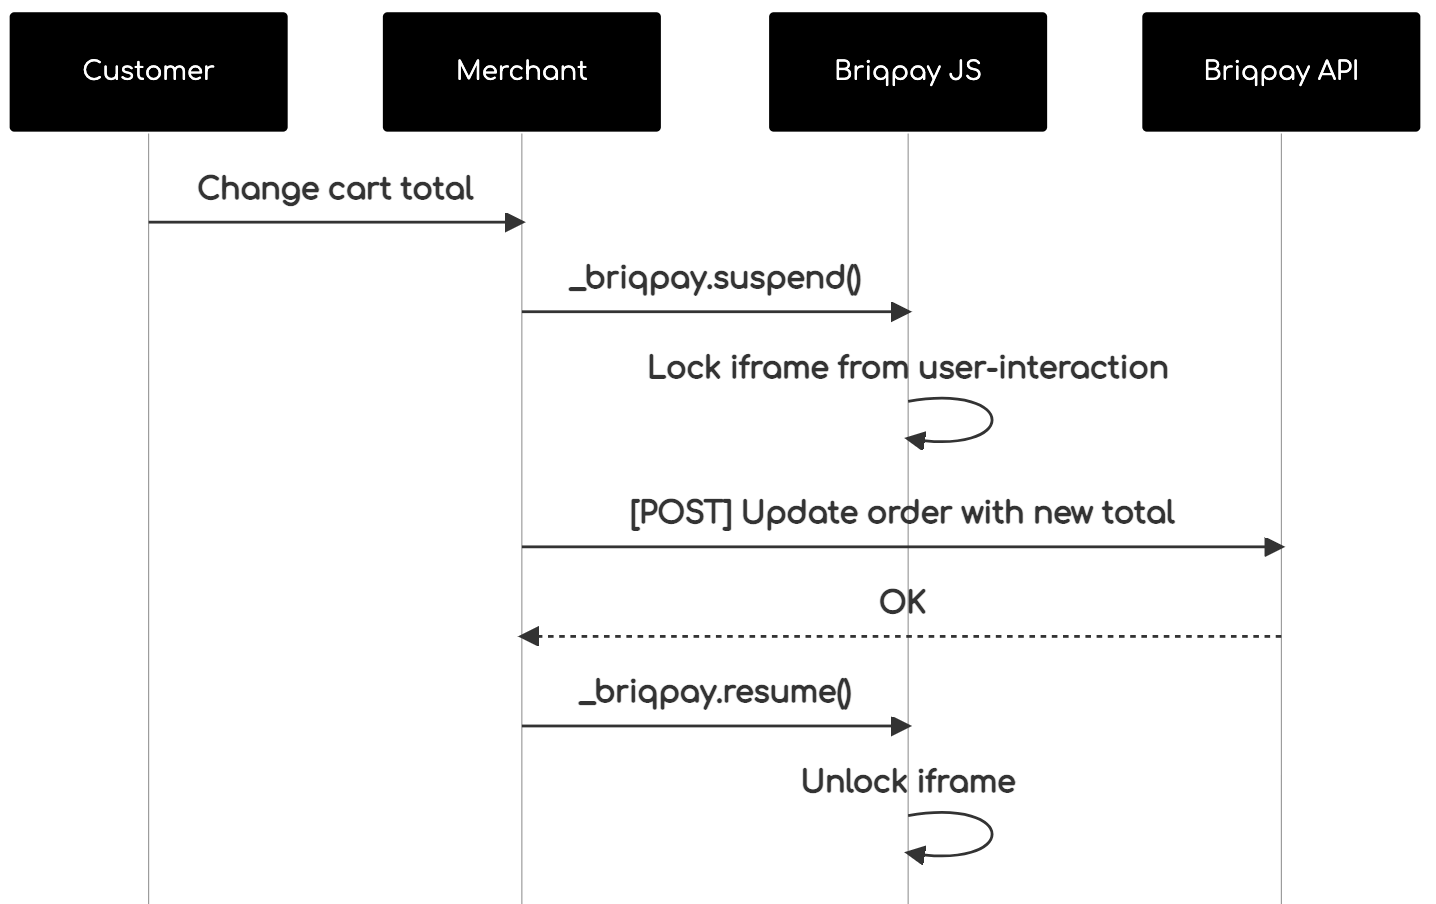 The iframe will auto-resume after 7 seconds if you dont call ``_briqpay.resume()`` before # Test Data In order to verify your integration you will neeed to use test data towards our credit engine. ## Company identication numbers * 1111111111 - To recieve a high credit scoring company ( 100 in rating) * 2222222222 - To test the enviournment with a bad credit scoring company (10 in rating) ## Card details In our playground setup your account is by default setup with a Stripe integration. In order to test out the card form you can use the below card numbers: * 4000002500003155 - To mock 3ds authentication window * 4000000000000069 Charge is declined with an expired_card code. You can use any valid expiry and CVC code # Authentication Briqpay utilizes JWT in order to authenticate calls to our platform. Authentication tokens expire after 48 hours, and at that point you can generate a new token for the given resource using the ``/auth`` endpoint. - Basic Auth - only used on the auth endpoint in order to get the Bearer Token - JWT Bearer Token - All calls towards the API utlizes this method"
webignition/base-panther-test-case
3386 Downloads
sunvalley-technologies/phpunit-callable-test-case
3920 Downloads
Provides a callable test case and trait for callable expectations. Code is extracted from react-php test cases.
sayuprc/http-test-case
119 Downloads
Library for HTTP testing
herrera-io/phpunit-test-case
5773 Downloads
A PHPUnit test case class with additional functionality.
cspray/database-test-case
299 Downloads
A framework-agnostic library for setting up a database suitable for automated testing.
datana-gmbh/doctrine-type-testcases
254343 Downloads
Doctrine Type Testcases
drupsys/codeception-use-cases-module
1127 Downloads
Codeception module to support use case based tests
xsolve-pl/xsolve-unit-skelgen-bundle
10807 Downloads
XSolve PHPUnit SkelGen Bundle to improve creating test cases for PHPUnit
socialpoint/parallel-phpunit
18241 Downloads
Parallel Test Cases Runner for PHPUnit
ollily/ezlogging
137 Downloads
Simplify the usage of - Logging with Monolog
ollily/ezkoding
100 Downloads
Simplify the usage of - Testing with PHPUnit - Reflection with PHP - Developer shortkeys for composer
codekandis/phpunit
611 Downloads
`codekandis/phpunit` is a library for `PHPUnit` testing with enhanced test cases and custom constraint assertions.