Libraries tagged by theme setup
pdfgeneratorapi/php-client
227019 Downloads
# Introduction [PDF Generator API](https://pdfgeneratorapi.com) allows you easily generate transactional PDF documents and reduce the development and support costs by enabling your users to create and manage their document templates using a browser-based drag-and-drop document editor. The PDF Generator API features a web API architecture, allowing you to code in the language of your choice. This API supports the JSON media type, and uses UTF-8 character encoding. ## Base URL The base URL for all the API endpoints is `https://us1.pdfgeneratorapi.com/api/v4` For example * `https://us1.pdfgeneratorapi.com/api/v4/templates` * `https://us1.pdfgeneratorapi.com/api/v4/workspaces` * `https://us1.pdfgeneratorapi.com/api/v4/templates/123123` ## Editor PDF Generator API comes with a powerful drag & drop editor that allows to create any kind of document templates, from barcode labels to invoices, quotes and reports. You can find tutorials and videos from our [Support Portal](https://support.pdfgeneratorapi.com). * [Component specification](https://support.pdfgeneratorapi.com/en/category/components-1ffseaj/) * [Expression Language documentation](https://support.pdfgeneratorapi.com/en/category/expression-language-q203pa/) * [Frequently asked questions and answers](https://support.pdfgeneratorapi.com/en/category/qanda-1ov519d/) ## Definitions ### Organization Organization is a group of workspaces owned by your account. ### Workspace Workspace contains templates. Each workspace has access to their own templates and organization default templates. ### Master Workspace Master Workspace is the main/default workspace of your Organization. The Master Workspace identifier is the email you signed up with. ### Default Template Default template is a template that is available for all workspaces by default. You can set the template access type under Page Setup. If template has "Organization" access then your users can use them from the "New" menu in the Editor. ### Data Field Data Field is a placeholder for the specific data in your JSON data set. In this example JSON you can access the buyer name using Data Field `{paymentDetails::buyerName}`. The separator between depth levels is :: (two colons). When designing the template you don’t have to know every Data Field, our editor automatically extracts all the available fields from your data set and provides an easy way to insert them into the template. ``` { "documentNumber": 1, "paymentDetails": { "method": "Credit Card", "buyerName": "John Smith" }, "items": [ { "id": 1, "name": "Item one" } ] } ``` ## Rate limiting Our API endpoints use IP-based rate limiting and allow you to make up to 2 requests per second and 60 requests per minute. If you make more requests, you will receive a response with HTTP code 429. Response headers contain additional values: | Header | Description | |--------|--------------------------------| | X-RateLimit-Limit | Maximum requests per minute | | X-RateLimit-Remaining | The requests remaining in the current minute | | Retry-After | How many seconds you need to wait until you are allowed to make requests | * * * * * # Libraries and SDKs ## Postman Collection We have created a [Postman Collection](https://www.postman.com/pdfgeneratorapi/workspace/pdf-generator-api-public-workspace/overview) so you can easily test all the API endpoints without developing and code. ## Client Libraries All our Client Libraries are auto-generated using [OpenAPI Generator](https://openapi-generator.tech/) which uses the OpenAPI v3 specification to automatically generate a client library in specific programming language. * [PHP Client](https://github.com/pdfgeneratorapi/php-client) * [Java Client](https://github.com/pdfgeneratorapi/java-client) * [Ruby Client](https://github.com/pdfgeneratorapi/ruby-client) * [Python Client](https://github.com/pdfgeneratorapi/python-client) * [Javascript Client](https://github.com/pdfgeneratorapi/javascript-client) We have validated the generated libraries, but let us know if you find any anomalies in the client code. ## Model Context Protocol (MCP) Server Integrate document generation directly into your AI agents and LLM applications using our official Model Context Protocol (MCP) Server. The MCP server provides a standardized interface that allows AI assistants (like Claude Desktop and other MCP-compatible clients) to securely interact with the PDF Generator API. With it, your AI applications can automatically fetch workspaces, retrieve templates, merge data, and generate PDF documents on the fly. [Get PDF Generator API MCP Server](https://github.com/pdfgeneratorapi/mcp-server) * * * * * # Authentication The PDF Generator API uses __JSON Web Tokens (JWT)__ to authenticate all API requests. These tokens offer a method to establish secure server-to-server authentication by transferring a compact JSON object with a signed payload of your account’s API Key and Secret. When authenticating to the PDF Generator API, a JWT should be generated uniquely by a __server-side application__ and included as a __Bearer Token__ in the header of each request. ## Accessing your API Key and Secret You can find your __API Key__ and __API Secret__ from the __Account Settings__ page after you login to PDF Generator API [here](https://pdfgeneratorapi.com/login). ## Creating a JWT JSON Web Tokens are composed of three sections: a header, a payload (containing a claim set), and a signature. The header and payload are JSON objects, which are serialized to UTF-8 bytes, then encoded using base64url encoding. The JWT's header, payload, and signature are concatenated with periods (.). As a result, a JWT typically takes the following form: ``` {Base64url encoded header}.{Base64url encoded payload}.{Base64url encoded signature} ``` We recommend and support libraries provided on [jwt.io](https://jwt.io/). While other libraries can create JWT, these recommended libraries are the most robust. ### Header Property `alg` defines which signing algorithm is being used. PDF Generator API users HS256. Property `typ` defines the type of token and it is always JWT. ``` { "alg": "HS256", "typ": "JWT" } ``` ### Payload The second part of the token is the payload, which contains the claims or the pieces of information being passed about the user and any metadata required. It is mandatory to specify the following claims: * issuer (`iss`): Your API key * subject (`sub`): Workspace identifier * expiration time (`exp`): Timestamp (unix epoch time) until the token is valid. It is highly recommended to set the exp timestamp for a short period, i.e. a matter of seconds. This way, if a token is intercepted or shared, the token will only be valid for a short period of time. ``` { "iss": "ad54aaff89ffdfeff178bb8a8f359b29fcb20edb56250b9f584aa2cb0162ed4a", "sub": "[email protected]", "exp": 1586112639 } ``` ### Payload for Partners Our partners can send their unique identifier (provided by us) in JWT's partner_id claim. If the `partner_id` value is specified in the JWT, the organization making the request is automatically connected to the partner account. * Partner ID (`partner_id`): Unique identifier provide by PDF Generator API team ``` { "iss": "ad54aaff89ffdfeff178bb8a8f359b29fcb20edb56250b9f584aa2cb0162ed4a", "sub": "[email protected]", "partner_id": "my-partner-identifier", "exp": 1586112639 } ``` ### Signature To create the signature part you have to take the encoded header, the encoded payload, a secret, the algorithm specified in the header, and sign that. The signature is used to verify the message wasn't changed along the way, and, in the case of tokens signed with a private key, it can also verify that the sender of the JWT is who it says it is. ``` HMACSHA256( base64UrlEncode(header) + "." + base64UrlEncode(payload), API_SECRET) ``` ### Putting all together The output is three Base64-URL strings separated by dots. The following shows a JWT that has the previous header and payload encoded, and it is signed with a secret. ``` eyJhbGciOiJIUzI1NiIsInR5cCI6IkpXVCJ9.eyJpc3MiOiJhZDU0YWFmZjg5ZmZkZmVmZjE3OGJiOGE4ZjM1OWIyOWZjYjIwZWRiNTYyNTBiOWY1ODRhYTJjYjAxNjJlZDRhIiwic3ViIjoiZGVtby5leGFtcGxlQGFjdHVhbHJlcG9ydHMuY29tIn0.SxO-H7UYYYsclS8RGWO1qf0z1cB1m73wF9FLl9RCc1Q // Base64 encoded header: eyJhbGciOiJIUzI1NiIsInR5cCI6IkpXVCJ9 // Base64 encoded payload: eyJpc3MiOiJhZDU0YWFmZjg5ZmZkZmVmZjE3OGJiOGE4ZjM1OWIyOWZjYjIwZWRiNTYyNTBiOWY1ODRhYTJjYjAxNjJlZDRhIiwic3ViIjoiZGVtby5leGFtcGxlQGFjdHVhbHJlcG9ydHMuY29tIn0 // Signature: SxO-H7UYYYsclS8RGWO1qf0z1cB1m73wF9FLl9RCc1Q ``` ## Temporary JWTs You can create a temporary token in [Account Settings](https://pdfgeneratorapi.com/account/organization) page after you login to PDF Generator API. The generated token uses your email address as the subject (`sub`) value and is valid for __15 minutes__. You can also use [jwt.io](https://jwt.io/) to generate test tokens for your API calls. These test tokens should never be used in production applications. * * * * * # Error codes | Code | Description | |--------|--------------------------------| | 401 | Unauthorized | | 402 | Payment Required | | 403 | Forbidden | | 404 | Not Found | | 422 | Unprocessable Entity | | 429 | Too Many Requests | | 500 | Internal Server Error | ## 401 Unauthorized | Description | |-------------------------------------------------------------------------| | Authentication failed: request expired | | Authentication failed: workspace missing | | Authentication failed: key missing | | Authentication failed: property 'iss' (issuer) missing in JWT | | Authentication failed: property 'sub' (subject) missing in JWT | | Authentication failed: property 'exp' (expiration time) missing in JWT | | Authentication failed: incorrect signature | ## 402 Payment Required | Description | |-------------------------------------------------------------------------| | Your account is suspended, please upgrade your account | ## 403 Forbidden | Description | |-------------------------------------------------------------------------| | Your account has exceeded the monthly document generation limit. | | Access not granted: You cannot delete master workspace via API | | Access not granted: Template is not accessible by this organization | | Your session has expired, please close and reopen the editor. | ## 404 Entity not found | Description | |-------------------------------------------------------------------------| | Entity not found | | Resource not found | | None of the templates is available for the workspace. | ## 422 Unprocessable Entity | Description | |-------------------------------------------------------------------------| | Unable to parse JSON, please check formatting | | Required parameter missing | | Required parameter missing: template definition not defined | | Required parameter missing: template not defined | ## 429 Too Many Requests | Description | |-------------------------------------------------------------------------| | You can make up to 2 requests per second and 60 requests per minute. | * * * * *
picocms/pico-theme
32424 Downloads
This is Pico's official default theme. Pico is a stupidly simple, blazing fast, flat file CMS.
oopsydev/laravel
1527 Downloads
Lightweight error monitoring for Laravel — captures PHP exceptions with full stack traces, code context, breadcrumbs, and sends them to Oopsy. Two-line setup, zero config.
picocms/composer-installer
32967 Downloads
A composer plugin responsible for installing plugins and themes for Pico, a stupidly simple, blazing fast, flat file CMS.
liip/drupalconnectormodule
1702 Downloads
The DrupalConnector Module is an abstraction layer to the Drupal 7 API of global functions in order to use them in an OOD setup.
payum/payum-server
318 Downloads
PHP 7.1+ Payment processing server. Setup once and rule them all
m-michalis/boxnow-api
2481 Downloads
Document describes the API description for partners in order to create and track delivery requests. ## Revision history |Date|Author|Description|Version| |-|-|-|-| |2024-09-26|Hoffmann, P.| Add P466 error code |1.65| |2024-09-25|Filatov, R.| Add P465 error for /api/{v1,v2}/delivery-requests:checkAddressDelivery |1.64| |2024-08-13|Hoffmann, P.| Update `shippingRegions` in /api/v1/entrusted-partners response. |1.63| |2024-07-22|Hoffmann, P.| Add `shippingRegions` and `phoneNumber` to /api/v1/entrusted-partners response. |1.62| |2024-07-11|Filatov, R.| Add P461, P462, P464 errors for ArcGIS validations to /api/v2/delivery-requests:checkAddressDelivery |1.61| |2024-07-08|Hoffmann, P.| Add `email` and `phoneNumber` to /api/v1/entrusted-partners response. Add `originContactEmail` and `originContactNumber` to /api/v1/delivery-requests:fromCsv request body |1.60| |2024-05-23|Balagazova, K.| Add lost parcel event |1.59| |2024-04-08|Hoffmann, P.| Add declareDeliveryPartnerReturn |1.58| |2024-03-15|Šmolík, J.| Add generate upload label link |1.57| |2024-02-02|Šmolík, J.| Add location id to /api/v1/parcels events |1.56| |2023-11-15|Filatov, R.| Add P422, P423, P424 error codes |1.55| |2023-11-13|Filatov, R.| Add new `/api/v2/delivery-requests:checkAddressDelivery` endpoint switched to ArcGIS |1.54| |2023-11-08|Filatov, R.| Add `customerReturnsMaxAllowedSize` for /api/v1/entrusted-partners |1.53| |2023-06-10|Filatov, R.| Add `weight` min/max validation (error cde P421) and always round it to 2 decimals on /api/v1/delivery-requests:customerReturns|1.52| |2023-05-10|Balagazova, K.| Forbid usage of `q` parameter of `api/v1/parcels` for partner server accounts |1.51| |2023-04-28|Hoffmann, P.| Remove `X-Overwrite-Date` request header from /api/v1/delivery-requests and /api/v1/entrusted-partners |1.50| |2023-04-28|Azizov, J.| Add P442 error code |1.49| |2023-04-12|Balagazova, K.|Add `limit` field and automatic ordering by distance to /api/v1/destinations |1.48| |2023-04-04|Balagazova K.| Add `showRecipientInformation` field to /api/v1/delivery-requests /api/v1/delivery-requests:fromCsv |1.47| |2023-02-23|Balagazova K.| Add customer information to the webhook message |1.46| |2022-11-29|Azizov J.| Add Webhook schema and an example endpoint |1.45| |2022-11-28|Vala J.| Add partner permission to /entrusted-partners response |1.44| |2022-11-24|Vala J.| Add partner permission `addressAsDestination`, `codAddressAsDestination`. Validate partner permission for delivery to address and cod payment use for delivery to address when creating delivery request |1.43| |2022-11-14|Vala J.| Add `X-Overwrite-Date` request header for delivery request to test Croatian currency conversion, only testeable on dev |1.42| |2022-10-21|Vala J.| Add validation error code to /api/v1/simple-delivery-requests /api/v1/delivery-requests /api/v1/delivery-requests:customerReturns |1.41| |2022-09-22|Šmolík, J.|Add accepted-to-locker parcel event |1.40| |2022-09-08|Šmolík J.| Add support for user to choose partner they want to work with |1.39| |2022-08-10|Šmolík J.| Add /labels:search to download PDF labels for defined criteria |1.38| |2022-08-08|Azizov. J.| Add `region` field to /destinations and /origins endpoints |1.37| |2022-07-27|Vala J.| Add EP for listing shipping label data of parcels order /api/v1/delivery-requests/{orderNumber}/label |1.36| |2022-07-27|Vala J.| Add EP for listing shipping label data of parcel /api/v1/parcels/{id}/label |1.35| |2022-07-22|Vala J.| Add destination_public_id column to csv export of parcels |1.34| |2022-07-08|Vala J.| Add exportCsvUrl to headers ['X-export-url-csv'] to response from /api/v1/parcelsAdd endpoint to export parcels to csv file /ui/v1/parcels.csv |1.33| |2022-06-27|Vala J.| Add width and printerModel query parameters for zpl shipping labels for /api/v1/delivery-requests/{orderNumber}/label.{type} and /api/v1/parcels/{id}/label.{type} |1.32| |2022-06-17|Šmolík, J.| Allow to select return location for delivery request |1.31| |2022-05-25|Vala, J.| Add single labelUrlPdf to headers ['X-labels-url-pdf'] in response from /api/v1/delivery-requests:fromCsv |1.30| |2022-05-25|Vala, J.| Add EP to handle csv import orders printing of shipping label /ui/v1/delivery-requests/{orderImportsNumber}/label.pdf |1.29| |2022-05-20|Vala, J.| Add possibility to overwrite 4 rows in shipping label sender info to /api/v1/delivery-requests endpoint |1.28| |2022-05-04|Azizov, J.| Add state and created filters to to /api/v1/parcels endpoint |1.27| |2022-05-03|Azizov, J.| Add possibility to search parcels to /api/v1/parcels endpoint |1.26| |2022-04-27|Azizov, J.| Add /api/v1/delivery-requests:customerReturns for customer returns delivery requests |1.25| |2022-04-26|Vala, J.| Add createTime, updateTime to parcel list response |1.24| |2022-04-21|Šmolík, J.| Add payment info to parcels |1.23| |2022-02-22|Azizov, J.| Add P408 and P409 error codes |1.22| |2022-02-22|Azizov, J.| Add notifySMSOnAccepted to DeliveryRequest |1.21| |2022-02-01|Šmolík, J.| Add check address delivery endpointAdd /api/v1/simple-delivery-requests for simpler delivery creation |1.20| |2022-01-20|Šmolík, J.| Add P405, P406 and P407 error codes |1.19| |2022-01-10|Šmolík, J.| Add CSV import endpointAdd JWT custom claims descriptionMove 403 error codes to own section |1.18| |2021-12-23|Šmolík, J.| Add new endpoint to confirm AnyAPM delivery of a parcelPartition error codes by HTTP status response |1.17| |2021-12-16|Šmolík, J.| Add new error code P403 |1.16| |2021-12-09|Šmolík, J.| Add new error codes P401, P402 |1.15| |2021-11-30|Šmolík, J.| Add delivery request origin, destination and items fields description |1.14| |2021-11-11|Šmolík, J.| Add endpoint for parcel delivery cancellation |1.13| |2021-11-09|Šmolík, J.| Add X403 error code spec |1.12| |2021-10-14|Šmolík, J.| Add Accepted for return event |1.11| |2021-10-05|Šmolík, J.| Make DeliveryRequest.items required |1.10| |2021-09-22|Šmolík, J.| Add canceled event state and event|1.9| |2021-09-17|Šmolík, J.| Add PDF label URLs to parcels response |1.8 |2021-09-13|Šmolík, J.| Update parcel state enum valuesRemove history event displayName, add type|1.7 |2021-08-25|Azizov, J.| Add possibility to print labels for all parcels in orderMake contact information of origin optional in delivery request|1.6 |2021-08-02|Azizov, J.| Add items metadata to parcel |1.5| |2021-07-15|Šmolík, J.| Add destination expected delivery time |1.4| |2021-06-23|Šmolík, J.| Update money value fields description |1.3| |2021-06-21|Šmolík, J.| Update Requesting a delivery textAdd `name` filter to origins and destinations Rename delivery request code of description to plain descriptionAdd more specific info to value amount fieldsUpdate address country to match ISO CodeUpdate address postal code formattingUpdate origin/destination for delivery requestRemove height, length, width from order itemAdd events to parcel infoUpdate delivery request responseUpdate order number descriptionAdd parcel id filter to /parcelsAdd message to errorMake contact name requiredAdd delivery partner parcel idsRemove order items' code and status |1.2| |2021-06-14|Šmolík, J.| Add a todo to specify client notification type after accepting the order. Let the partner choose to receive an email when successful delivery request is made. Remove `typeOfOrder` from delivery request.Add option to select delivery partner for pickupMake item weight in the order optionalMake origin contact email requiredAdd support to add sender's name when making delivery requestRemove landmark and code from addressAdd new error code or partners not eligible to create COD delivery requestsAdd support to filter destinations/origins by typeAdd support to send compartment size for order item, required for APM originMake `typeOfService` optional |1.1| |2021-06-09|Šmolík, J.|Initial version|1.0| # Setup Register your company through our support. We are going to need - Company name - List of Phone numbers for SMS OTP authentication of people who'll you want to have access to the Partner CMS - List of addresses for pickup points - where do we pickup your order for delivery You will get in return - `OAUTH_CLIENT_ID` - OAuth2 Client ID for authenticating with the Partner API. Keep it safe. Value may vary for each environment. - `OAUTH_CLIENT_SECRET` - OAuth2 Client Secret for authenticating with the Partner API. Keep it safe. Value may vary for each environment. - `API_URL` - Base URL for Partner API ## Environments Product offers multiple environments - Sandbox - For you to test the integration. Limited functionality. - Production - Connected to real end-users. Use with care. Environment setting summary: | Value \ Env | Sandbox | Production | |---|---|---| | `API_URL` | N/A | N/A | | `OAUTH_CLIENT_SECRET` | Contact Support | Contact Support | | `OAUTH_CLIENT_ID` | Contact Support | Contact Support | # API ## Authentication Authentication is based on OAuth2 standard, Client Credentials grant. Token endpoint `/auth-sessions`, see examples below. Client ID and Secret MUST be passed to you from BoxNow support in advance. In order to use the API, you MUST attach the access token to Authorization header as a Bearer token. ### Custom JWT claims You can find additional user information in custom claims under namespace key `https://boxnow.gr`. For example ```json { "iat": 1641980553, "exp": 1641984153, "https://boxnow.gr": { "permission": { "warehouseAsOrigin": true, "anyApmAsOrigin": true, "anyApmToSameApmDelivery": true, "anyApmToSameApmDeliveryWithoutConfirmation": true, "depotAsOrigin": true } } } ``` ## Listing available destinations You can skip this if you don't want to deliver your order to one of our APMs. Use `/destinations` to list available APM locations we can deliver the goods to. You will refer to these records by `id` when requesting delivery later on. ## What can influence `/destinations` endpoint response - Only APMs with `Box Now Ready` state are considered - APMs must be available for your required package size (see: '#/components/parameters/LocationRequiredSize') ## Requesting a delivery Create a delivery request to delivery your order to the client. Use `/delivery-requests` endpoint for this operation. Once a successful request delivery is made - (optional) we send you an email notifying about successful delivery request creation, if you choose to receive this email - you should fetch the PDF label for each of the parcel from `/parcels/{id}/label.pdf`, print it and stick it to the parcel/s - we send a courier to pick up the labeled parcel/s - we notify the client via email that we have accepted the order from you and its being delivered by us ## Modifying a delivery request After a delivery request is successfully made, you can alter some parts of it later on. Use `/delivery-requests/{id}` endpoint for these modifications. ## Checking on the deliveries You can list parcel related to your delivery requests via `/parcels` endpoint. ## Error codes ### Description of codes for `400 Bad Request` responses - `P400` - Invalid request data. Make sure are sending the request according to this documentation. - `P401` - Invalid request origin location reference. Make sure you are referencing a valid location ID from Origins endpoint or valid address. - `P402` - Invalid request destination location reference. Make sure you are referencing a valid location ID from Destinations endpoint or valid address. - `P403` - You are not allowed to use AnyAPM-SameAPM delivery. Contact support if you believe this is a mistake. - `P404` - Invalid import CSV. See error contents for additional info. - `P405` - Invalid phone number. Make sure you are sending the phone number in full international format, e.g. +30 xx x xxx xxxx. - `C404` - Invalid phone number. Make sure you are sending the phone number in full international format, e.g. +30 xx x xxx xxxx. - `P406` - Invalid compartment/parcel size. Make sure you are sending one of required sizes 1, 2 or 3. Size is required when sending from AnyAPM directly. - `P407` - Invalid country code. Make sure you are sending country code in ISO 3166-1 alpha-2 format, e.g. GR. - `P408` - Invalid amountToBeCollected amount. Make sure you are sending amount in the valid range of (0, 5000> - `P409` - Invalid delivery partner reference. Make sure you are referencing a valid delivery partner ID from Delivery partners endpoint. - `P410` - Order number conflict. You are trying to create a delivery request for order ID that has already been created. Choose another order id. - `P411` - You are not eligible to use Cash-on-delivery payment type. Use another payment type or contact our support. - `P412` - You are not allowed to create customer returns deliveries. Contact support if you believe this is a mistake. - `P413` - Invalid return location reference. Make sure you are referencing a valid location warehouse ID from Origins endpoint or valid address. - `P415` - You are not allowed to create delivery to home address. Contact support if you believe this is a mistake. - `P416` - You are not allowed to use COD payment for delivery to home address. Contact support if you believe this is a mistake. - `P417` - You are not allowed to use `q` parameter. It is forbidden for server partner accounts. - `P420` - Parcel not ready for cancel. You can cancel only new, undelivered, or parcels that are not returned or lost. Make sure parcel is in transit and try again. - `P421` - Invalid parcel weight. Make sure you are sending value between 0 and 10^6. - `P422` - Address not found. Try to call just with postal code and country. - `P423` - Nearby locker not found. - `P424` - Invalid region format. Please ensure the format includes a language code followed by a country code in ISO 3166-1 alpha-2 format, separated by a hyphen, e.g. el-GR, or region exists in context. - `P425` - Parcel not ready to declare a delivery partner return. Make sure parcel is not in any of the following states in order to declare a delivery partner return: 'canceled-return', 'lost', 'canceled', 'returned', 'expired-return'. - `P426` - Parcel not eligible to declare a delivery partner return. Parcel needs to use a delivery partner in order to declare a return. - `P430` - Parcel not ready for AnyAPM confirmation. Parcel is probably already confirmed or being delivered. Contact support if you believe this is a mistake. - `P440` - Ambiguous partner. Your account is linked to multiple partners and is unclear on whose behalf you want to perform this action. Send `X-PartnerID` header with ID of the partner you want to manage. You can get list of available Partner IDs from /entrusted-partners endpoint. - `P441` - Invalid X-PartnerID header. Value you provided for X-PartnerID header is either invalid or references partner you don't have access to. Make sure you are sending ID from /entrusted-partners endpoint. - `P442` - Invalid limit query parameter. The query limit for this API has been exceeded. Please reduce the size of your query (max allowed is 100). - `P460` - Parcel not eligible for external destination delivery. Delivery request destination.deliveryPartnerId is not set. - `P461` - Invalid street. Make sure the length is not more than 100 characters. - `P462` - Invalid city. Make sure the length is not more than 50 characters. - `P464` - Invalid postal code. Make sure the length is not more than 20 characters. ### Description of codes for `403 Forbidden` responses - `X403` - Account disabled. Your account had been disabled, contact support. - `P414` - Unauthorized parcel access. You are trying to access information to parcel/s that don't belong to you. Make sure you are requesting information for parcels you have access to. - `P465` - Partner doesn't have access for checking delivery addresses. - `P466` - You are not allowed to create a delivery request because your account has an overdue flag and you are not a vip partner. ### Description of codes for `503 Service Unavailable` responses | Code | Description | |---|---| | `P600` | Locker bridge communication failed. There has been some error when communicating with the locker bridge. Try again later or contact support. | | `P610` | Geolocation API failed. There has been some error when translating address to gps coordinates. Try again later or contact support. |
briqpay/php-sdk
11940 Downloads
This is the API documentation for Briqpay. You can find out more about us and our offering at our website [https://briqpay.com](https://briqpay.com) In order to get credentials to the playgrund API Please register at [https://app.briqpay.com](https://app.briqpay.com) # Introduction Briqpay Checkout is an inline checkout solution for your b2b ecommerce. Briqpay Checkout gives you the flexibility of controlling your payment methods and credit rules while optimizing the UX for your customers # SDKs Briqpay offers standard SDKs to PHP and .NET based on these swagger definitions. You can download them respively or use our swagger defintitions to codegen your own versions. #### For .NET `` Install-Package Briqpay `` #### For PHP `` composer require briqpay/php-sdk `` # Standard use-case As a first step of integration you will need to create a checkout session. \n\nIn this session you provide Briqpay with the basic information necessary. In the response from briqpay you will recieve a htmlsnippet that is to be inserted into your frontend. The snippet provided by briqpay will render an iframe where the user will complete the purchase. Once completed, briqpay will redirect the customer to a confirmation page that you have defined. 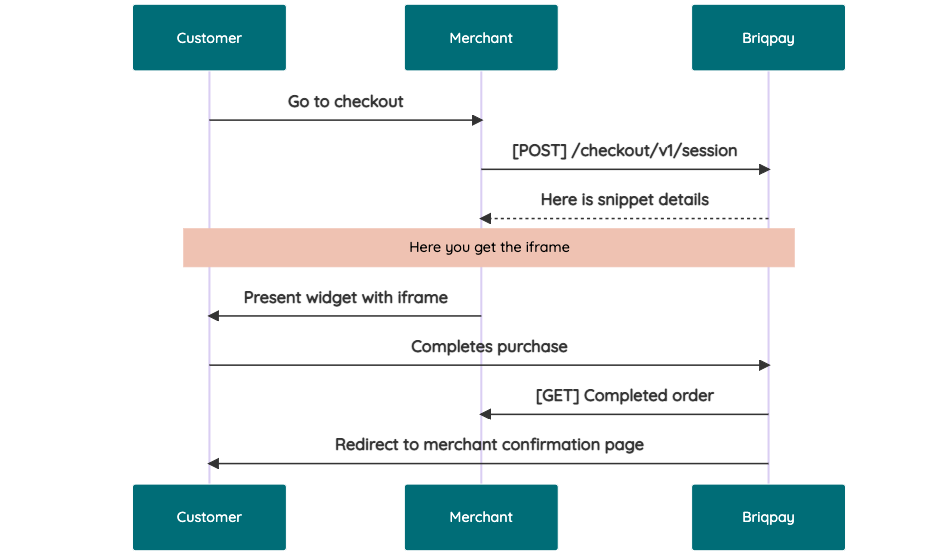 # JavaScript SDK The first step of integration is to add our JS to your site just before closing the ```` tag. This ensures that our JS library is avaliable to load the checkout. ```` Briqpay offers a few methods avaliable through our Javascript SDK. The library is added by our iframe and is avalable on ``window._briqpay`` If you offer the posibility to update the cart or order amonts on the checkout page, the JS library will help you. If your store charges the customer different costs and fees depening on their shipping location, you can listen to the ``addressupdate``event in order to re-calculate the total cost. ```javascript window._briqpay.subscribe('addressupdate', function (data) { console.log(data) }) ``` If your frontend needs to perform an action whe the signup has completed, listen to the ``signup_finalized`` event. ```javascript window._briqpay.subscribe('signup_finalized', function (status) { // redirect or handle status 'success' / 'failure' }) ``` If you allow customers to change the total cart value, you can utilise the JS library to suspend the iframe while you perform a backen update call towards our services. As described below: 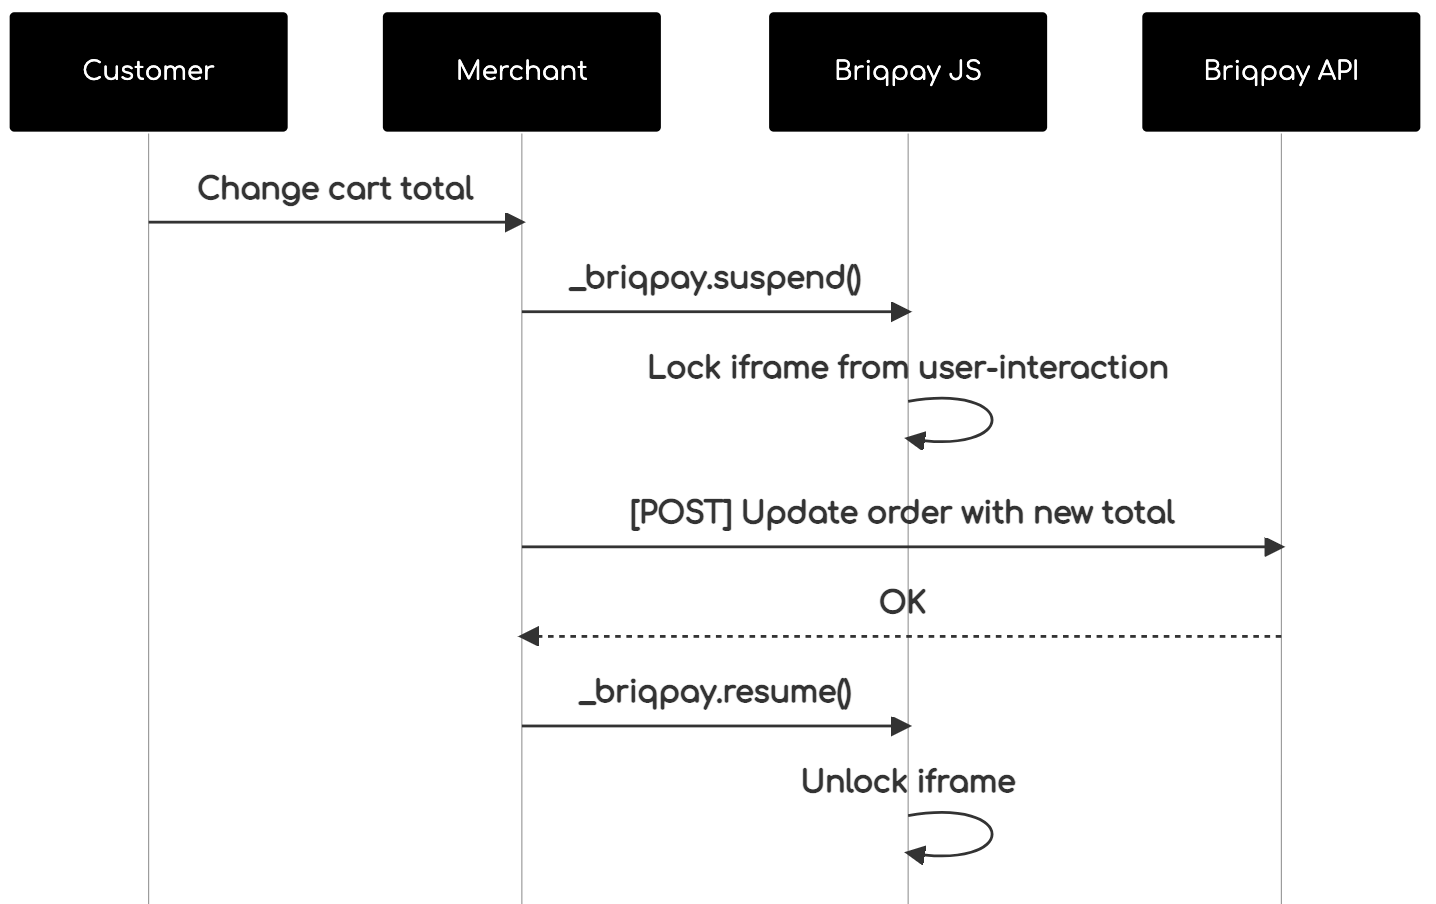 The iframe will auto-resume after 7 seconds if you dont call ``_briqpay.resume()`` before # Test Data In order to verify your integration you will neeed to use test data towards our credit engine. ## Company identication numbers * 1111111111 - To recieve a high credit scoring company ( 100 in rating) * 2222222222 - To test the enviournment with a bad credit scoring company (10 in rating) ## Card details In our playground setup your account is by default setup with a Stripe integration. In order to test out the card form you can use the below card numbers: * 4000002500003155 - To mock 3ds authentication window * 4000000000000069 Charge is declined with an expired_card code. You can use any valid expiry and CVC code # Authentication Briqpay utilizes JWT in order to authenticate calls to our platform. Authentication tokens expire after 48 hours, and at that point you can generate a new token for the given resource using the ``/auth`` endpoint. - Basic Auth - only used on the auth endpoint in order to get the Bearer Token - JWT Bearer Token - All calls towards the API utlizes this method"
hov/jobfair
3644 Downloads
Simple job market based on Extbase and Fluid. Basically works like dmmjobcontrol. There are list and detail views available. In addition, it is possible to set up an online application system. Furthermore, FE-Users can be enabled to add and edit jobs in the frontend, so to BE-Administration is required. Feeds (Rss091, Rss2, Atom) are also available
laravel-neuro/core
24 Downloads
A powerful laravel framework for connecting to AI APIs such as OpenAI, Gemini, and Ollama, send prompts, collect responses, create agents and agent networks, and put them to work using easy to setup and highly customizable state machines.
crimsonkissaki/mockmaker
44 Downloads
Whether you call them doubles, stubs, mocks, partials, fakes, or something else there are times when a mocking library such as PHPUnit's mockBuilder, Mockery, Prophecy, etc. just doesn't do exactly what you need or want. Sometimes you just need a concrete class implementation to run through the unit test wringer or a full end to end functional unit test suite. MockMaker aims to simplify the process of generating concrete fake ORM entity objects. Flexible and extendable, the generated seed code can be altered to suit your particular project with relative ease. That means after the initial setup you can re-run MockMaker for any new entities that get added in or update existing entities that change with little to no fuss. What's more, once MockMaker has made your files it's done; you don't have to include it in your code base and can use the generated files like any other project class.
phrozenbyte/pico-theme
26 Downloads
This is PhrozenByte's fork of Pico's default theme. Pico is a stupidly simple, blazing fast, flat file CMS.
zvps/ebay-sell-marketing-php-client
33 Downloads
The Marketing API offers two platforms that sellers can use to promote and advertise their products: Promoted Listings is an eBay ad service that lets sellers set up ad campaigns for the products they want to promote. eBay displays the ads in search results and in other marketing modules as SPONSORED listings. If an item in a Promoted Listings campaign sells, the seller is assessed a Promoted Listings fee, which is a seller-specified percentage applied to the sales price. For complete details, see Promoted Listings. Promotions Manager gives sellers a way to offer discounts on specific items as a way to attract buyers to their inventory. Sellers can set up discounts (such as "20% off" and other types of offers) on specific items or on an entire customer order. To further attract buyers, eBay prominently displays promotion teasers throughout buyer flows. For complete details, see Promotions Manager. Marketing reports, on both the Promoted Listings and Promotions Manager platforms, give sellers information that shows the effectiveness of their marketing strategies. The data gives sellers the ability to review and fine tune their marketing efforts. Important! Sellers must have an active eBay Store subscription, and they must accept the Terms and Conditions before they can make requests to these APIs in the Production environment. There are also site-specific listings requirements and restrictions associated with these marketing tools, as listed in the "requirements and restrictions" sections for Promoted Listings and Promotions Manager. The table below lists all the Marketing API calls grouped by resource.
macropage/sdk-ebay-rest-marketing
23 Downloads
The Marketing API offers two platforms that sellers can use to promote and advertise their products: Promoted Listings is an eBay ad service that lets sellers set up ad campaigns for the products they want to promote. eBay displays the ads in search results and in other marketing modules as SPONSORED listings. If an item in a Promoted Listings campaign sells, the seller is assessed a Promoted Listings fee, which is a seller-specified percentage applied to the sales price. For complete details, refer to the Promoted Listings playbook.Promotions Manager gives sellers a way to offer discounts on specific items as a way to attract buyers to their inventory. Sellers can set up discounts (such as "20% off" and other types of offers) on specific items or on an entire customer order. To further attract buyers, eBay prominently displays promotion teasers throughout buyer flows. For complete details, see Promotions Manager. Marketing reports, on both the Promoted Listings and Promotions Manager platforms, give sellers information that shows the effectiveness of their marketing strategies. The data gives sellers the ability to review and fine tune their marketing efforts.Store Email Campaign allows sellers to create and send email campaigns to customers who have signed up to receive their newsletter. For more information on email campaigns, see Store Email Campaigns.Important! Sellers must have an active eBay Store subscription, and they must accept the Terms and Conditions before they can make requests to these APIs in the Production environment. There are also site-specific listings requirements and restrictions associated with these marketing tools, as listed in the "requirements and restrictions" sections for Promoted Listings and Promotions Manager. The table below lists all the Marketing API calls grouped by resource.
bright-cloud-studio/constant-contact-integration
7 Downloads
Establish a connection between Contao and Constant Contact. Set up forms to automatically create Contacts and add them to Lists