Libraries tagged by get documents
matasarei/text-at-any-cost
0 Downloads
Text at any cost: get text from any office document (DOC, DOCX, ODT, PDF and other).
baozi/annotation
6 Downloads
get class and function annotation document
hunnomad/ravendb
0 Downloads
This class provides a simple interface for interacting with a RavenDB database using HTTP requests. It supports basic operations such as `PUT`, `GET`, `QUERY`, and `DELETE` for managing documents within a RavenDB instance. The class utilizes cURL for making HTTP requests and expects a PEM file for SSL certificate verification.
paga/paga-collect
1560 Downloads
This document lists the different RESTful web services Paga offers allowing anyone (payment request initiator) to initiate a payment request to a third party and automatically get notified when the payment request is fulfilled
numeno/api-art-rec
2 Downloads
## Introduction Use the Numeno Article Recommender API to receive a curated selection of articles from across the web. See below for the steps to creating a Feed, as well as an introduction to the top-level concepts making up the Article Recommender API. ## Steps to creating a Feed 1. Create a Feed - [`/feeds`](create-feed) 2. Create a number of Stream queries associated with the Feed - [`/feeds/:feedId/streams`](create-stream) 3. Pull from the Feed as the Feed refreshes - [`/feeds/:feedId/articles`](get-articles-in-feed) 4. Use those Article IDs to look up metadata for the Articles -[`/articles/:id`](get-article-by-id) 5. Visit the Article links and render to your server DB or client app. ## Sources, Articles and Topics A **Source** is a place where Articles come from, typically a website, a blog, or a knowledgebase endpoint. Sources can be queried for activity via the [`/sources`](get-sources) endpoint. Beyond the Sources Numeno regaularly indexes, additional Sources can be associated with Stream queries, and Sources can be `allowlist`/`denylist`'d. **Articles** are the documents produced by Sources, typically pages from a blogpost or website, articles from a news source, or posts from a social platform or company intranet. See the [`/articles`](search-articles) endpoint. **Topics** - Numeno has millions of Topics that it associates with Articles when they are sourced. Topics are used in Stream queries, which themselves are composed to create Feeds. Get topics via the [`/topics`](get-topics) endpoint. ## Feeds **A Feed is a collection of Streams.** Feeds are configured to refresh on a regular schedule. No new Articles are published to a Feed except when it's refreshed. Feeds can be refreshed manually if the API Key Scopes allow. You can ask for Articles chronologically or by decreasing score. You can also limit Articles to a date-range, meaning that you can produce Feeds from historical content. Interact with Feeds via the [`/feeds`](create-feed) endpoint. ## Streams Think of a **Stream** as a search query with a "volume control knob". It's a collection of Topics that you're interested and a collection of Sources you'd explicitly like to include or exclude. Streams are associated with a Feed, and a collection of Streams produce the sequence of Articles that appear when a Feed is refreshed. The "volume control knob" on a Stream is a way to decide how many of the search results from the Stream query are included in the Feed. Our searches are "soft", and with a such a rich `Article x Topic` space to draw on, the "volume control" allows you to put a cuttoff on what you'd like included. Streams are a nested resource of `/feeds` - get started by explorting [`/feeds/:feedId/streams`](create-stream).
nikleb/pdf_form_fields_coords
11 Downloads
Get a list of form fields from a document with their coordinates on page
kruegge82/jumingo
31 Downloads
## About With the JUMINGO shipping API you can import your shipments into your JUMINGO account from any source. The functionalities of the API include creating and updating shipment drafts, fetching suitable shipment rates for a given shipment and purchasing shipping labels. Furthermore, you can retrieve tracking data and fetch shipping labels and documents for all your purchased shipments. The current main purpose of the API is to connect your account to e-commerce systems and marketplaces. ## General The API is organized around REST. Our API has resource-oriented URLs and uses HTTP response codes to indicate API errors. We use built-in HTTP features, like HTTP authentication and HTTP verbs. All API requests must be made over HTTPS. Calls made over plain HTTP will return errors. Request data is passed to the API as JSON objects and JSON is also returned by all API responses, including errors, although our API SDKs convert requests and responses to appropriate language-specific objects. Best practice usage of the API and business logic is described in the supplementary [integration guide](https://www.jumingo.com/cms/JUMiNGO_API-integration-guide.pdf "JUMiNGO API Integration Guide"). ## Base URL The base URL for all calls is: `https://api.jumingo.com/v1` ## HTTP status codes HTTP response codes in the `2xx` range indicate success. Codes in the `4xx` range indicate an error on the client side (e.g. a required parameter is missing). Codes in the `5xx` range indicate an error with our servers. Each error should provide an error code and an error message with further information. HTTP status code | Description ---------------- | ----------- 200, 201, 204 - OK | Everything worked. 400 - Bad Request | The request was unacceptable, often due to missing a required parameter or a validation error. 401 - Unauthorized | No valid API key has been provided or your account is disabled. 403 - Forbidden | You are not allowed to talk to this endpoint. This can either be due to a wrong authentication or when you’re trying to reach an endpoint that your account isn’t allowed to access. 404 - Not Found | The requested resource doesn’t exist. 500, 502, 503, 504 - Server Errors | Something went wrong on our side. Please contact our support if you receive this error. ## Authentication All API requests requires authentication. Unauthorized calls will return errors. Authenticate by including your API key in the `X-AUTH-TOKEN` HTTP header of each API call, e.g.: `X-AUTH-TOKEN: INSERT_YOUR_API_KEY` You can find your API key in your JUMINGO user account. You can get access to the JUMiNGO customer API by enabling it in your [user account](https://www.jumingo.com/de-de/users/connections/create/8). After activation, you will get your personal API key. ## Date/Time Format All values of type `string ` are defined in a specific [RFC 3339](https://tools.ietf.org/html/rfc3339#section-5.6) format and must also be formatted accordingly for requests. The format is: YYYY-MM-DD hh:mm:ss Example: 2018-07-26 15:54:13 All dates and times are specified in UTC (Coordinated Universal Time).
dcarbone/paragon-solutions-php-sdk
2 Downloads
Paragon Processing PlatformThis document is to provide a detailed description of how a developer or software solution provider can integrate with the Paragon Processing Platform (Paragon Platform). The Paragon Platform is for developers who wish to use Paragon's processing services within their software applications. The Paragon Platform can stand alone as a web-based storefront with (or without) attached card readers or may be used in combination with point-of-sale (POS) and order entry applications.The Paragon Platform accepts payments in many forms, including check, credit, debit, gift, loyalty and EBT cards. Payments may be taken online, over the telephone, from a mobile phone and at physical store locations. In addition to handling large volumes of payment transactions, the Paragon Platform manages and settles batches, protects sensitive card information, administers billing contracts and produces operational and analytical reports. Application Programming Interfaces (APIs) With our API, software systems and devices communicate with the Paragon Platform by exchanging messages. Client Application formulates a message and transmits the request to the Paragon Platform. The Paragon Platform translates the request and relays it to the Payment Processing Network. The Payment Processing Network processes the request and returns a response to the Paragon Platform. The Paragon Platform translates the response and relays it to the Client Application.The Path to Integration Step 1: Open a Test Account Visit https://developer.paragonsolutions.com/testaccount to register for a free test account. Once registered you have instant access to your test account credentials and all the documentation you need to get started. Head over to the library and make sure to check out all of our API's to learn about the Paragon Processing Platform transaction requests and responses.Step 2: Code & CertifyOnce in the Paragon Development portal, begin your certification or have an experienced Paragon integration specialist guide you through the testing process. Once coding and testing are completed submit your request for certification. Our team will then perform a detailed review of your integration to make sure your integration meets all your business requirements for success. Step 3: Go Live!After final review and testing your software solution is ready to begin taking live payments! We know, an integration that is easy sounds too good to be true. Don't take our word for it, start your integration today! Developer NotesInstall your development platform according to its product documentation.Read through all the steps before you get started. We recommend reviewing the rest of this guide to familiarize yourself with the Paragon Processing Platform's terms, capabilities, web services and operations.
knuckleswtf/pastel
1201208 Downloads
Write your API docs in Markdown and get them converted into pretty HTML🎨
binarytorch/larecipe-feedback
7869 Downloads
Get feedback from your users about your documentations.
paypaplane/svix-client
24256 Downloads
Welcome to the Svix API documentation! Useful links: [Homepage](https://www.svix.com) | [Support email](mailto:[email protected]) | [Blog](https://www.svix.com/blog/) | [Slack Community](https://www.svix.com/slack/) # Introduction This is the reference documentation and schemas for the [Svix webhook service](https://www.svix.com) API. For tutorials and other documentation please refer to [the documentation](https://docs.svix.com). ## Main concepts In Svix you have four important entities you will be interacting with: - `messages`: these are the webhooks being sent. They can have contents and a few other properties. - `application`: this is where `messages` are sent to. Usually you want to create one application for each user on your platform. - `endpoint`: endpoints are the URLs messages will be sent to. Each application can have multiple `endpoints` and each message sent to that application will be sent to all of them (unless they are not subscribed to the sent event type). - `event-type`: event types are identifiers denoting the type of the message being sent. Event types are primarily used to decide which events are sent to which endpoint. ## Authentication Get your authentication token (`AUTH_TOKEN`) from the [Svix dashboard](https://dashboard.svix.com) and use it as part of the `Authorization` header as such: `Authorization: Bearer ${AUTH_TOKEN}`. For more information on authentication, please refer to the [authentication token docs](https://docs.svix.com/api-keys). ## Code samples The code samples assume you already have the respective libraries installed and you know how to use them. For the latest information on how to do that, please refer to [the documentation](https://docs.svix.com/). ## Idempotency Svix supports [idempotency](https://en.wikipedia.org/wiki/Idempotence) for safely retrying requests without accidentally performing the same operation twice. This is useful when an API call is disrupted in transit and you do not receive a response. To perform an idempotent request, pass the idempotency key in the `Idempotency-Key` header to the request. The idempotency key should be a unique value generated by the client. You can create the key in however way you like, though we suggest using UUID v4, or any other string with enough entropy to avoid collisions. Svix's idempotency works by saving the resulting status code and body of the first request made for any given idempotency key for any successful request. Subsequent requests with the same key return the same result. Please note that idempotency is only supported for `POST` requests. ## Cross-Origin Resource Sharing This API features Cross-Origin Resource Sharing (CORS) implemented in compliance with [W3C spec](https://www.w3.org/TR/cors/). And that allows cross-domain communication from the browser. All responses have a wildcard same-origin which makes them completely public and accessible to everyone, including any code on any site.
dmk/mksanitizedparameters
36229 Downloads
Sanitize $_REQUEST, $_POST and $_GET before the processing of TYPO3 in backend or frontend starts. Take a look into the documentation how to add your own rules or see which one exist.
wpify/raynet-api-php-sdk
648 Downloads
Cloud CRM REST API je programové rozhraní systému RAYNET CRM, které umožňuje pracovat s daty uvnitř CRM z aplikací třetích stran. Komunikace probíhá standardním protokolem HTTP s ohledem na [REST](https://en.wikipedia.org/wiki/Representational_state_transfer) principy. ## Připojení k RAYNET CRM Komunikačním protokolem je HTTP, proto je možné použít libovolnou aplikaci nebo knihovnu, která tento protokol podporuje. Pro demonstraci bude využita aplikace [curl](https://curl.haxx.se/). Alternativou je například add-on [Talend API Tester](https://chrome.google.com/webstore/detail/talend-api-tester-free-ed/aejoelaoggembcahagimdiliamlcdmfm) do prohlížeče Google Chrome. Přístup je zabezpečen pomocí basic authentication (uživatelským jménem a API klíčem) a šifrován protokolem TLSv1.2 a vyšším (HTTPS) pro zajištění maximální bezpečnosti. V hlavičce požadavku je nutné zaslat název Vaší instance (např. `moje-crm`). ```bash curl -X GET -u 'uzivatel:api-klic' -H 'X-Instance-Name: moje-crm' 'https://app.raynet.cz/api/v2/company/' ``` ## Datové typy Hodnoty jednotlivých atributů v systému RAYNET CRM jsou tvořeny několika základními datovými typy: + `Řetězec` - Textová hodnota. + `Číslo` - Číselná hodnota. V závislosti na kontextu se může jednat buď o číslo celé nebo o číslo desetinné. V desetinných číslech se používá desetinná tečka. + `Pravdivostní hodnota` - Hodnota ANO/NE. Pro hodnotu ANO lze využít true, on, yes a 1; pro hodnotu NE pak false, off, no a 0. + `Datum` - Datum jako řetězec ve formátu `yyyy-MM-dd`. + `Datum a čas` - Datum a čas jako řetězec ve formátu `yyyy-MM-dd HH:mm`. Akceptovány jsou také datum a čas ve formátu ISO8601 (např. `2022-01-01T12:00:00.000+01:00`). + `Reference` - Datový typ reference odkazuje na jiný záznam v systému RAYNET CRM. V příchozích datech je reference mapou (JavaScriptový objektem), která obsahuje klíče: + id - Identifikátor referencovaného záznamu. ### Datum a čas Datum a čas jako řetězec ve formátu `yyyy-MM-dd HH:mm` je v časové zóně uživatele, přes kterého jsou API požadavky realizovány. Pro filtrování a zápis (`PUT`, `POST`) je možné využít oba formáty (`yyyy-MM-dd HH:mm`, ISO8601). V response je ve výchozím stavu datum a čas formátován jako `yyyy-MM-dd HH:mm` v časové zóně uživatele. Přidáním parametru `dateFormat=ISO8601` lze ovlivnit výstupní formát, kdy bude hodnota formátována do tvaru `2022-01-01T12:00:00.000+01:00`. např. `https://ww....company/?dateFormat=ISO8601` ## Filtrování seznamu Operátory pracující nad atributy a hodnotami jsou následující: + `EQ` - Test na rovnost hodnot. + `EQ_OR_NULL` - Test na rovnost nebo prázdnou hodnotu. + `NE` - Test na nerovnost hodnot. + `NE_OR_NULL` - Test na nerovnost nebo prázdnou hodnotu. + `LT` - Hodnota v databázi je menší než zadaná. + `LE` - Hodnota v databázi je menší nebo rovna než zadaná. + `GT` - Hodnota v databázi je větší než zadaná. + `GE` - Hodnota v databázi je větší nebo rovna než zadaná. + `LIKE` - Test na hodnotu odpovídající výrazu (např. hodnota filtru ABC% nalezne všechny záznamy, které začínají znaky ABC). + `LIKE_NOCASE` - Obdoba LIKE, ale bez ohledu na malá a velká písmena. + `IN` - Test na rovnost (více) hodnot oddělených čárkou. Správný formát vstupu je např.: `1,2,3,4`. + `NOT_IN` - Test na nerovnost (více) hodnot oddělených čárkou. Správný formát vstupu je např.: `1,2,3,4`. + `CUSTOM` - Speciální operátor - chování testu je popsáno dále v dokumentaci. Výchozím operátorem je rovnost `EQ`. Operátor se zapisuje do hranatých závorek za název atributu. Je tak možné zadat více filtrovacích kritérií nad stejným atributem. `https://app..../?validFrom[GT]="2014-06-01"&validTill[LT]="2014-06-10"` Častým scénářem je vyfiltrování všech záznamů, které mají daný atribut prázdný nebo naopak neprázdný. Pro tyto účely lze použít hodnotu `prázdný řetězec` v kombinaci s operátorem `EQ` nebo `NE`. ## Uspořádání seznamu Uspořádání seznamu je kontrolováno parametrem `sortColumn` a `sortDirection`. U každého API je výčet hodnot, pomocí kterých lze seznam řadit. Parametr `sortDirection` může nabývat hodnot: + `ASC` - Hodnoty jsou řazeny vzestupně + `DESC` - Hodnoty jsou řazeny sestupně ## Stránkování seznamu Seznam je možné stránkovat nastavením parametrů `offset` a `limit`. Offset udává první záznam, který bude zobrazen, limit pak počet záznamů. Maximální velikost stránky je 1 000 položek. Například `https://app..../?offset=0&limit=2` ## Fulltext Ve většině seznamů je možné využít fulltextové vyhledání podle zadaného textového řetězce. Slouží k tomu parametr `fulltext`, který se aplikuje např. takto: `https://app..../?fulltext=nejakytext` ## Limity API Každá API odpověď obsahuje hlavičky, které popisují stav využití API pro danou instanci. ``` curl -X GET -u 'uzivatel:api-klic' -H 'X-Instance-Name: moje-crm' 'https://app.raynet.cz/api/v2/company/' HTTP/1.1 200 OK Status: 200 OK X-Ratelimit-Limit: 24000 X-Ratelimit-Remaining: 23999 X-Ratelimit-Reset: 1508889600 ``` Význam jednotlivých hlaviček je následující: | Hlavička | Význam | | -------- | ------ | | X-Ratelimit-Limit | Celkový limit pro aktuální časové okno a instanci. | | X-Ratelimit-Remaining | Zbývající počet požadavků. | | X-Ratelimit-Reset | Čas, kdy bude vyprší časové okno a limit bude resetován. Hodnota udává [unixový čas](https://cs.wikipedia.org/wiki/Unixov%C3%BD_%C4%8Das). | Pokud je limit překročen, je navrácena chybová hláška s HTTP kódem `429 Too Many Requests`: ```json { "type": "RequestLimitReached", "message": "API request limit reached. See the X-RateLimit-* headers and check out the API documentation for more details." } ``` ### Co když mi limity nestačí Ve výchozím stavu je přístup limitován na 24 000 požadavků za den (uvažováno od půlnoci do další půlnoci v časové zóně UTC). V případě, že limit pro vaši integraci nestačí, kontaktujte naší zákaznickou podporu na e-mailu [email protected] a spolu se určitě dobereme vhodného řešení. ### Špatné přihlášení V případě zaslaní více než 20 požadavků se špatnými přihlašovacími údaji, bude tento přístup na 60 minut zablokován. Toto omezení platí pro konkrétní IP adresu.
nitsan/ns-social-login
1037 Downloads
Meet our all-in-one TYPO3 Social Login and Register extension, which allows users to log in and register using various social media accounts directly from your TYPO3 frontend. With this extension, users can easily access your site using popular platforms like Facebook, Google, Twitter, LinkedIn, Instagram, OpenID, Apple, Discord, Keycloak, Slack, Telegram, Dropbox, and more. Get seamless, one-click frontend login with the TYPO3 Social Login extension. Explore the Demo, Product Page, Documentation & Support: https://t3planet.com/typo3-social-login-extension
briqpay/php-sdk
11954 Downloads
This is the API documentation for Briqpay. You can find out more about us and our offering at our website [https://briqpay.com](https://briqpay.com) In order to get credentials to the playgrund API Please register at [https://app.briqpay.com](https://app.briqpay.com) # Introduction Briqpay Checkout is an inline checkout solution for your b2b ecommerce. Briqpay Checkout gives you the flexibility of controlling your payment methods and credit rules while optimizing the UX for your customers # SDKs Briqpay offers standard SDKs to PHP and .NET based on these swagger definitions. You can download them respively or use our swagger defintitions to codegen your own versions. #### For .NET `` Install-Package Briqpay `` #### For PHP `` composer require briqpay/php-sdk `` # Standard use-case As a first step of integration you will need to create a checkout session. \n\nIn this session you provide Briqpay with the basic information necessary. In the response from briqpay you will recieve a htmlsnippet that is to be inserted into your frontend. The snippet provided by briqpay will render an iframe where the user will complete the purchase. Once completed, briqpay will redirect the customer to a confirmation page that you have defined. 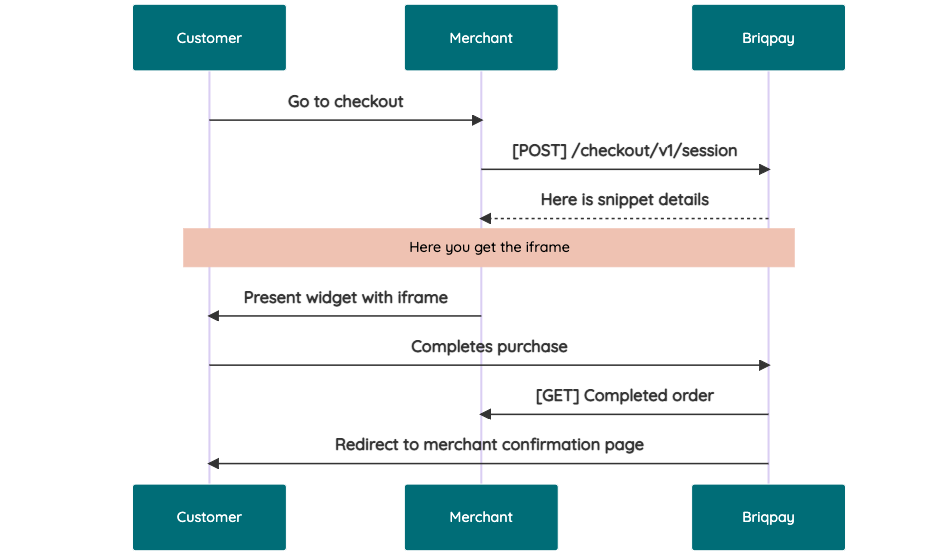 # JavaScript SDK The first step of integration is to add our JS to your site just before closing the ```` tag. This ensures that our JS library is avaliable to load the checkout. ```` Briqpay offers a few methods avaliable through our Javascript SDK. The library is added by our iframe and is avalable on ``window._briqpay`` If you offer the posibility to update the cart or order amonts on the checkout page, the JS library will help you. If your store charges the customer different costs and fees depening on their shipping location, you can listen to the ``addressupdate``event in order to re-calculate the total cost. ```javascript window._briqpay.subscribe('addressupdate', function (data) { console.log(data) }) ``` If your frontend needs to perform an action whe the signup has completed, listen to the ``signup_finalized`` event. ```javascript window._briqpay.subscribe('signup_finalized', function (status) { // redirect or handle status 'success' / 'failure' }) ``` If you allow customers to change the total cart value, you can utilise the JS library to suspend the iframe while you perform a backen update call towards our services. As described below: 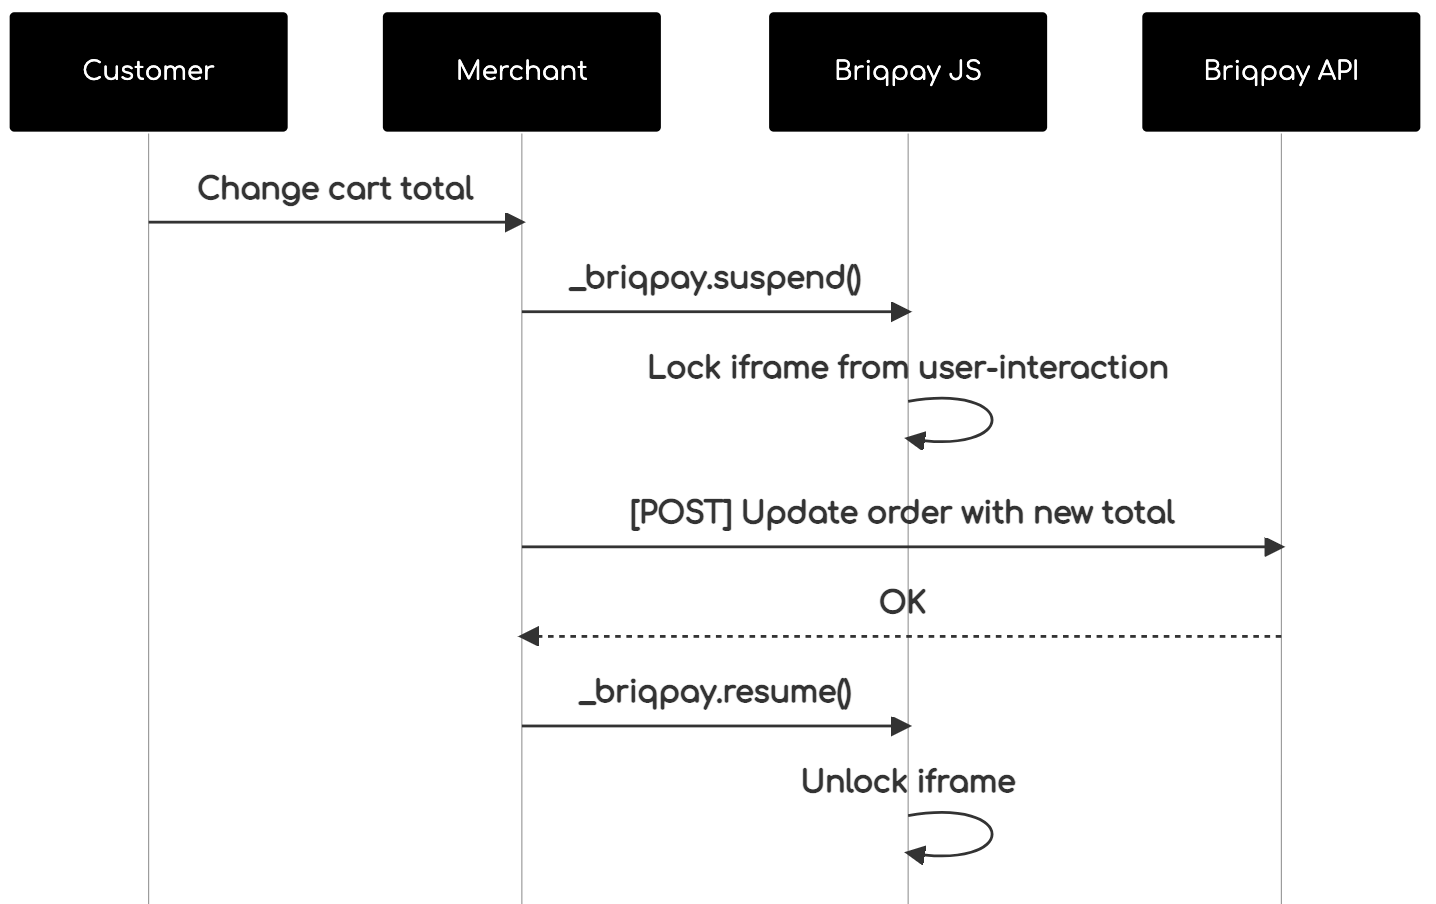 The iframe will auto-resume after 7 seconds if you dont call ``_briqpay.resume()`` before # Test Data In order to verify your integration you will neeed to use test data towards our credit engine. ## Company identication numbers * 1111111111 - To recieve a high credit scoring company ( 100 in rating) * 2222222222 - To test the enviournment with a bad credit scoring company (10 in rating) ## Card details In our playground setup your account is by default setup with a Stripe integration. In order to test out the card form you can use the below card numbers: * 4000002500003155 - To mock 3ds authentication window * 4000000000000069 Charge is declined with an expired_card code. You can use any valid expiry and CVC code # Authentication Briqpay utilizes JWT in order to authenticate calls to our platform. Authentication tokens expire after 48 hours, and at that point you can generate a new token for the given resource using the ``/auth`` endpoint. - Basic Auth - only used on the auth endpoint in order to get the Bearer Token - JWT Bearer Token - All calls towards the API utlizes this method"