Libraries tagged by blog post api
kruegge82/jtlffn
7 Downloads
# Introduction JTL-FFN is a standardized interface for fulfillment service providers and their customers. Fulfiller can offer their services to merchants and merchants can respectively choose from a wide range of service providers according to their needs. ## The ecosystem The FFN network consists of this REST API, an online portal and third party integrations (JTL-Wawi being one of them). The REST API orchestrates the interactions between the participants and the portal website provides services by JTL (such as managing and certifying warehouses of a fulfiller and merchants searching for their service providers). ## About this API The base url of this api is [https://ffn2.api.jtl-software.com/api](https://ffn2.api.jtl-software.com/api). This API (and this documentation) consists of three parts: * Fulfiller API - operations used when acting as a fulfiller in the network. Only users with the role `Fulfiller` can access these endpoints. * Merchant API - operations used when acting as a merchant in the network. Only users with the role `Merchant` can access these endpoints. * Shared API - operations available to all users. Please use the navigation menu at the top to switch between the documentation for the different APIs. # OAuth The FFN-API uses [OAuth2](https://tools.ietf.org/html/rfc6749) with the [Authorization Code Grant](https://tools.ietf.org/html/rfc6749#section-4.1) for its endpoints. Users must have an active [JTL customer center](https://kundencenter.jtl-software.de) account to authorize against the OAuth2 server. Applications and services using the API must acquire client credentials from JTL. ## Application credentials When making calls against the API, you need to do it in the context of an application. You will get the credentials for your application from JTL. Application credentials consist of the following: * `client_id` - uniquely identifies your application * `client_secret` - secret used to authenticate your application * `callback_uri` - the uri the OAuth2 server redirect to on authorization requests ## Requesting authorization When you want to authorize a user you redirect him to `https://oauth2.api.jtl-software.com/authorize` with the following query string parameters: * `response_type` - Must be set to "code" for the [Authorization Code Grant](https://tools.ietf.org/html/rfc6749#section-4.1). * `redirect_uri` - After the user accepts your authorization request this is the url that will be redirected to. It must match the `callback_uri` in your client credentials. * `client_id` - Your applications identifier from your application credentials. * `scope` - The scopes you wish to authorize (space delimited). * `state` - An opaque value that will be included when redirecting back after the user accepts the authorisation. This is not required, but is important for [security considerations](http://www.thread-safe.com/2014/05/the-correct-use-of-state-parameter-in.html). After successful authorization by the user, the OAuth2 server will redirect back to your applications callback with the following query string parameters: * `code` - The authorization code. * `state` - The state parameter that was sent in the request. ## Verifying authorization The authorization code you acquired in the last step will now be exchanged for an access token. In order to do this you need to POST a request to `https://oauth2.api.jtl-software.com/token`. >POST > >Authorization: Basic `application_basic_auth`\ >Content-Type: application/x-www-form-urlencoded > >grant_type=authorization_code&code=`code`&redirect_uri=`redirect_uri` In the Authorization header [Basic HTTP authentication](https://tools.ietf.org/html/rfc7617) is used. Your application credentials `client_id` will be used as the username and your `client_secret` as the password. The header should have the value "Basic" plus the Base64 encoded string comprising of `client_id:client_secret`. The body of the request consist of the form encoded parameters: * `grant_type` - Must be set to "authorization_code". * `code` - The authorization code received from the previous step. * `redirect_uri` - Must match the `callback_uri` in your client credentials. A successful verification request will return a JSON response with the properties: * `token_type` - is always "Bearer" * `expires_in` - the time in seconds until the access token will expire * `access_token` - the access token used for API requests * `refresh_token` - token used to get a new access_token without needing to ask the user again Now the APIs endpoints that need authorization can be called by setting the header >Authorization: Bearer `access_token` ## Refreshing authorization To get a new `access_token` (for example when the old one expired) one can POST a request to `https://oauth2.api.jtl-software.com/token`. >POST > >Authorization: Basic `application_basic_auth`\ >Content-Type: application/x-www-form-urlencoded > >grant_type=refresh_token&refresh_token=`refresh_token` The Basic HTTP Authorization works exactly as in the verification step. The body of the request consist of the form encoded parameters: * `grant_type` - Must be set to "refresh_token". * `refresh_token` - The `refresh_token` you acquired during verification. The response will be the same as in the verification step. ## Scopes Scopes allow fine grained control over what actions are allowed for a given application. During login users must approve the requested scopes, so it is often feasible to limit asking for permissions your application really needs. Global scopes for common permission scenarios are the following: * `ffn.fulfiller.read` - full read access for the fulfiller API * `ffn.fulfiller.write` - full write access for the fulfiller API * `ffn.merchant.read` - full read access for the merchant API * `ffn.merchant.write` - full write access for the merchant API More fine grained scopes can be acquired from each respective endpoints documentation. ## Example ### Prerequsites * JTL Customer center account (https://kundencenter.jtl-software.de/) * cUrl (https://curl.se/) * FFN portal account (just login here: https://fulfillment.jtl-software.com) * FFN portal sandbox account (if you want to test on sandbox: https://fulfillment-sandbox.jtl-software.com) * Oauth Client for authorization and define scopes Values in this example (access_token, refresh_token, code...) are expired and cannot be used verbatim. ### Step 1 - Create an OAuth client Navigate to https://kundencenter.jtl-software.de/oauth and create a new OAuth client. (You can´t navigate to Oauth in customer account, you should use this link, or you can change logged in index to oauth) !Templates define what scopes are possible for this client. scopes with access rights: * ffn.merchant.read - full read access for the fulfiller API * ffn.merchant.write - full write access for the fulfiller API * ffn.fulfiller.read - full read access for the merchant API * ffn.fulfiller.write - full write access for the merchant API More fine grained scopes can be acquired from each respective endpoints documentation.  Overview: clients, scopes, client-secret and client-id  In our example: * client_id: 97170e65-d390-4633-ba46-d6ghef8222de * client_secret: f364ldUw3wGJFGn3JXE2NpGdCvUSMlmK72gsYg1z * redirect_uri: http://localhost:53972/ffn/sso The values for this client should not be used in production and are for testing only. ### Step 2 - User login In this step you will redirect the user to the JTL OAuth website using his default browser. Here the user will provide his username/password and accept the requested scopes. Finally the JTL Oauth website will redirect to the provided redirect_uri and provide the code. Template: authorize specified scopes and get code answer to request the access token ``` https://oauth2.api.jtl-software.com/authorize?response_type=code&redirect_uri=[redirect_uri]&client_id=[client_id]&scope=[scopes] ``` Note: the scopes should be seperated by spaces or %20 Filled with our example values: ``` https://oauth2.api.jtl-software.com/authorize?response_type=code&redirect_uri=http://localhost:53972/ffn/sso/oauth&client_id=97170e65-d390-4633-ba46-d6ghef8222de&scope=ffn.merchant.read%20ffn.merchant.write ``` * enter password  * authorize scopes  * code answer from server  Example of the answer from the OAuth server to our redirect_uri: ``` http://localhost:53972/ffn/sso?code=def50200f3ac7aabbb6e82a6b131874115b858549dab62e73c68ea21a03de59b5744dc0f0ee321d7607062cf9bfa57471cd0ee7572db1d7b0a15779b0dda7d0ed8f8bfdb0f69939a34678d67aee41e4849d355d8aa223733ab1f397280b205fa739c6252d77d9ff600136e1b744352115fd62ba1035d8da4cbc1b6791c61d0bb621952b0a14625dd75807113ea0746e35528c304a8ce3c06724c1e1d9e1cb3709e9f52778bc8ca5b2d8f7c055f14244b1f8fcb61554c5bf48e02b882b87b9a76a43579eecd578cec97c6f603907e282e45cfec43837c063dc36b556d4974776a942f47cee19023e130ae852bfca6d3ca9c7cb3283d2bc4971f80651b626f8e7ba0ec2d13dddc4c528e1f3e470de907af7eb304d781534dd9b071d9760c9890e5756893c7800589c407bd2da3a2ff56c3fb15a410e24aa2df7ac54e8d0f7445e38e390171b58a0b66b337057d59acd29ed5bbc4df6bee921b244f030c86f49bcae21c9ca77c05eea0094414803f30089c39d585bf83604a2d9bbcc6442fbfdcff6cca946eb84d1eac2e4f98dff31a93460c951c853f9ef7140f572be963e82a3baf72afba34572af63ee7da ``` Extract the code and note it for next steps. ### Step 3 - Get an access_token from the code Template: get access token + refresh token ``` curl --location --request POST "https://oauth2.api.jtl-software.com/token" --header "Content-Type: application/x-www-form-urlencoded" -u "[client_id]:[client_secret]" --data-urlencode "grant_type=authorization_code" --data-urlencode "redirect_uri=[redirect_uri]" --data-urlencode "code=[code]" ``` Filled with our example values: ``` curl --location --request POST "https://oauth2.api.jtl-software.com/token" --header "Content-Type: application/x-www-form-urlencoded" -u "97170e64-d390-4696-ba46-d6fcef8207de:f364ldUw3wIJFGn3JXE2NpGdAvUSMlmK72gsYg1z" --data-urlencode "grant_type=authorization_code" --data-urlencode "redirect_uri=http://localhost:49420/oauth" --data-urlencode "code=def50200e6f3c65cfaba9419cbf6e48a7ed4324ef851b0ace493213884496b851fd825b90b4f994ee265a62f2358bbcbb0f990af5dbfd93dc63e51a7a6fa3bcfc7f722f56366b0a726fd1ed5df1cb926b16610fc7beb0f236e8858e86397422e3caa75d8094af8ba8ad6a93b938bd341bec1e4df671ad71ad1d5fa41166f5d4b2a3ac7d9172c35a8501f10ad722ec2aea88439c21b148ec2ba85e93c17acebe7d7f3d0118a50941cab145ed5ce92946426e5d388584556c0b010c567b433c577a1c4f7b1dfb2c99c25a0efadece4f64f19e54305bfc591e2b30b1a7ba1a33af3e039bcfa80b21ca365dc003f07989fca92472c2c8e2daab51151624a6a10bc511f2ed586f06544f7b98566df4667f5bbd6ba7c6707cb673c767c9eab5a74e63a8269688941c3158e8cc1cb5ebe9a8aa468faf415171a481ee1489b58bedb5fc329b23e0e34e76a4a500270fbebe4e1d20a0f17cebc96cd8ab3db383af746ca0699da34b4665afad30e9dde4f5f507a1dd14c73a692f06de8bafe3be81d7744dbcd8c5f7d3c767101ff5ce0556c244130c1c3fc3f53975a841c0cacebb70118f7552f50c2d2b1c421b8a21e" ``` The result will be a JSON answer with the users access_token and refresh_token as well as the expiry in seconds. ``` { "token_type":"Bearer", "expires_in":1800, "access_token":"eyJ0eXAiOiJKV1QiLCJhbGciOiJSUzI1NiJ9. eyJhdWQiOiI5NzE3MGU2NC1kMzkwLTQ2OTYtYmE0Ni1kNmZjZWY4MjA3ZGUiLCJqdGkiOiJlOWVhN2Q0MWI1NDIzNTcyYWU0MDEzYjEzMDZiMGRkNWM3YmQ2ZTNjMDNhYTZmNjQ2M2NlMjUzNTc0ZmUyMWE3NGQyNTIyMTJhODQwMmI1ZCIsImlhdCI6MTY2MTI1MzE0OCwibmJmIjoxNjYxMjUzMTQ4LCJleHAiOjE2NjEyNTQ5NDgsInN1YiI6IjQ2MjA5Iiwic2NvcGVzIjpbImZmbi5tZXJjaGFudC5yZWFkIiwiZmZuLm1lcmNoYW50LndyaXRlIl19.eEwY021wR3BWVp-wbAVQrjfqwFbYqLlOV_ca-cb7-O3Kdpi8mkFQBxfI8rzSiV_1WpAINf4ydV9FR9Ty992SMiAqGJ3T9zDHd68oUDePeq7Xfafp-87UboI2mCfGd7518CoKVLqg5ohb4YCqgC7Dz588FofggCQyDZQSM-8raOgcM-pJ1TT7oRuYuDHsOzCOTPcX2YiGYKCc3M6kxlBy_NjrJoLa4qysLRmPkznWwj0caC7a0VJO5KubvECcMb9D7Byr3UNjI7GiGMAufa770V5qCjrWs4gOsRV-Bn7oQydvsL21qqjBKHcssQrlLZWmrcfKqgBKwfRXIx3Mu5HBCmtHjHMnuvPVEZAj6fEfIwjYSeTAHTHApEwbE7J1MPd8MU0K6X2YEUF315fXN5F3rO3ZL5FdTwcM1E-1-PKubLuMAaE6Lw-QsDtBoI4ESylomCmCCfgLV4Vj-in_oCJUmKXAX0tDSa9y9vb6oAExung_BTJCBemffCtkJ55Px7bvi9JXmwvI0pIFo3QzTUtRbFDizCMrPZvsatFx64mXX3IDoVqXr3uzvdetBIJEj2ngVdGRrKGt4Yboae5oFV2d5jdSZBL28pwGjey__ZB4zLR1DodQ0sOqDWJ3WsEjMYXU8_-IGrS8Kkw8Q0R0UqqyVLfcLr-cfH5tYqf2QLqAScY","refresh_token":"def50200e636703f8d6372401e7b5e1163e0f46e5d593f6f8a1e9b1b2777d64684b87b7c552db62f9670bc482a3958d8aafb78083c7166c13f2f233fe4623d22873c819a560dc3213a51448a1e0763c2a0f7fb7230ceeae22a7fa84717458886584ab5a0ed1a500be5f9d3ed36b1d063d39b56c8431f3fe623055626c1f99f8c5b684853965645fe5c5bee941857aef79ae4f9b994316bec9d365119fe0fe8d035218c44d00a47c0e92b4613c1f388b9c171f3d79e45a6d2a52dfbd8d25608d6b0350420155e48cc179764a2432220cc0d1e9bfa7798050d0b36fe658e967186ea75cc1d1277cad973d43a0839c50b6885a87b5b446452855a00ac75c5f6d7f62b914496e30ab89a16b335977e4363b94dda7364bb052832a5d122696b6476fb0e1631030ea3c42d9659ca839cc44919efc9532c84f7170e634d3e189eb181d0c114ed9d8150c619f7567587e0311d89d51d1325646d2c014757ba7f2d7b02f7b56a52e093ed2ea95a8abe4a0289b24a5636dce8ad01c20e8cce8c4c51263e7f1731bb6335b0e31342e2439c77ab7cce7a147e24c9be9d61d8eba216fbfd4d5be2fba3502e69000ad6e67b7230a7f924" } ``` ### Step 4 - Test the access_token Using your newly aquired access_token you can test if its working (reminder: the access_token has a limited lifetime and might be expired, in which case we would need to refresh it (see Step 5)). Template: Test communication with access token on sandbox or production (our client is for both systems) ``` curl --location --request GET "https://ffn-sbx.api.jtl-software.com/api/v1/users/current" --header "Authorization: Bearer [access_token]" ``` If you cannot retrieve the user data using this endpoint make sure you have logged into our respective portal website (sandbox, production) at least once as this triggers user creation in the system. ### Step 5 - Refresh access_token when it expires Template: Get a new access token + refresh token with the refresh token ``` curl --location --request POST "https://oauth2.api.jtl-software.com/token" --header "Content-Type: application/x-www-form-urlencoded" -u "[client_id]:[client_secret]" --data-urlencode "grant_type=refresh_token" --data-urlencode "refresh_token=[refresh_token]" ``` Filled with our example values: ``` curl --location --request POST "https://oauth2.api.jtl-software.com/token" --header "Content-Type: application/x-www-form-urlencoded" -u "97170e64-d390-4696-ba46-d6fcef8207de:f364ldUw3wIJFGn3JXE2NpGdAvUSMlmK72gsYg1z" --data-urlencode "grant_type=refresh_token" --data-urlencode "refresh_token=def50200a01c0caff50b7db271f8268e3806ab2cce8e28e25f41e5fe9167a6521b47f6ed0dd3dd2d7856e1983ae645b032cf9285e91c1ee535decb0e0ca3e52670773f2737114955267d83db0204f80233214a623fcc36de04127e1cdcda006eaf60cacfb30c80081a8c9314e20117f64639ab5e333301a10173385c1bfc660709fde0b1a3517f8030dfdba8187e53c23c9d5fe9f33c48e11a4aa41bfd9ea1291507ea1bc8c64df32bdc91c61af907c41cf0bb305cae76e68448a85ad65b0a03a23ec35a7e9cc42aadd0792b9d7d187ae028e2759a7f4a0164f94d9baca29779a702f023216631e1e777069cc2bc65fd404f4fcc5818219063beb1717afe159b8110394af9a0d245de960c227b1183d6a745819ac08d92238938da798f702f83a3faf648f07a8a6d1e694c008517fd8be2fa154aab88a3eaacb3cbb1830c4bdee018e06c7f81e68c5844213f1d02372b23a22d99ac06a860748a3db891fd71768d74470c9a5a8571058dd901c888d13cd4481d63a800322614e63d3d8e6fb109ee7e1b1e046cd086ecbc2d4d362ca662e3ac867f21168833abd7a8247b06602197b7da555361efbf07b0afed69f7a558" ``` The result will be the same format as in step 3. Refresh_tokens are only valid for a single refresh and you will get a new refresh_token every single time that you must persist. ### My token is not working! #### 404 NotFound You need to log into the respective portal website (sandbox-https://fulfillment-sandbox.jtl-software.com, production-https://fulfillment.jtl-software.com) at least once to trigger user creation. #### 403 Forbidden You might be missing scopes in your token and don't have sufficient rights. #### 401 Forbidden Incorrect Oauth method. For example, we do not support the Oauth method authorisation "client_credentials grant". The authorisation method "code grant" with user must be used.
interserver/mailbaby-client-php
206 Downloads
**Send emails fast and with confidence through our easy to use [REST](https://en.wikipedia.org/wiki/Representational_state_transfer) API interface.** # Overview This is the API interface to the [Mail Baby](https://mail.baby/) Mail services provided by [InterServer](https://www.interserver.net). To use this service you must have an account with us at [my.interserver.net](https://my.interserver.net). # Mail Orders Every sending account in MailBaby is backed by a **Mail Order** — a provisioned sending credential with a numeric `id` and a corresponding SMTP username (`mb`). Most calls accept an optional `id` parameter; when omitted the API automatically selects the first active order on your account. Use `GET /mail` to list all orders, and `GET /mail/{id}` to inspect a single order including its current SMTP password. # Sending Email Three sending methods are available depending on your use-case: | Endpoint | Best for | |----------|----------| | `POST /mail/send` | Simple single-recipient messages | | `POST /mail/advsend` | Multiple recipients, CC/BCC, attachments, named contacts | | `POST /mail/rawsend` | Pre-built RFC 822 messages (e.g. DKIM-signed payloads) | After a successful send each endpoint returns a `GenericResponse` whose `text` field contains the **transaction ID** assigned by the relay. This ID can later be matched against entries in `GET /mail/log` via the `mailid` query parameter. # Filtering & Logs `GET /mail/log` provides paginated access to every message accepted by the relay for your account. Combine any of the query parameters to narrow results — e.g. `from`, `to`, `subject`, `messageId`, `origin`, `mx`, `startDate`/`endDate`, and `delivered`. # Blocking Two independent mechanisms exist for suppressing unwanted email: - **Block lists** (`GET /mail/blocks`, `POST /mail/blocks/delete`) — addresses flagged by the system spam filters (LOCAL_BL_RCPT / MBTRAP rules in rspamd, and suspicious subjects). - **Deny rules** (`GET /mail/rules`, `POST /mail/rules`, `DELETE /mail/rules/{ruleId}`) — custom rules you configure to reject specific senders, domains, destination addresses, or subject-line prefixes before a message is even attempted. # Authentication In order to use most of the API calls you must pass credentials from the [my.interserver.net](https://my.interserver.net/) site. We support several different authentication methods but the preferred method is to use the **API Key** which you can get from the [Account Security](https://my.interserver.net/account_security) page. Pass your key in the `X-API-KEY` HTTP request header for every protected call.
bank-io/bankio-sdk-php
106 Downloads
# Summary The **NextGenPSD2** *Framework Version 1.3.6* (with errata) offers a modern, open, harmonised and interoperable set of Application Programming Interfaces (APIs) as the safest and most efficient way to provide data securely. The NextGenPSD2 Framework reduces XS2A complexity and costs, addresses the problem of multiple competing standards in Europe and, aligned with the goals of the Euro Retail Payments Board, enables European banking customers to benefit from innovative products and services ('Banking as a Service') by granting TPPs safe and secure (authenticated and authorised) access to their bank accounts and financial data. The possible Approaches are: * Redirect SCA Approach * OAuth SCA Approach * Decoupled SCA Approach * Embedded SCA Approach without SCA method * Embedded SCA Approach with only one SCA method available * Embedded SCA Approach with Selection of a SCA method Not every message defined in this API definition is necessary for all approaches. Furthermore this API definition does not differ between methods which are mandatory, conditional, or optional. Therefore for a particular implementation of a Berlin Group PSD2 compliant API it is only necessary to support a certain subset of the methods defined in this API definition. **Please have a look at the implementation guidelines if you are not sure which message has to be used for the approach you are going to use.** ## Some General Remarks Related to this version of the OpenAPI Specification: * **This API definition is based on the Implementation Guidelines of the Berlin Group PSD2 API.** It is not a replacement in any sense. The main specification is (at the moment) always the Implementation Guidelines of the Berlin Group PSD2 API. * **This API definition contains the REST-API for requests from the PISP to the ASPSP.** * **This API definition contains the messages for all different approaches defined in the Implementation Guidelines.** * According to the OpenAPI-Specification [https://github.com/OAI/OpenAPI-Specification/blob/master/versions/3.0.1.md] "If in is "header" and the name field is "Accept", "Content-Type" or "Authorization", the parameter definition SHALL be ignored." The element "Accept" will not be defined in this file at any place. The elements "Content-Type" and "Authorization" are implicitly defined by the OpenApi tags "content" and "security". * There are several predefined types which might occur in payment initiation messages, but are not used in the standard JSON messages in the Implementation Guidelines. Therefore they are not used in the corresponding messages in this file either. We added them for the convenience of the user. If there is a payment product, which needs these fields, one can easily use the predefined types. But the ASPSP need not to accept them in general. * **We omit the definition of all standard HTTP header elements (mandatory/optional/conditional) except they are mentioned in the Implementation Guidelines.** Therefore the implementer might add these in his own realisation of a PSD2 comlient API in addition to the elements defined in this file. ## General Remarks on Data Types The Berlin Group definition of UTF-8 strings in context of the PSD2 API has to support at least the following characters a b c d e f g h i j k l m n o p q r s t u v w x y z A B C D E F G H I J K L M N O P Q R S T U V W X Y Z 0 1 2 3 4 5 6 7 8 9 / - ? : ( ) . , ' + Space
ypio/php-microsoft-graph-file-converter
285 Downloads
A PHP library that allow you to easly use the Microsft Graph API to convert some file formats in some others file format like docx to pdf.
briqpay/php-sdk
11949 Downloads
This is the API documentation for Briqpay. You can find out more about us and our offering at our website [https://briqpay.com](https://briqpay.com) In order to get credentials to the playgrund API Please register at [https://app.briqpay.com](https://app.briqpay.com) # Introduction Briqpay Checkout is an inline checkout solution for your b2b ecommerce. Briqpay Checkout gives you the flexibility of controlling your payment methods and credit rules while optimizing the UX for your customers # SDKs Briqpay offers standard SDKs to PHP and .NET based on these swagger definitions. You can download them respively or use our swagger defintitions to codegen your own versions. #### For .NET `` Install-Package Briqpay `` #### For PHP `` composer require briqpay/php-sdk `` # Standard use-case As a first step of integration you will need to create a checkout session. \n\nIn this session you provide Briqpay with the basic information necessary. In the response from briqpay you will recieve a htmlsnippet that is to be inserted into your frontend. The snippet provided by briqpay will render an iframe where the user will complete the purchase. Once completed, briqpay will redirect the customer to a confirmation page that you have defined. 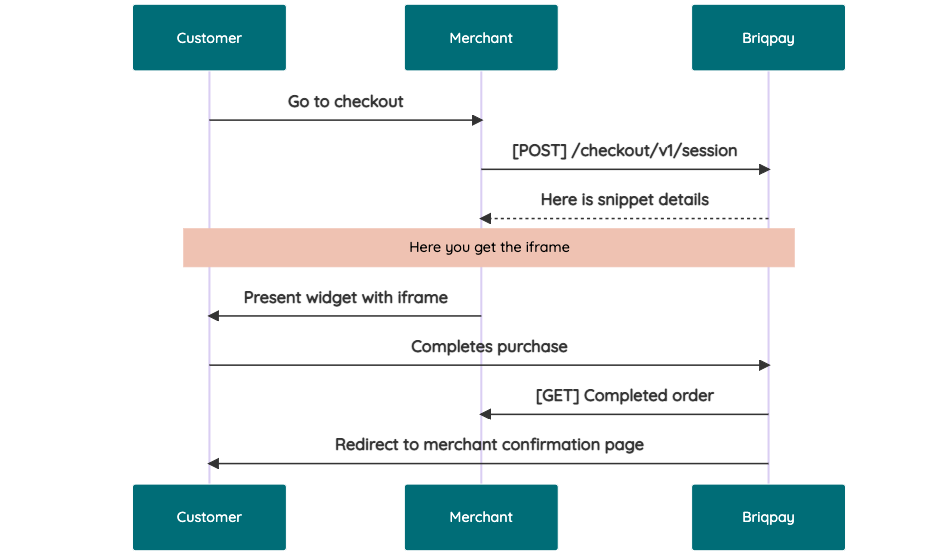 # JavaScript SDK The first step of integration is to add our JS to your site just before closing the ```` tag. This ensures that our JS library is avaliable to load the checkout. ```` Briqpay offers a few methods avaliable through our Javascript SDK. The library is added by our iframe and is avalable on ``window._briqpay`` If you offer the posibility to update the cart or order amonts on the checkout page, the JS library will help you. If your store charges the customer different costs and fees depening on their shipping location, you can listen to the ``addressupdate``event in order to re-calculate the total cost. ```javascript window._briqpay.subscribe('addressupdate', function (data) { console.log(data) }) ``` If your frontend needs to perform an action whe the signup has completed, listen to the ``signup_finalized`` event. ```javascript window._briqpay.subscribe('signup_finalized', function (status) { // redirect or handle status 'success' / 'failure' }) ``` If you allow customers to change the total cart value, you can utilise the JS library to suspend the iframe while you perform a backen update call towards our services. As described below: 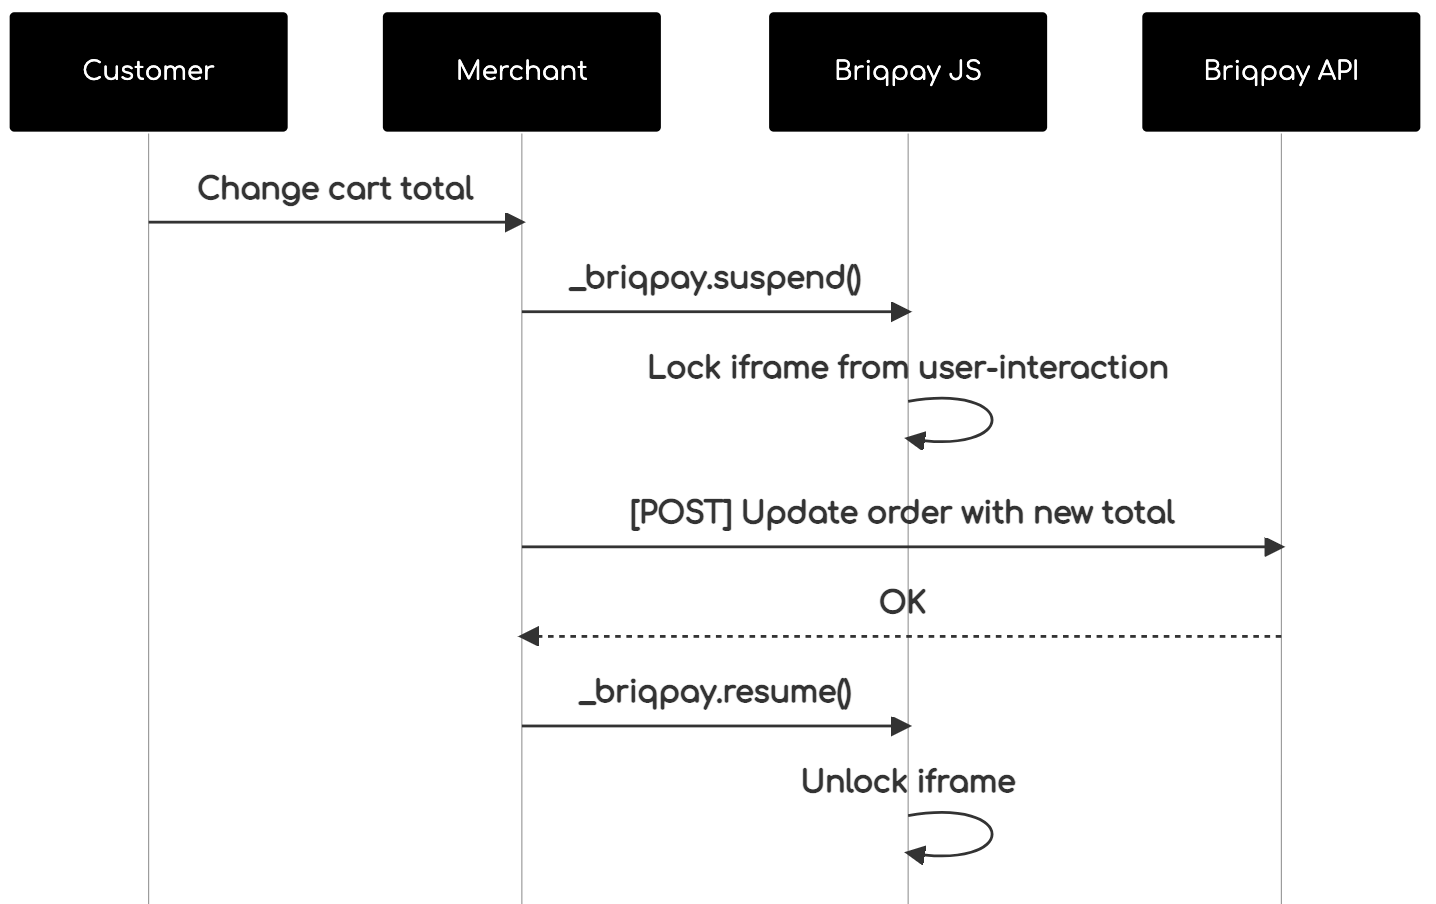 The iframe will auto-resume after 7 seconds if you dont call ``_briqpay.resume()`` before # Test Data In order to verify your integration you will neeed to use test data towards our credit engine. ## Company identication numbers * 1111111111 - To recieve a high credit scoring company ( 100 in rating) * 2222222222 - To test the enviournment with a bad credit scoring company (10 in rating) ## Card details In our playground setup your account is by default setup with a Stripe integration. In order to test out the card form you can use the below card numbers: * 4000002500003155 - To mock 3ds authentication window * 4000000000000069 Charge is declined with an expired_card code. You can use any valid expiry and CVC code # Authentication Briqpay utilizes JWT in order to authenticate calls to our platform. Authentication tokens expire after 48 hours, and at that point you can generate a new token for the given resource using the ``/auth`` endpoint. - Basic Auth - only used on the auth endpoint in order to get the Bearer Token - JWT Bearer Token - All calls towards the API utlizes this method"