Libraries tagged by at_hash
inda-hr/php_sdk
1290 Downloads
# Introduction **INDA (INtelligent Data Analysis)** is an [Intervieweb](https://www.intervieweb.it/hrm/) AI solution provided as a RESTful API. The INDA pricing model is *credits-based*, which means that a certain number of credits is associated to each API request. Hence, users have to purchase a certain amount of credits (established according to their needs) which will be reduced at each API call. INDA accepts and processes a user's request only if their credits quota is grater than - or, at least, equal to - the number of credits required by that request. To obtain further details on the pricing, please visit our [site](https://inda.ai) or contact us. INDA HR embraces a wide range of functionalities to manage the main elements of a recruitment process: + [**candidate**](https://api.inda.ai/hr/docs/v2/#tag/Resume-Management) (hereafter also referred to as **resume** or **applicant**), or rather a person looking for a job; + [**job advertisement**](https://api.inda.ai/hr/docs/v2/#tag/JobAd-Management) (hereafter also referred to as **job ad**), which is a document that collects all the main information and details about a job vacancy; + [**application**](https://api.inda.ai/hr/docs/v2/#tag/Application-Management), that binds candidates to job ads; it is generated whenever a candidate applies for a job. Each of them has a specific set of methods that grants users the ability to create, read, update and delete the relative documents, plus some special features based on AI approaches (such as *document parsing* or *semantic search*). They can be explored in their respective sections. Data about the listed document types can be enriched by connecting them to other INDA supported entities, such as [**companies**](https://api.inda.ai/hr/docs/v2/#tag/Company-Management) and [**universities**](https://api.inda.ai/hr/docs/v2/#tag/Universities), so that recruiters may get a better and more detailed idea on the candidates' experiences and acquired skills. All the functionalities mentioned above are meant to help recruiters during the talent acquisition process, by exploiting the power of AI systems. Among the advantages a recruiter has by using this kind of systems, tackling the bias problem is surely one of the most relevant. Bias in recruitment is a serious issue that affect both recruiters and candidates, since it may cause wrong hiring decisions. As we care a lot about this problem, we are constantly working on reduce the bias in original data so that INDA results may be as fair as possible. As of now, in order to tackle the bias issue, INDA automatically ignores specific fields (such as name, gender, age and nationality) during the initial processing of each candidate data. Furthermore, we decided to let users collect data of various types, including personal or sensitive details, but we do not allow their usage if it is different from statistical purposes; our aim is to discourage recruiters from focusing on candidates' personal information, and to put their attention on the candidate's skills and abilities. We want to help recruiters to prevent any kind of bias while searching for the most valuable candidates they really need. The following documentation is addressed both to developers, in order to provide all technical details for INDA integration, and to managers, to guide them in the exploration of the implementation possibilities. The host of the API is [https://api.inda.ai/hr/v2/](https://api.inda.ai/hr/v2/). We recommend to check the API version and build (displayed near the documentation title). You can contact us at [email protected] in case of problems, suggestions, or particular needs. The search panel on the left can be used to navigate through the documentation and provides an overview of the API structure. On the right, you can find (*i*) the url of the method, (*ii*) an example of request body (if present), and (*iii*) an example of response for each response code. Finally, in the central section of each API method, you can find (*i*) a general description of the purpose of the method, (*ii*) details on parameters and request body schema (if present), and (*iii*) details on response schema, error models, and error codes.
sheadawson/quickaddnew
34640 Downloads
A decorator for form fields that manage object relationships, to allow adding a new object on the fly through a dialog window. It can handle has_one, has_many or many_many relationships. At the moment it has been tested / works on DropdownField and ListboxField. It works both in the CMS and in the frontend.
webmaster/maxmind-db-reader
1936 Downloads
This is the MaxMind DB Reader for Hyperf or other resident process framework. It preloads the entire mmdb file into memory, with the memory usage equal to the size of the mmdb file. It has no disk IO operations and maintains query efficiency at the microsecond level.
nogrod/tyre24-seller-php-sdk
347 Downloads
## API Versioning We're constantly updating and improving the API, and while we try to ensure backwards compatibility, there's always a chance that we'll introduce a change that affects the way your app works. To get around any problems that this might cause, we recommend that you include the Accept header with every API request that you make. This header enables you to target your request to a particular version of the API. It looks like this in HTTP: ```text Accept: application/vnd.saitowag.api+json;version={version_number} ``` Normally, you set the value of the placeholder to the current version of the API. But if you're troubleshooting your app, and you know that an older version of the API works perfectly, say version 1.0, you'd substitute 1.0 for the placeholder value. The API then handles the request as if it were for version 1.0, and your app goes back to working properly. ### Example of an error with invalid `ACCEPT` header. The `HTTP status code` in case of an invalid `ACCEPT` header will be `400 Bad Request` and the following response will be returned. ```json { "data": [ { "error_code": "ERR_ACCEPT_HEADER_NOT_VALID", "error_message": "Accept header is not valid or not set." } ] } ``` ### Unexpected Error If an unexpected error occours, a so called Error General will be returned. The `HTTP status code` in case of an invalid `ACCEPT` header will be `500` and the following response will be returned. ```json { "data": [ { "error_code": "ERR_GENERAL", "error_message": "An unexpected error has occurred. If this problem persists, please contact our support." } ] } ``` ### Invalid Endpoint Error Any call to a non-existing API endpoint (i.e. wrong route) will return a response with `HTTP status code` `404` and the following response body: ```json { "data": [ { "error_code": "ERR_GENERAL_INVALID_ENDPOINT", "error_message": "The requested endpoint does not exist." } ] } ``` Please, note that this error is returned also when a request parameter, part of a valid route, is not well formed. For example, a call to a route that contains a wrong order id (i.e. it does not meet the accepted order id pattern - e.g. 123456789PAC instead of PAC123456789) will return the error just mentioned, as the route is considered as badly formed. In conclusion, please pay special attention to all those routes that have request parameters with specific pattern requirements. ### Shipping Method IDs These ids may not be available in all the countries. | ID | Name | | --- | --- | | 1 | Standard `Standard` | | 2 | Self-collection `Selbstabholung` | | 3 | Express morning (truck) `Express-Morgen (LKW)` | | 4 | Express Today (Truck) `Express-Heute (LKW)` | | 5 | Express morning (package forwarding) `Express-Morgen (Packet Spedition)` | | 7 | Express-now | ### Payment Method IDs These ids may not be available in all the countries. | ID | Name | | --- | --- | | 1 | SEPA Direct Debit `SEPA-Lastschrift` | | 2 | Prepayment `Vorkasse` | | 3 | Cash on delivery `Nachnahme` | | 4 | PayPal/Credit Card `PayPal/Kreditkarte` | | 5 | open payment method `offene Zahlungsart` | | 7 | Invoice(8 days payment term) `Rechnung(8 Tage Zahlungsziel)` | | 8 | open payment method (SEPA) `offene Zahlungsart (SEPA)` | ## Query String Filters Query String Filters | Operator | Full Name | Description | Example | | ------ | ------ | ------ | ------ | | eq | Equal | Used to narrow down the result of a query to some specific value, for specified field. It adds the "**=**" symbol to the SQL query. Eg. `{url}?filter[{alias_name}]=eq;11` will result in the following sql: `SELECT {field_name} AS {alias_name} FROM {table_name} WHERE {alias_name} = 11` | integer: `{url}?filter[id]=eq;21`float: `{url}?filter[average]=eq;3.7`string: `{url}?filter[free_text]=eq;apple`Date: `{url}?filter[birthday]=eq;2020-06-03`DateTime: `{url}?filter[created_at]=eq;2020-06-03 14:32:32`boolean: `{url}?filter[is_active]=eq;1` | | neq | Not equal | Used to exclude the value from a query result. It adds the "****" symbol to the SQL query. Eg. `{url}?filter[{alias_name}]=neq;11` will result in the following sql: `SELECT {field_name} AS {alias_name} FROM {table_name} WHERE {alias_name} 11` | integer: `{url}?filter[id]=neq;21`float: `{url}?filter[average]=neq;3.7`string: `{url}?filter[free_text]=neq;apple`Date: `{url}?filter[birthday]=neq;2020-06-03`DateTime: `{url}?filter[created_at]=neq;2020-06-03 14:32:32`boolean: `{url}?filter[is_active]=neq;1` | | gt | Greater than | Used to reduce fetched values to those greater than the one provided in a query string. It adds the "**>**" symbol to the SQL query. Eg. `{url}?filter[{alias_name}]=gt;11` will result in the following sql: `SELECT {field_name} AS {alias_name} FROM {table_name} WHERE {alias_name} > 11` | integer: `{url}?filter[id]=gt;21`float: `{url}?filter[average]=gt;3.7`Date: `{url}?filter[birthday]=gt;2020-06-03`DateTime: `{url}?filter[created_at]=gt;2020-06-03 14:32:32` | | gte | Greater than or equal | Used to reduce fetched values to those greater than or equal to the one provided in a query string. It adds the "**>=**" symbol to the SQL query. Eg. `{url}?filter[{alias_name}]=gte;11` will result in the following sql: `SELECT {field_name} AS {alias_name} FROM {table_name} WHERE {alias_name} >= 11` | integer: `{url}?filter[id]=gte;21`float: `{url}?filter[average]=gte;3.7`Date: `{url}?filter[birthday]=gte;2020-06-03`DateTime: `{url}?filter[created_at]=gte;2020-06-03 14:32:32` | | lt | Less than | Used to reduce fetched values to those less than provided in a query string. It adds the "**
nogrod/tyre24-common-php-sdk
343 Downloads
## API Versioning We're constantly updating and improving the API, and while we try to ensure backwards compatibility, there's always a chance that we'll introduce a change that affects the way your app works. To get around any problems that this might cause, we recommend that you include the Accept header with every API request that you make. This header enables you to target your request to a particular version of the API. It looks like this in HTTP: ```text Accept: application/vnd.saitowag.api+json;version={version_number} ``` Normally, you set the value of the placeholder to the current version of the API. But if you're troubleshooting your app, and you know that an older version of the API works perfectly, say version 1.0, you'd substitute 1.0 for the placeholder value. The API then handles the request as if it were for version 1.0, and your app goes back to working properly. ### Example of an error with invalid `ACCEPT` header. The `HTTP status code` in case of an invalid `ACCEPT` header will be `400 Bad Request` and the following response will be returned. ```json { "data": [ { "error_code": "ERR_ACCEPT_HEADER_NOT_VALID", "error_message": "Accept header is not valid or not set." } ] } ``` ### Unexpected Error If an unexpected error occours, a so called Error General will be returned. The `HTTP status code` in case of an invalid `ACCEPT` header will be `500` and the following response will be returned. ```json { "data": [ { "error_code": "ERR_GENERAL", "error_message": "An unexpected error has occurred. If this problem persists, please contact our support." } ] } ``` ### Invalid Endpoint Error Any call to a non-existing API endpoint (i.e. wrong route) will return a response with `HTTP status code` `404` and the following response body: ```json { "data": [ { "error_code": "ERR_GENERAL_INVALID_ENDPOINT", "error_message": "The requested endpoint does not exist." } ] } ``` Please, note that this error is returned also when a request parameter, part of a valid route, is not well formed. For example, a call to a route that contains a wrong order id (i.e. it does not meet the accepted order id pattern - e.g. 123456789PAC instead of PAC123456789) will return the error just mentioned, as the route is considered as badly formed. In conclusion, please pay special attention to all those routes that have request parameters with specific pattern requirements. ### Shipping Method IDs These ids may not be available in all the countries. | ID | Name | | --- | --- | | 1 | Standard `Standard` | | 2 | Self-collection `Selbstabholung` | | 3 | Express morning (truck) `Express-Morgen (LKW)` | | 4 | Express Today (Truck) `Express-Heute (LKW)` | | 5 | Express morning (package forwarding) `Express-Morgen (Packet Spedition)` | | 7 | Express-now | ### Payment Method IDs These ids may not be available in all the countries. | ID | Name | | --- | --- | | 1 | SEPA Direct Debit `SEPA-Lastschrift` | | 2 | Prepayment `Vorkasse` | | 3 | Cash on delivery `Nachnahme` | | 4 | PayPal/Credit Card `PayPal/Kreditkarte` | | 5 | open payment method `offene Zahlungsart` | | 7 | Invoice(8 days payment term) `Rechnung(8 Tage Zahlungsziel)` | | 8 | open payment method (SEPA) `offene Zahlungsart (SEPA)` | ## Query String Filters Query String Filters | Operator | Full Name | Description | Example | | ------ | ------ | ------ | ------ | | eq | Equal | Used to narrow down the result of a query to some specific value, for specified field. It adds the "**=**" symbol to the SQL query. Eg. `{url}?filter[{alias_name}]=eq;11` will result in the following sql: `SELECT {field_name} AS {alias_name} FROM {table_name} WHERE {alias_name} = 11` | integer: `{url}?filter[id]=eq;21`float: `{url}?filter[average]=eq;3.7`string: `{url}?filter[free_text]=eq;apple`Date: `{url}?filter[birthday]=eq;2020-06-03`DateTime: `{url}?filter[created_at]=eq;2020-06-03 14:32:32`boolean: `{url}?filter[is_active]=eq;1` | | neq | Not equal | Used to exclude the value from a query result. It adds the "****" symbol to the SQL query. Eg. `{url}?filter[{alias_name}]=neq;11` will result in the following sql: `SELECT {field_name} AS {alias_name} FROM {table_name} WHERE {alias_name} 11` | integer: `{url}?filter[id]=neq;21`float: `{url}?filter[average]=neq;3.7`string: `{url}?filter[free_text]=neq;apple`Date: `{url}?filter[birthday]=neq;2020-06-03`DateTime: `{url}?filter[created_at]=neq;2020-06-03 14:32:32`boolean: `{url}?filter[is_active]=neq;1` | | gt | Greater than | Used to reduce fetched values to those greater than the one provided in a query string. It adds the "**>**" symbol to the SQL query. Eg. `{url}?filter[{alias_name}]=gt;11` will result in the following sql: `SELECT {field_name} AS {alias_name} FROM {table_name} WHERE {alias_name} > 11` | integer: `{url}?filter[id]=gt;21`float: `{url}?filter[average]=gt;3.7`Date: `{url}?filter[birthday]=gt;2020-06-03`DateTime: `{url}?filter[created_at]=gt;2020-06-03 14:32:32` | | gte | Greater than or equal | Used to reduce fetched values to those greater than or equal to the one provided in a query string. It adds the "**>=**" symbol to the SQL query. Eg. `{url}?filter[{alias_name}]=gte;11` will result in the following sql: `SELECT {field_name} AS {alias_name} FROM {table_name} WHERE {alias_name} >= 11` | integer: `{url}?filter[id]=gte;21`float: `{url}?filter[average]=gte;3.7`Date: `{url}?filter[birthday]=gte;2020-06-03`DateTime: `{url}?filter[created_at]=gte;2020-06-03 14:32:32` | | lt | Less than | Used to reduce fetched values to those less than provided in a query string. It adds the "**
briqpay/php-sdk
11949 Downloads
This is the API documentation for Briqpay. You can find out more about us and our offering at our website [https://briqpay.com](https://briqpay.com) In order to get credentials to the playgrund API Please register at [https://app.briqpay.com](https://app.briqpay.com) # Introduction Briqpay Checkout is an inline checkout solution for your b2b ecommerce. Briqpay Checkout gives you the flexibility of controlling your payment methods and credit rules while optimizing the UX for your customers # SDKs Briqpay offers standard SDKs to PHP and .NET based on these swagger definitions. You can download them respively or use our swagger defintitions to codegen your own versions. #### For .NET `` Install-Package Briqpay `` #### For PHP `` composer require briqpay/php-sdk `` # Standard use-case As a first step of integration you will need to create a checkout session. \n\nIn this session you provide Briqpay with the basic information necessary. In the response from briqpay you will recieve a htmlsnippet that is to be inserted into your frontend. The snippet provided by briqpay will render an iframe where the user will complete the purchase. Once completed, briqpay will redirect the customer to a confirmation page that you have defined. 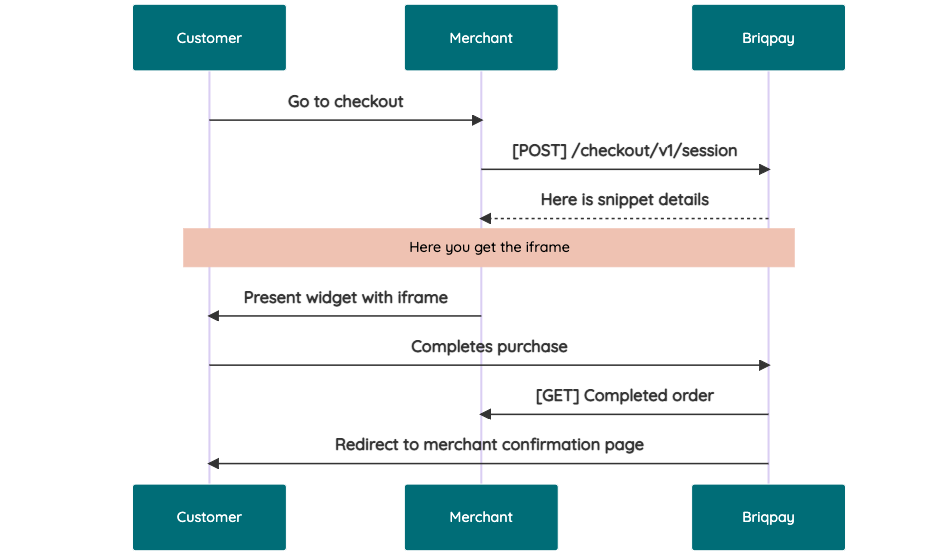 # JavaScript SDK The first step of integration is to add our JS to your site just before closing the ```` tag. This ensures that our JS library is avaliable to load the checkout. ```` Briqpay offers a few methods avaliable through our Javascript SDK. The library is added by our iframe and is avalable on ``window._briqpay`` If you offer the posibility to update the cart or order amonts on the checkout page, the JS library will help you. If your store charges the customer different costs and fees depening on their shipping location, you can listen to the ``addressupdate``event in order to re-calculate the total cost. ```javascript window._briqpay.subscribe('addressupdate', function (data) { console.log(data) }) ``` If your frontend needs to perform an action whe the signup has completed, listen to the ``signup_finalized`` event. ```javascript window._briqpay.subscribe('signup_finalized', function (status) { // redirect or handle status 'success' / 'failure' }) ``` If you allow customers to change the total cart value, you can utilise the JS library to suspend the iframe while you perform a backen update call towards our services. As described below: 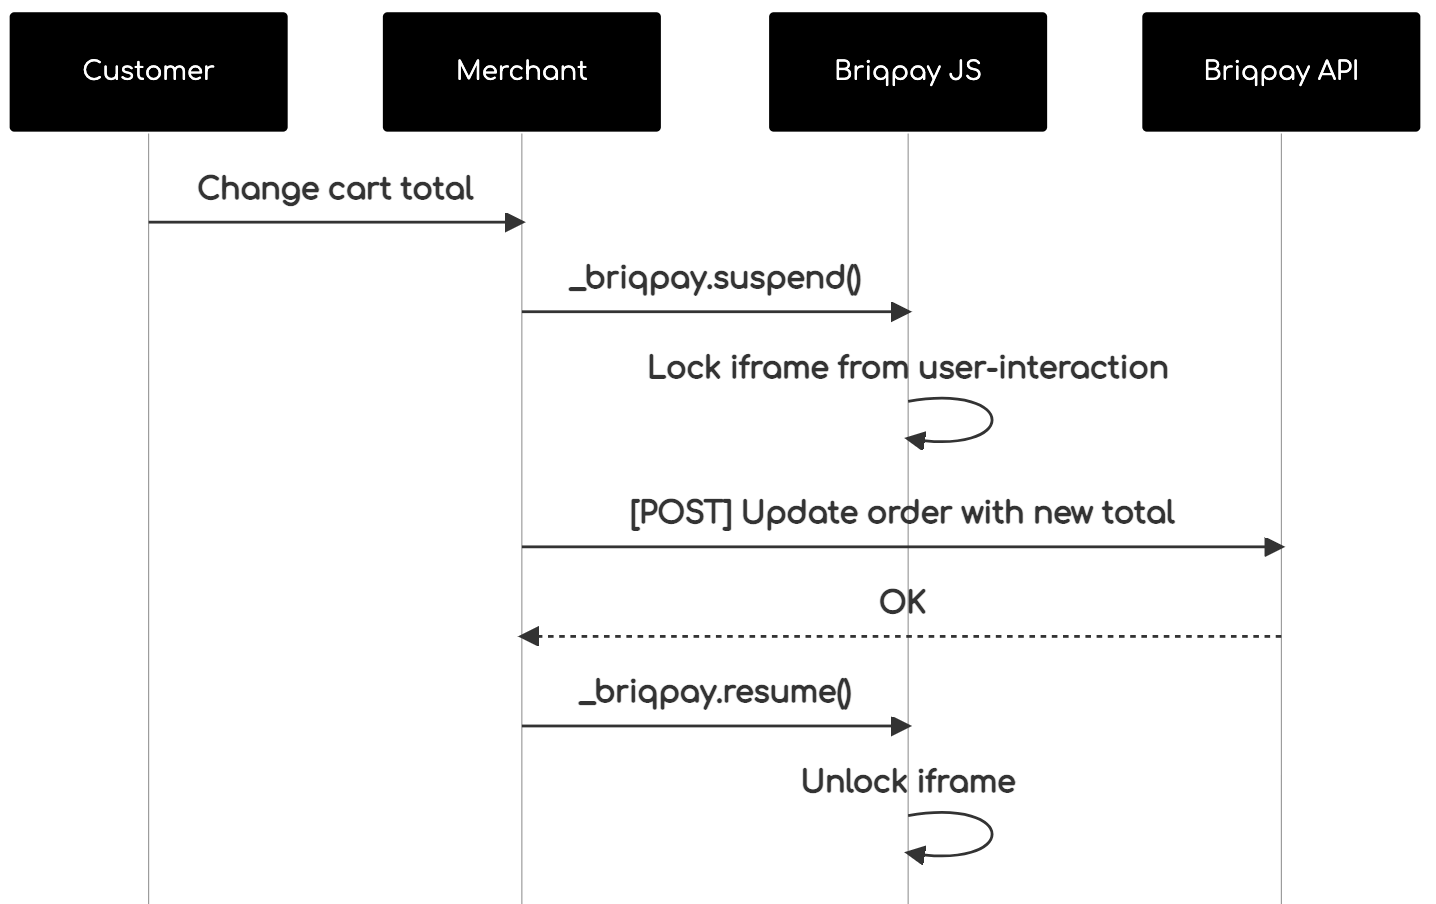 The iframe will auto-resume after 7 seconds if you dont call ``_briqpay.resume()`` before # Test Data In order to verify your integration you will neeed to use test data towards our credit engine. ## Company identication numbers * 1111111111 - To recieve a high credit scoring company ( 100 in rating) * 2222222222 - To test the enviournment with a bad credit scoring company (10 in rating) ## Card details In our playground setup your account is by default setup with a Stripe integration. In order to test out the card form you can use the below card numbers: * 4000002500003155 - To mock 3ds authentication window * 4000000000000069 Charge is declined with an expired_card code. You can use any valid expiry and CVC code # Authentication Briqpay utilizes JWT in order to authenticate calls to our platform. Authentication tokens expire after 48 hours, and at that point you can generate a new token for the given resource using the ``/auth`` endpoint. - Basic Auth - only used on the auth endpoint in order to get the Bearer Token - JWT Bearer Token - All calls towards the API utlizes this method"
se7enxweb/ezie
483 Downloads
An image editor for simple and usual image modifications integrated in the editing interface of any eZ Publish Content Object that has at least an image as attribute.
linkrobins/toc
60 Downloads
Auto-generated table of contents for Flarum posts. Builds anchors from Markdown headings (#, ##, ###) and renders an inline TOC at the top of each post that has 2+ headings.
hexathos/laravel-hasuserdata
207 Downloads
Autofills updated_by, created_by, updated_at and created_at
se7enxweb/ezie-ls
65 Downloads
An image editor for simple and usual image modifications integrated in the editing interface of any eZ Publish Content Object that has at least an image as attribute.
restruct/silverstripe-quickaddnew
16 Downloads
A decorator for form fields that manage object relationships, to allow adding a new object on the fly through a dialog window. It can handle has_one, has_many or many_many relationships. At the moment it has been tested / works on DropdownField and ListboxField. It works both in the CMS and in the frontend.
bank-io/bankio-sdk-php
106 Downloads
# Summary The **NextGenPSD2** *Framework Version 1.3.6* (with errata) offers a modern, open, harmonised and interoperable set of Application Programming Interfaces (APIs) as the safest and most efficient way to provide data securely. The NextGenPSD2 Framework reduces XS2A complexity and costs, addresses the problem of multiple competing standards in Europe and, aligned with the goals of the Euro Retail Payments Board, enables European banking customers to benefit from innovative products and services ('Banking as a Service') by granting TPPs safe and secure (authenticated and authorised) access to their bank accounts and financial data. The possible Approaches are: * Redirect SCA Approach * OAuth SCA Approach * Decoupled SCA Approach * Embedded SCA Approach without SCA method * Embedded SCA Approach with only one SCA method available * Embedded SCA Approach with Selection of a SCA method Not every message defined in this API definition is necessary for all approaches. Furthermore this API definition does not differ between methods which are mandatory, conditional, or optional. Therefore for a particular implementation of a Berlin Group PSD2 compliant API it is only necessary to support a certain subset of the methods defined in this API definition. **Please have a look at the implementation guidelines if you are not sure which message has to be used for the approach you are going to use.** ## Some General Remarks Related to this version of the OpenAPI Specification: * **This API definition is based on the Implementation Guidelines of the Berlin Group PSD2 API.** It is not a replacement in any sense. The main specification is (at the moment) always the Implementation Guidelines of the Berlin Group PSD2 API. * **This API definition contains the REST-API for requests from the PISP to the ASPSP.** * **This API definition contains the messages for all different approaches defined in the Implementation Guidelines.** * According to the OpenAPI-Specification [https://github.com/OAI/OpenAPI-Specification/blob/master/versions/3.0.1.md] "If in is "header" and the name field is "Accept", "Content-Type" or "Authorization", the parameter definition SHALL be ignored." The element "Accept" will not be defined in this file at any place. The elements "Content-Type" and "Authorization" are implicitly defined by the OpenApi tags "content" and "security". * There are several predefined types which might occur in payment initiation messages, but are not used in the standard JSON messages in the Implementation Guidelines. Therefore they are not used in the corresponding messages in this file either. We added them for the convenience of the user. If there is a payment product, which needs these fields, one can easily use the predefined types. But the ASPSP need not to accept them in general. * **We omit the definition of all standard HTTP header elements (mandatory/optional/conditional) except they are mentioned in the Implementation Guidelines.** Therefore the implementer might add these in his own realisation of a PSD2 comlient API in addition to the elements defined in this file. ## General Remarks on Data Types The Berlin Group definition of UTF-8 strings in context of the PSD2 API has to support at least the following characters a b c d e f g h i j k l m n o p q r s t u v w x y z A B C D E F G H I J K L M N O P Q R S T U V W X Y Z 0 1 2 3 4 5 6 7 8 9 / - ? : ( ) . , ' + Space
halestar/laravel-drop-in-cms
84 Downloads
An extremely simple content management system meant to be dropped into existing laravel projects. It makes no assumptions about users and permissions and uses as much as possible from the host's project. It has plugins to add functionality, but at it's hears it is simply meant to build pages. Initial release will also come with a Blogging plugin.
thiagobrauer/laravel-incremental-migrations
77 Downloads
This Laravel package extends the command php artisan make:migration to add an incremental number at the end of a migration file, if there is already another migration with the same name. It also has its own artisan command to fix the names of the existing migrations.
nathan-emanuel/congressus
5 Downloads
# Introduction The Congressus API allows you to interact with your Congressus administration. The API is RESTful and uses JSON to transport information. This documentation aims to get you started with your first requests. Make sure to read this introduction completely to know all aspects of our API. ## REST basics A REST API describes the resources you can access in a clearly defined path structure. This documentation contains a reference for each resource in the API. Before you can use these resources, you need to know the basics of accessing the Congressus REST API. **Paths and versioning** The Congressus API resides on the following paths: https://api.congressus.nl/ `version` / `resource_path` ? `query_params` - The `version` part of the path indicates the version of the API you want to use. At this moment version v30 is the current version. By pointing to a specific version, we can make sure you always can expect equal behaviour from our API. - The `resource_path` part indicates the path of the resource you want to access. Specific paths to resources can be found in the API documentation. Examples of resource paths are: /members to retrieve all members or /member/ `obj_id` /statuses to create new member status for a member. - The `query_params` contains all filtering, ordering and pagination information. ## Authentication The current authentication flow present at Congressus API is by the use of the Bearer Token suggested by OAuth 2.0. To interact with the Congressus API, you must authenticate by supplying the header `Authorization` with the value `Bearer {access_token}`. **How do I get an API key?** You can create new apps and API keys in Congressus Manager through [this link](https://manager.congressus.nl/settings/integrations/apps). ## Requests There are different approaches for making requests to our API. The command line tool [curl](https://curl.se/) is easy and fast for testing our API. When you want to integrate the API into your own software, you can choose to use a general purpose REST library or to [create your own API client library](https://github.com/OpenAPITools/openapi-generator) based on our OpenAPI specs. ## Responses Congressus uses conventional HTTP response codes to indicate success or failure of an API request. In general, codes in the 2xx range indicate success, codes in the 4xx range indicate an error that resulted from the provided information (e.g. a required parameter was missing or input data was invalid), and codes in the 5xx range indicate an error with the Congressus API. ## Pagination Endpoints returning a list of entities, are paginated to prevent large responses. To control the pagination, you can use the `page` and `page_size` parameters. page determines which page to return (default: 1), page_size controls the amount of entities to return (default: 25, maximum: 100). Each paginated response contains the following information: - `has_prev` bool - `prev_num` int with previous page number - `has next` bool - `next_num` int with next page number - `data` list with results on current page - `total` int with total number of results ## Filtering Most list endpoints support filtering to get a subset of the available information. Filtering is done using the query. For some filter attributes, filtering for multiple options is supported by adding the `=` multiple times. E.g. `category_id=1&category_id=2`. ### Filtering on period For some resources, a period filter is available. This filter is used to get a subset of the available information within a certain period. The period filter is used by adding the `period_filter` query parameter to the endpoint. **Absolute periods** Absolute periods are defined by exact dates. The format is `YYYY(MM(DD))`. E.g. `2024` or `202402` or `20240227`. A different end date can be given by adding `..` and the end date. E.g. `202402..202403` for the period February 2024 to March 2024. **Relative periods** Relative periods are defined by a period in the past or future. Multiple formats are supported: - `today` - today's date - `yesterday` - yesterday's date - `tomorrow` - tomorrow's date - `(last/this/next)_(day/month/quarter/half_year/year)` - e.g. `last_month` or `next_year` or `this_quarter` - `last_x_days` - e.g. `last_7_days` or `last_14_days` ## Ordering Most list endpoints support ordering on one or more attributes. The order is defined using the `order=` parameter in the query part of the endpoint. Multiple columns can be used for ordering, delimited by a comma. E.g. `order=lastname,initials,first_name`. Each attribute used in the order parameter could be extended with a sort property `:`. E.g. `order=lastname:desc`. The following properties are supported throughout our API: - ```:asc``` ASC NULLS LAST (default) [comment]: (- ```:asc_nulls_last``` ASC NULLS LAST) [comment]: (- ```:asc_nulls_first``` ASC NULLS FIRST) - ```:desc``` DESC NULLS FIRST [comment]: (- ```:desc_nulls_last``` DESC NULLS LAST) [comment]: (- ```:desc_nulls_first``` DESC NULLS FIRST) ## Searching and location filtering For some resources a dedicated /search endpoint is available, which is optimized for searching large datasets. We use an Elasticsearch database to deliver these results. The schema for these resources is often a concise version of the schema used for regular endpoints, but always contains the primary key (obj_id). If you need the full schema for a resource found through /search, you can perform an additional call to the GET / endpoint. In most cases, searching has the following query parameters: - `term` - generic term used for the search - `city` or `zip` - a city name or postal code (only Dutch postal codes allowed) - `distance` - distance from the center of the given city or zip (default *5km*) Results from /search endpoints do not support custom ordering, but are ordered based on relevance (i.e. *score* for term queries and *distance* for all location bound search queries). ## Rate limiting Usage of the Congressus API is unlimited within the plan and permissions of the account you are using. To prevent fraud and abuse, requests to the API are throttled. You can request the API 60 times each minute and 1000 times per hour. The API will respond with a **429 Too many requests** response. This response contains the following fields in the headers: - `X-RateLimit-Limit` The total number of requests allowed for the active window - `X-RateLimit-Remaining` The number of requests remaining in the active window. - `X-RateLimit-Reset` UTC seconds since epoch when the window will be reset. - `Retry-After` Seconds to retry after when the Rate Limit will be reset. ## Cross-Origin Resource Sharing This API features Cross-Origin Resource Sharing (CORS) implemented in compliance with W3C spec. This allows cross-domain communication from the browser. All responses have a wildcard same-origin, which allows to use our API from any domain or server. # Webhooks Information in a Congressus administration is constantly changing. If you want to perform actions based on these changes, webhooks help you to achieve this. Instead of querying the API at a certain interval, Congressus will notify you about changes to information in the administration. ## Usage Webhooks are useful in a broad range of situations. When the state of an resource changes, Congressus will perform a HTTP request to the URL you provide. Based on the payload of the request, you can determine which action you need to perform. How it works: - You need a URL that Congressus can call to deliver the payload. The Congressus servers must be able to access this URL. - You can add HTTP basic authentication or other token authentication in the URL, as long as the URL stays valid. - Your URL always needs to respond with a 200 HTTP status. Upon registration this is checked. - When your URL responds with another HTTP status code, Congressus will retry to deliver the call 10 times. The time interval between retries is gradually extended. - After each call, Congressus will store the last HTTP status code and HTTP body. Using the webhooks API, you can retrieve this information for debugging purposes. - You can register as many webhooks as required in an administration. Registration is done by sending a POST request to the webhooks API. > **We strongly recommend that you use a secure HTTPS endpoint for receiving payload from Congressus. If you use > unencrypted HTTP, anyone on the network may be able to listen in on sensitive information like members and invoices.** ## Webhook events Each webhook subscribes to an event. When an event occurs, Congressus will call the webhook using an HTTP request to the provided URL. The following events are available: **Members** - member - All member related events - member_added - Member added to the administration - member_updated - Existing Member is updated - member_deleted - Member is removed from the administration - member_birthday - Triggered once on the birthday of a member **Events** - event - All event related events - event_added - Event added - event_updated - Event updated - event_deleted - Event deleted from the administration **Event participations** - event_participation - All event participation related events - event_participation_added - Event participation added - event_participation_updated - Event participation updated - event_participation_deleted - Event participation deleted from the administration **Form entries** - form_entry - All form entry related events - form_entry_added - Form entry added - form_entry_updated - Form entry updated - form_entry_deleted - Form entry deleted from the administration **Sale invoices** - sale_invoices - All sale invoice related events - sale_invoices_added - Sale invoice added - sale_invoices_updated - Sale invoice updated - sale_invoices_deleted - Sale invoice deleted from the administration ## Payload Each webhook call has a payload based on the category of the event that triggered the webhook. E.g. events in the category **Members** get a payload based on the schema for Members, filled with the data for the resource that triggered the webhook. Each webhook call contains the following information: - `webhook_id`- The id of the webhook that triggered the call - `webhook_event` - The category of events for the webhook - `webhook_event_trigger` - The trigger that caused the webhook call - `created` - Date and time at which the webhook was triggered - `data` - List which contains the payload(s) in the form of the complete resource that triggered the event # Changelog This is version 3.0 of the Congressus API. In this chapter we describe all changes in v3.0. ## 2025-09-30 Endpoint for Filters added - A new endpoint `/filters` is added to retrieve available filters for Members, Events and Organisations. ## 2025-08-13 Filter on folder_id added to Storage - The `folder_id` parameter is added to the `storage` endpoint. This allows you to filter storage resources by folder. ## 2025-07-11 Website added to Magic link endpoint - The `website_id` parameter is added to the `magic-links` endpoint. This allows you to create magic links for a specific website. ## 2025-05-24 Organisation resource improvements - `Organisation` resources now also have the 'published' attribute. - `Organisation` resources now also include custom field data in the `custom_field_data` attribute. - Custom fields are defined per organisation category, so the custom fields available for an organisation depend on the category of the organisation. - `Organisation category` resources now also include metadata for the custom fields available for that category in the `custom_fields` attribute. ## 2025-05-04 Magic links added - `Magic links` are added to the API. These links can be used to authenticate a website visitor without the need for a password. ## 2024-11-25 Form and Form entry resources added - `Form` and `Form entry` resources are added to the API. - `Form` resources can be created and updated through the API. It is currently not possible to delete a form or manage fields and fieldsets. - `forms//entries` endpoint is available to retrieve form entries. - `forms//fields` endpoint is available to retrieve form fields. ## 2024-04-23 Custom fields for Members available in PUT/POST requests - Custom fields for Members can now be added or updated through the API. The custom fields are available in the `custom_field_data` attribute of the Member resource. - The old `custom_fields` attribute is deprecated and will be removed in a future version. - The `members/custom-fields` resource shows the available custom fields for Members, including meta information. ## 2024-02-27 Action endpoints for EventParticipation added - `EventParticipation` status can now be changed through the API, including fines when unsubscribing or declining a participation. - API upgrade guide from v20 to v30 removed from docs, as it is no longer relevant. The v20 API is unavailable since mid 2023. ## 2022-12-09 Event ticket types endpoints - `EventTicketType` resources can now be created, updated and deleted through the API - The context is now applied at row level according to the status of the Member for the `v30/members` endpoint ## 2022-06-28 Events updated, MembershipStatus resources added - `Event` resources are now fully operational, including the possibility to add participants / sell tickets through the API. - `MembershipStatus` is now available for Member resources. ## 2022-06-22 Minor updates and fixes - Feat: /members can be filtered against multiples statuses with the status_id query parameter (i.e: /members?status_id=2&status_id=3). - Feat: the News model now contains a list of websites where the news item is published on - Fix: add the default website to POST /news on create - Fix: sale_invoice_id is now honored when given by the creation of a sale invoice /sale-invoices//send ## 2022-06-03 Minor updates and fixes - Feat: Additional filtering for /sale-invoices endpoint added (invoice_type 'debit', 'is_credited' and 'is_not_credited'). - Feat: Renamed /groups/folders endpoints to /group-folders for more consistency. Deprecated old endpoints. - Feat: Added member status resources through /member-statuses. - Feat: Added profile_picture and formal_picture to Member resources. - Fix: we incorrectly used 'per_page' as parameter in the Pagination-section of these docs. The correct parameter is **'page_size'**. - Fix: all non-recursive endpoints for Group folders and Product folders returned children, this is resolved. ## 2022-05-03 Member validation through context added - Added extended validation options for Member-resources by setting a `context` parameter. This context ensures validation according to the field settings as set in Congressus Manager for the member status. - Description for Context validation added to the Member-resources. - Introduction on Context validation added to the [upgrade guide](#section/Upgrading-from-v20-to-v30) ## 2022-04-22 Upgrade guide from v20 to v30 added - First version for the [upgrade guide](#section/Upgrading-from-v20-to-v30) added ## 2022-03-23 Additional filtering for Group and Organisation resources - `Group` and `Group membership` resources can use a filter on member_id - `Organisation` and `Organisation membership` resources can use a filter on member_id ## 2022-03-21 Group and GroupFolder resources added - Group, GroupFolder and GroupMembership resources are added to the API. - `Group folders` are added and use a tree-like structure. - `Organisation` resources have create, update and delete views added. - `Organisation membership` resources are added - Fix: SDD mandates returned and empty list for Member resources. ## 2021-10-14 Organisation resources added - Both Organisation and Organisation category resources are added to the API. ## 2021-10-02 Additional filters added for Event participations - `Event participations` have additional filter functionality ## 2021-09-22 Added resources for Product folders and Sale invoice workflows - `Product folders` are added, using a tree-like structure. - `Sale invoice workflows` are added as resource. Read-only for this moment. - Updated descriptions for Sale invoice attributes. ## 2021-08-09 additional filters for events and products - Events can now be filtered on published true/false - Products can now be filtered on published and folder_id. More than one folder_id can be given by supplying it more than once as query param, e.g. `products?folder_id=123&folder_id=456` ## 2021-08-04 custom fields and descriptions added, publication options added to events and blogs - The retrieve member resource now also shows the custom field information for a member - Many attributes have an additional description added - Publication attributes are added to Event and Blog resources ## 2021-06-09 website related resources added - Website and Webpage resources added (list and get only) - News resources added - Default order is added for Websites, Webpages, Events and News list endpoints. You can overwrite the default order with the `order` query param - Improved descriptions for several resources, removed some typo's in the documentation ## 2021-04-06 initial release - This initial release contains a minor set of resources to work with.