Libraries tagged by resource controller
asivas/analytics-dashboard
93 Downloads
The "CRUD-Resouce" Analytics Dashboard controller, to be used as part of the Asivas solution for https://gitlab.com/asivas/larvue-abm/ABM
josephcrowell/wn-passage-plugin
389 Downloads
Fast, Efficient permission system for controlling access to your website resources
briqpay/php-sdk
11962 Downloads
This is the API documentation for Briqpay. You can find out more about us and our offering at our website [https://briqpay.com](https://briqpay.com) In order to get credentials to the playgrund API Please register at [https://app.briqpay.com](https://app.briqpay.com) # Introduction Briqpay Checkout is an inline checkout solution for your b2b ecommerce. Briqpay Checkout gives you the flexibility of controlling your payment methods and credit rules while optimizing the UX for your customers # SDKs Briqpay offers standard SDKs to PHP and .NET based on these swagger definitions. You can download them respively or use our swagger defintitions to codegen your own versions. #### For .NET `` Install-Package Briqpay `` #### For PHP `` composer require briqpay/php-sdk `` # Standard use-case As a first step of integration you will need to create a checkout session. \n\nIn this session you provide Briqpay with the basic information necessary. In the response from briqpay you will recieve a htmlsnippet that is to be inserted into your frontend. The snippet provided by briqpay will render an iframe where the user will complete the purchase. Once completed, briqpay will redirect the customer to a confirmation page that you have defined. 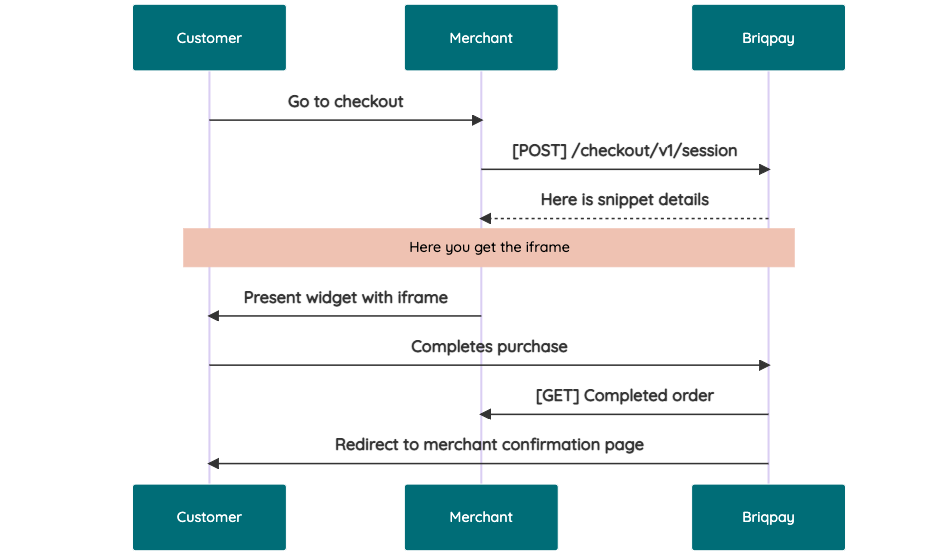 # JavaScript SDK The first step of integration is to add our JS to your site just before closing the ```` tag. This ensures that our JS library is avaliable to load the checkout. ```` Briqpay offers a few methods avaliable through our Javascript SDK. The library is added by our iframe and is avalable on ``window._briqpay`` If you offer the posibility to update the cart or order amonts on the checkout page, the JS library will help you. If your store charges the customer different costs and fees depening on their shipping location, you can listen to the ``addressupdate``event in order to re-calculate the total cost. ```javascript window._briqpay.subscribe('addressupdate', function (data) { console.log(data) }) ``` If your frontend needs to perform an action whe the signup has completed, listen to the ``signup_finalized`` event. ```javascript window._briqpay.subscribe('signup_finalized', function (status) { // redirect or handle status 'success' / 'failure' }) ``` If you allow customers to change the total cart value, you can utilise the JS library to suspend the iframe while you perform a backen update call towards our services. As described below: 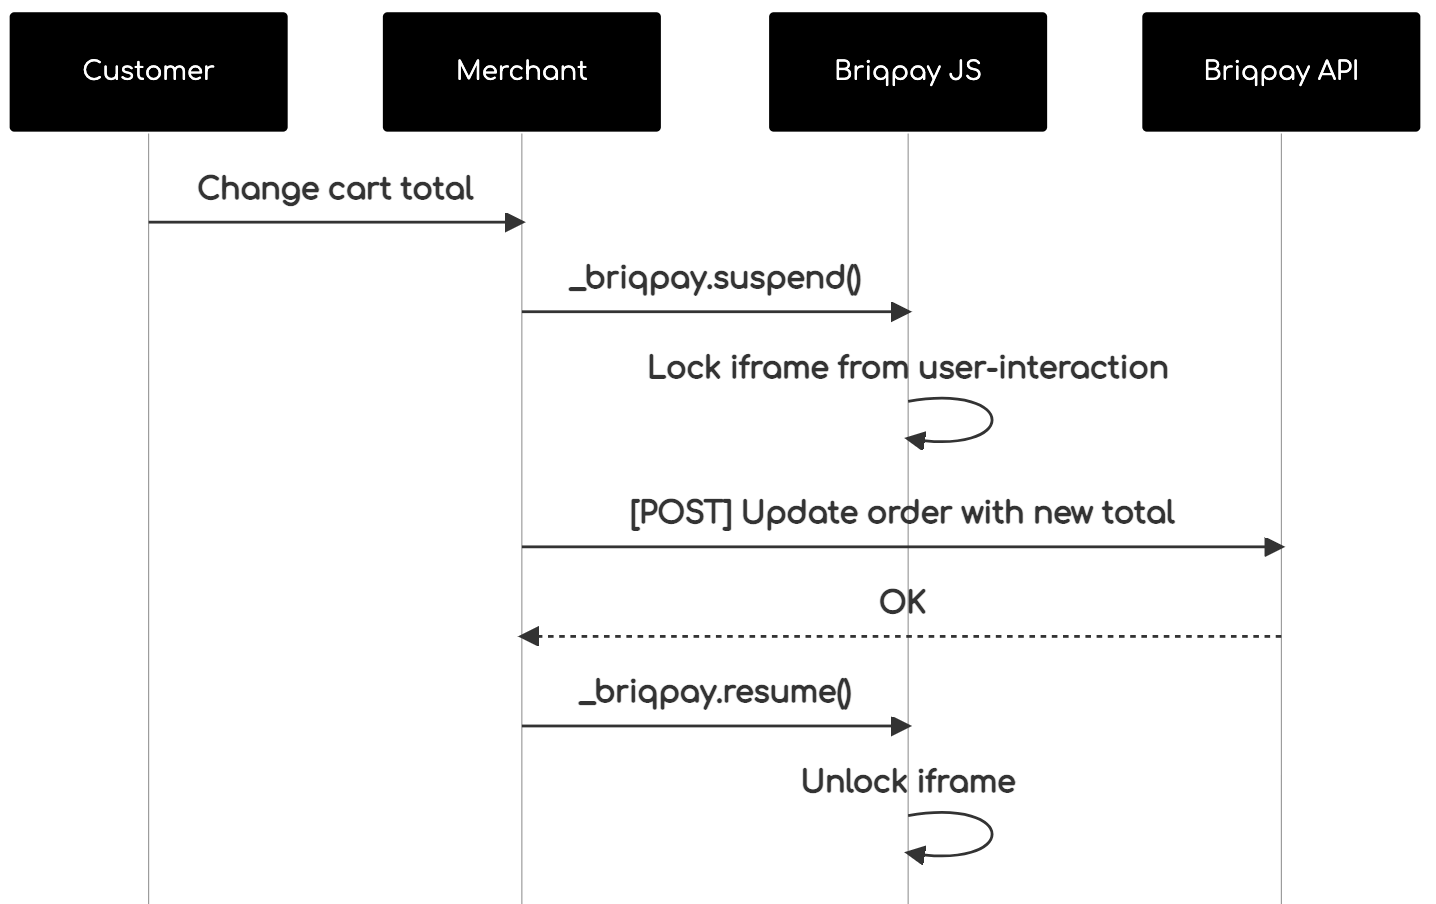 The iframe will auto-resume after 7 seconds if you dont call ``_briqpay.resume()`` before # Test Data In order to verify your integration you will neeed to use test data towards our credit engine. ## Company identication numbers * 1111111111 - To recieve a high credit scoring company ( 100 in rating) * 2222222222 - To test the enviournment with a bad credit scoring company (10 in rating) ## Card details In our playground setup your account is by default setup with a Stripe integration. In order to test out the card form you can use the below card numbers: * 4000002500003155 - To mock 3ds authentication window * 4000000000000069 Charge is declined with an expired_card code. You can use any valid expiry and CVC code # Authentication Briqpay utilizes JWT in order to authenticate calls to our platform. Authentication tokens expire after 48 hours, and at that point you can generate a new token for the given resource using the ``/auth`` endpoint. - Basic Auth - only used on the auth endpoint in order to get the Bearer Token - JWT Bearer Token - All calls towards the API utlizes this method"
anasa/response-strategy
65 Downloads
Package to isolate the logic that determines the return type of the controller based on the source (API/Web)
drewlabs/g-cli
134 Downloads
Generates classes, services, models and controller's components or entire project source code from databse structure
auto-api/auto-api-scwv
1 Downloads
Laravel Auto API Single Controller Web View This package that you activate first to learn the secrets of the API, you can write one path and one controller then return the view to the web and from the same controller to restore and re-register the json. This package will write one source code for the web and the API at the same time, you do not need to write one source code for the web and another for the API This package saves you from writing the source code because you will write one source code that works on the web and works on applications, all of this with one source code only
typo3/extjs
18792 Downloads
The package contains ExtJS for use in TYPO3 Flow packages. It is a slightly trimmed version of ExtJS (missing source, build, examples, documentation) with JavaScript, images, CSS and Flash moved to distinct folders. In addition it contains the ux files found in the examples folder of the ExtJS distribution. Using Ext Direct is supported by an Ext Direct request handler and a viewhelper to build a provider configuration from controller actions.
handsondigital/lib.php.admin.idplugger
2 Downloads
# Introdução Bem-vindo à documentação oficial da API da Plataforma de Promoção IdPlugger exclusiva para administradores da API! Se você está procurando a documentação destinada ao cliente da Plataforma de Promoção IdPlugger [acesse clicando aqui!](/docs/v3/promotion) # Sobre a API Esta API é baseada em REST, proporcionando uma arquitetura flexível e de fácil integração. # Começando Para começar a explorar e utilizar a API da Plataforma de Promoção IdPlugger, recomendamos que você siga os seguintes passos: 0. **Postman**: [Baixe a collection do postman](https://god.gw.postman.com/run-collection/13619232-20687020-3c58-488d-bd15-9f9d1a8164b1?action=collection%2Ffork&source=rip_markdown&collection-url=entityId%3D13619232-20687020-3c58-488d-bd15-9f9d1a8164b1%26entityType%3Dcollection%26workspaceId%3Df86d7ea0-5224-4351-bf69-54ada2ca328d), instale o postman na sua máquina e importe a collection. 1. **Autenticação**: Obtenha suas credenciais de autenticação ('username' e 'password') de administrador, para acessar a API. 2. **Explorar Endpoints**: Navegue pela lista de endpoints disponíveis e suas respectivas funcionalidades. 3. **Experimentar**: Utilize os exemplos de solicitação fornecidos para testar os endpoints e compreender melhor seu funcionamento. 4. **Integrar**: Integre a API da Plataforma de Promoção IdPlugger em seus próprios projetos e sistemas para aproveitar ao máximo suas capacidades. # Autenticação Todos os endpoints requerem token de autenticação válido, que pode ser obtido através de requisição à API enviando as credenciais obtidas. Este token é do tipo bearer e deve ser enviado no header da requisição no seguinte formato: | Header | Valor | | - | - | | Authorization | bearer `{token}` | Substitua `{token}` pelo token obtido na autenticação. IMPORTANTE: O bearer token tem um tempo de validade, o ideal é armazenar o bearer token e solicitar um novo token apenas quando o seu token expirar. A validade do token é enviada junto com o token na resposta do endpoint de autenticação. # Configurações de Promoção ## Pull Configurations O primeiro passo para configurar uma promoção na API é puxar a parametrização da promoção criada. Para isto, libere o servidor da API para acesso ao banco de dados da promoção e informe os dados de conexão através da rota [Pull Configuration](#/Promotion/App%5CHttp%5CControllers%5CAdmin%5CAdminController%3A%3ApullConfiguration) ## Steps Após puxar as configurações na etapa anterior, configure as steps da promoção. Steps são as partes de código que serão executadas para cada promoção. Cada promoção pode ter uma configuração diferente de steps. - Para consultar quais steps estão disponíveis, utilize [este endpoint](/docs/v3/setup/index.php#/Steps/App%5CHttp%5CControllers%5CStepsController%3A%3Aindex) - Para ativar steps em uma promoção, utilize [este endpoint](https://api.idplugger.com/docs/v3/setup/index.php#/Steps/App%5CHttp%5CControllers%5CStepsController%3A%3Aallow) - Para desativar steps em uma promoção, utilize [este endpoint](https://api.idplugger.com/docs/v3/setup/index.php#/Steps/App%5CHttp%5CControllers%5CStepsController%3A%3Aunallow) - Para consultar quais steps estão ativas, utilize o endpoint de ativação sem passar nenhuma step Algumas steps são configuradas por padrão ao fazer o pull configuration, para saber quais confira o parâmetro default na resposta do endpoint de consulta de steps. Este endpoint também retorna a descrição do que a step faz e se ela depende que outra esteja ativada ou desativada. ## Criar Usuário da API Para que um cliente possa utilizar a API, é necessário criar um usuário para ele. Para isto, após fazer o pull configuration e a parametrização de steps, utilize [este endpoint](#/User/App%5CHttp%5CControllers%5CAdmin%5CAdminController%3A%3Aregister) para criar um usuário da API. Este endpoint cria o usuário e retorna uma senha para este usuário. ## Permissões do usuário da API Após criar o usuário, é necessário dar as permissões para que ele possa atuar na promoção. Para isso, utilize [este endpoint](#/User/App%5CHttp%5CControllers%5CAdmin%5CAdminController%3A%3AgrantPermissions). Atenção: Selecione bem as permissões, deixando apenas as necessárias. ## Teste Utilize as credenciais do usuário criado para testar se a API está respondendo para a promoção configurada. # Postman Collection [](https://god.gw.postman.com/run-collection/13619232-20687020-3c58-488d-bd15-9f9d1a8164b1?action=collection%2Ffork&source=rip_markdown&collection-url=entityId%3D13619232-20687020-3c58-488d-bd15-9f9d1a8164b1%26entityType%3Dcollection%26workspaceId%3Df86d7ea0-5224-4351-bf69-54ada2ca328d)\n\n# Limite de Frequência (Rate Limit)\n\nA resposta da **API Idplugger** quando o limite de frequência (rate limit) é atingido é um código de status HTTP **429 (Too Many Requests)**.\n\nDetalhes do retorno:\n\n1. **Código de Status HTTP**: 429 Too Many Requests.\n2. **Corpo da Resposta (Body)**: Um JSON contendo a mensagem de erro: `{"message": "Too Many Requests"}`.\n3. **Cabeçalhos HTTP (Headers)**:\n - `X-RateLimit-Limit`: O limite total permitido.\n - `X-RateLimit-Remaining`: Quantidade de requisições restantes.\n - `Retry-After`: Segundos a esperar antes da próxima tentativa.\n - `X-RateLimit-Reset`: Timestamp de quando o limite será zerado.